Control Structures:
Conditional Statements
Introduction
Up to this point, we’ve said that the code we write gets executed from top to bottom in our file, one line at a time. The order in which we write our statements (every chunk of code that ends with a semicolon) is the order in which those statements get interpreted; if we move these lines of code around, we change the order and function of our code. This ordering is more generally what we call execution flow, which describes the flow through which the stuff in our code happens; the specific mechanism of code being interpreted line by line, in the sequence in which those lines are presented, is called sequential iteration. This is the default mode by which our code will be interpreted.
But this sequential iteration produces a strictly linear flow of code that sometimes won’t be sufficient for what we need to do. In many cases, we will need to control the flow of our code in more precise ways, depending on the task at hand. As an example, return to the cake recipe metaphor we’ve seen many times already. While the overall flow chart describes the recipe as a very simple process composed of only a few steps, the simplicity of the flow chart conceals the fact that there are many complex subtasks of many varieties embedded with it. For instance, within the recipe’s steps, there are places where the same task is repeated over and over again, in sequence, for a finite duration; when we mix the dry ingredients, we must place each ingredient in the mixing bowl, one by one, until they have been all combined in the same bowl. Elsewhere, there are actions that are dependent upon certain conditions being fulfilled first before proceeding; this is demonstrated at the end of the chart, where we cannot place the cake pan in the oven to bake the batter until the oven has been adequately preheated first. If the oven has not yet preheated, we must wait until that condition is satisfied before proceeding.
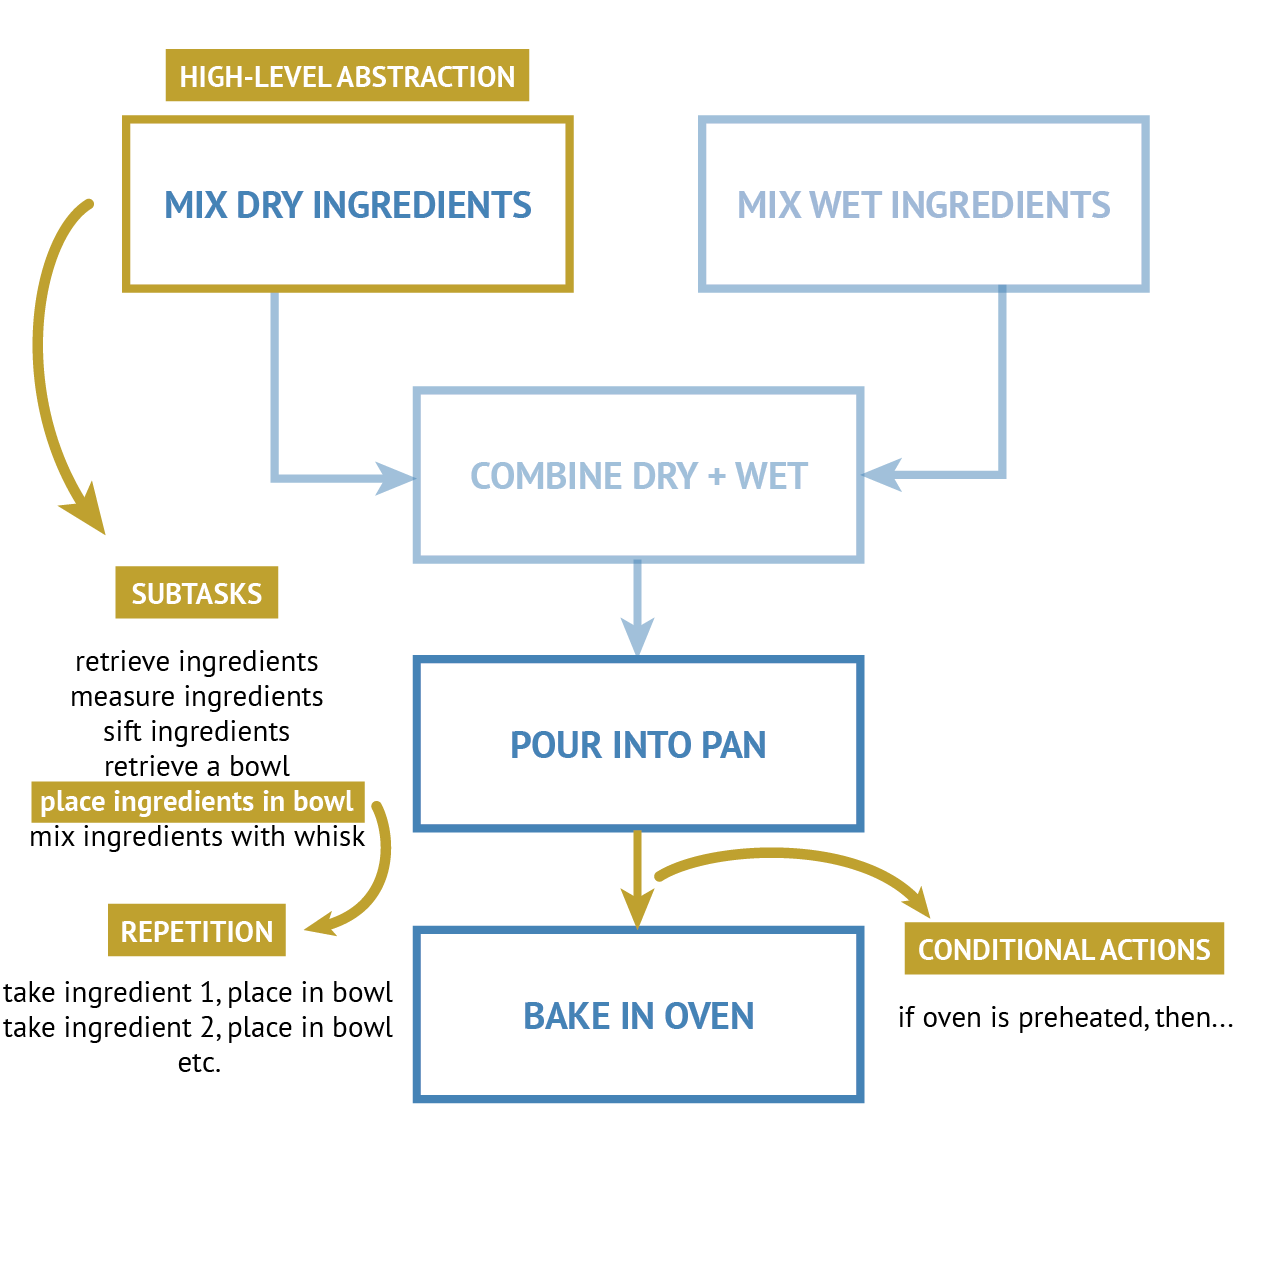
If the flow chart is a graphical representation of the execution flow of making a cake, then these examples demonstrate two key forms of control over that execution flow: one is based on controlling iterative and repetitive actions (like mixing ingredients), and the other is based on conditional procedures (like preheating the oven). In JavaScript, too, we have the same kind of ability, through patterns called control structures that give us the power to alter the execution flow of our script. Specifically, we will focus on the code patterns for two main categories of control structures in JavaScript: conditional statements (if statements), and loops (for loops and while loops).
In this first tutorial, we will examine conditional statements and see how they are used in JavaScript code. In a separate tutorial following this, we will examine loops, which will build upon some important ideas introduced here.
Conditional statements with conditional logic
In programming, a conditional statement is a pattern of code that allows us to do a certain task if and only if a specified condition has been met. If that condition has not been met, then we may perform another task instead, or just not do anything else at all.
In such structures, a condition is essentially any form of comparison that evaluates to true or false. We can think of these conditions as questions; in each situation, we will ask a question of our code, such as "Is this value greater than this other value?" or "Are these two variables equal to each other?", and in response, the JavaScript interpreter will tell us "Yes, this value is greater than the other!" or "No, these two variables aren't equal to each other." In code-speak, the response "Yes!" is encoded as the value true, while the response "No!" is encoded as the value false.
For this reason, the kind of conditional statement we will focus on in our study is called an if statement. When we use an if statement, we will ask a question that has a yes or no answer. If the answer to our question is yes, then we will do a specified task; otherwise, if the answer is no, then we won't do that task.
Every programming language has its own way of writing if statements. In JavaScript, this pattern looks like the following:
if(CONDITIONAL EXPRESSION) {
    CODE TO RUN IF
CONDITION IS MET
}
Inside the parentheses, we place a conditional expression. This conditional expression will either evaluate to true or false; if it evaluates to true, then the stuff between the curly braces gets executed, but if it evaluates to false, then the stuff between the curly braces doesn’t get executed. In either case, whether or not the stuff inside the if statement happens, we proceed with the rest of the code that follows the statement in our script as normal, after checking the condition.
Conditional expressions are constructed using comparison operators. We’ve seen some of these comparison operators already; for example, the > symbol checks to see if one value is greater than another, or the < symbol checks to see if one value is less than another. When we do these kinds of comparisons in JavaScript, we will always get back a value of true or false. For example, the following expressions evaluate to true:
3 < 4
» true

7 > 2
» true

5 <= 10
» true

9 >= 3
» true
Again, the values true and false are akin to the responses "yes" and "no" in code-speak. In all of the above, we are asking a question through a comparison ("Is the value of 3 less than the value of 4?"), and in response, the JavaScript interpreter tells us that yes, each comparison is in fact correct: the value 3 is indeed less than 4, so this expression returns a value of true. All of the other examples above likewise evaluate to true. In contrast, all of the following expressions evaluate to false:
4 > 5
» false

3 < 2
» false

9 >= 12
» false

8 <= 7
» false
In all of the above, the comparison is not correct: the value of 4 is not greater than 5, and so the expression evaluates to false. The other expressions follow suit.
In addition to the comparison operators > and <, we can also perform comparison based on equality or inequality. To compare two values to see if they are equal, we use the == operator (double equals sign), like this:
4 == 4
» true

7 == 9
» false

3 * 3 == 9
» true
In the first expression, 4 is in fact equal to 4, so the expression evaluates to true; in the second, 7 is not equal to 9, so the expression evaluates to false. And then notice the last example, in which the left side of the operator is itself a comparison (3 * 3); since the left side of the expression evaluates to 9, and the right side of the expression is the value of 9, both sides are equal to one another, and thus the comparison returns true.
When we want to compare two values for inequality, we use the exclamation point (!) with the equals sign, like this:
4 != 7
» true

3 != 3
» false
In the first expression, 4 is not equal to 7, so the expression evaluates to true. But notice the tricky thing happening in the second expression: it is not the case that 3 is unequal to 3 (instead, these two values are equal to one another), so the expression evaluates to false. (Make sure you understand this logic! Once we start dealing with inequality comparisons, we have to stretch our thinking a bit to understand the values we get back.)
The examples above all involve comparisons of Numbers. However, sometimes we’ll want to compare two String values, such as to see if one word is the same as another word. In such a situation, we might be tempted to try this:
"Hello!" == "Hello!"
» true
However, while this expression is syntactically correct and returns a value of true, it causes some theoretical problems in certain situations — particularly with Strings. The issue is that with the == operator, if two values are of different types, their values will be compared regardless of type, such as this:
4 == "4"
» true
In this example, the expression will evaluate to true, because both values being compared can be coerced to the same type, resulting in a comparison akin to 4 == 4. But — and this is tremendously important — these values in the original expression are not the same type. One is a Number type, and the other is a String type; they both look like the number 4, but to the browser, they are completely different entities.
Because of this, when working with Strings, we’ll want to perform a stricter comparison of equality. This can be done with the === operator (three equals signs), which checks for both equality in value and equality in type. (The double equals sign == operator only checks for equality in value, ignoring type.) If we use this in context:
4 === "4"
» false
Now the above expression will evaluate to false. Even though each value can be coerced to the same value of 4, they are different data types, and strict equality thus fails. This difference of just a single equals sign, although seemingly arbitrary at first glance, can mean the difference between a chunk of code running as expected and our code failing completely.
When we compare two Number values against each other, we can always use two equals signs ==. But when comparing two String values, we’ll always want to use three equals signs === in all situations, primarily to be safe. (There are extremely rare situations in which we will intentionally use two equals signs because we know in advance that two values we are comparing are of different types; we won't ever encounter these situations in our own demonstrations.) Much of the time, this will seem utterly unnecessary as the outcome of our code will be the same whether we use == or ===, but really weird things can happen in our code with moving data types that we don’t always see. This is perhaps one of our first encounters with what it means to write rigorous code: To ensure that our code is operating exactly the way we intend it to, without leaving loopholes in our code that can lead to unexpected outcomes, we’ll always want to make sure we’re comparing Strings against Strings, and Numbers against Numbers. The following examples demonstrate this usage for Strings:
"Word" === "Word"
» true

"Hello!" === "hello!"
» false

"Hello!" === "Hello! "
» false
Note that the first example evaluates to true, using === String comparison. Meanwhile, the second and third examples also use this same operator but evaluate to false, which reveals another important consideration: String equality is exact, and based on matching capitalization, spelling, punctuation, and even the existence or absence of extra whitespace.
If we want to check if two Strings are not equal, we can use !==, like this:
"Hello!" !== "hello!"
» true

"Howdy!" !== "Howdy!"
» false
The first example evaluates to true (they are not exactly the same Strings because they differ in capitalization of the first letter); the second evaluates to false, because both Strings are, in fact, perfectly identical.
Conditional expressions in context
These comparisons form the backbone of every if statement. The conditional expression we supply inside the parentheses — using comparison operators as those shown above — must evaluate to true in order for the code inside the curly braces to run. In all of the following examples, the condition evaluates to true, and thus the code inside the block runs:
if(2 == 2) {
    This Code Runs!
}


if(7 > 5) {
    This Code Runs!
}


let name = "Steven";
if(name === "Steven") {
    This Code Runs!
}
Notice what happens in the last example: the value of a variable is compared for equality against a literal String value. We can compare two variables to each other, too:
let num1 = 7;
let num2 = 7;
if(num1 == num2) {
    This Code Runs!
}
Meanwhile, the following examples feature conditional expressions that evaluate to false, meaning the code inside the curly braces does not run:
if(7 * 7 == 50) {
    This Code Does Not Run!
}


let age = 20;
if(age >= 21) {
    This Code Does Not Run!
}


let a = 7;
if(a % 2 == 0) {
    This Code Does Not Run!
}
(Can you imagine a situation in which the second example could be useful? Also, notice the third example using the modulo % operator: Do you understand what this is checking for? Hint: it has to do with whether the number 7 is even or odd.)
If statement variants
In the above examples, we are simply deciding whether or not to do a single specific thing based on another condition. If that condition is met, we will do the thing, but if that condition is not met, then we skip over the task entirely.
But in many cases, if a condition isn’t met, we won’t want to just do nothing — instead, we’ll want to do something else instead. In JavaScript, this is possible through variants of the standard if statement pattern above, using the keyword else.
When we want to do two different possible things, one of which only happens if a specified condition is met, and the other only happens if that specific condition is not met, we can use the if/else statement:
if(CONDITIONAL EXPRESSION) {
    CODE TO RUN IF
CONDITION IS MET
} else {
    CODE TO RUN IF
CONDITION IS NOT MET
}
This if/else statement is simply an extension of the regular if statement above. As before, we place a conditional expression inside the parentheses of the if(); when that condition evaluates to true, only the first block of code runs, but when that condition evaluates to false, only the second block of code runs. In all cases, only one code block in the structure runs: it’s one or the other, and never both (and never none at all!).
In these examples, the first chunk of code runs while the second is ignored:
if(7 > 3) {
    This Code Runs!
} else {
    This Code Does Not Run!
}


let score = 87;
if(score >= 85) {
    This Code Runs!
} else {
    This Code Does Not Run!
}
Meanwhile, in the following, the specified conditions don't evaluate to true, which means the first chunk of code is ignored and skipped over while the second runs:
let classyear = "junior";
if(classyear === "senior") {
    This Code Does Not Run!
} else {
    This Code Runs!
}


let score = 87;
if(score > 94) {
    This Code Does Not Run!
} else {
    This Code Runs!
}
And there are yet other variations of the standard if statement. Sometimes, we will want to do different actions based on two different possible conditions. In such a situation, we’ll want to check for one condition, and if that condition is not met, we will check for another condition we specify. This kind of structure is accomplished through the if/else if statement:
if(CONDITIONAL EXPRESSION 1) {
    CODE TO RUN IF
CONDITION #1 IS MET
} else if(CONDITIONAL EXPRESSION 2) {
    CODE TO RUN IF
CONDITION #1 IS NOT MET
BUT CONDITION #2 IS MET
}
In the above example, we check the first condition, and if it evaluates to true, the first block of code runs. If that first condition evaluates to false, then we check the second condition. If that condition is true, we run the second block of code, but if that condition is false, then nothing ends up happening at all.
In this structure, we either have only one of the blocks of code run, or neither of them. It’s important to note that even if both conditions in each if() statement happen to evaluate to true, then only the first condition that is satisfied in the order of conditions provided determines which block of code runs. For example, in the following, both if() statement conditions are true, but only the first block of code runs:
if(4 == 4) {
    This Code Runs!
} else if(7 == 7) {
    This Code Does Not Run!
}
As with any sort of if statement, only one block of code will ever run. Period. The block of code that does run is the one attached to whatever condition is met first. If no conditions are met, then nothing happens.
We can chain together any number of conditions with more else if() statements:
if(CONDITIONAL EXPRESSION 1) {
    CODE TO RUN IF
CONDITION #1 IS MET
} else if(CONDITIONAL EXPRESSION 2) {
    CODE TO RUN IF
CONDITION #1 IS NOT MET
BUT CONDITION #2 IS MET
} else if(CONDITIONAL EXPRESSION 3) {
    CODE TO RUN IF
CONDITIONS #1, #2 ARE NOT MET
BUT CONDITION #3 IS MET
} else if(CONDITIONAL EXPRESSION 4) {
    CODE TO RUN IF
CONDITIONS #1, #2, #3 ARE NOT MET
BUT CONDITION #4 IS MET
}
There’s no limit to the number of conditions we can specify. But if none of the conditions in our chain end up being true, then nothing will happen. If we want to make sure that something happens even if all the conditions are false, we can chain an else statement at the end that performs a default action, if all the preceding conditions end up being false:
if(CONDITIONAL EXPRESSION 1) {
    CODE TO RUN IF
CONDITION #1 IS MET
} else if(CONDITIONAL EXPRESSION 2) {
    CODE TO RUN IF
CONDITION #1 IS NOT MET
BUT CONDITION #2 IS MET
} else {
    CODE TO RUN IF
CONDITIONS #1 AND #2
ARE BOTH NOT MET
}
In the following examples, every provided condition evaluates to false, so the else block runs by default:
if(8 < 7) {
    This Code Does Not Run!
} else if("Hello!" === "Hello?") {
    This Code Does Not Run!
} else {
    This Code Runs!
}


let score = 87;
if(score < 75) {
    This Code Does Not Run!
} else if(score < 85) {
    This Code Does Not Run!
} else {
    This Code Runs!
}
The sky’s the limit. Whatever kind of structure we use, the pattern will always be the same:
- Start with an
if()statement - Add 0 or more
else if()statements - At the end, add 0 or 1
elsestatement
These dizzyingly various combinations mean that what we’re able to do in our code will suddenly explode in many new directions. By creating branches in the logic of our applications, we'll be able to open new frontiers for more complex kinds of computations and user interactions.
Practice on your own
In the discussions above, we've only looked at the overall structures themselves, without populating the code blocks (between the curly braces { }) with actual code to run or not run. Inside these code blocks, we can put any valid JavaScript or D3 code that we want. That code can be very simple, such as printing a message to the console, or very complex, such as drawing an entirely different illustration based on the value of an input variable. To get a first sense of how these blocks are run, we'll focus our first discussion on the simpler end of this continuum: printing different messages to the console based on which condition is (or is not) met.
For example, the following if() statement checks to see if the provided condition evaluates to true; if it does, then a message is printed to the console, but if it does not, then that message never gets printed at all:
let name = "Steven";
if(name === "Steven") {
    console.log("Hi, Steven!");
}
In the above example, the condition is met, and so a message gets printed to the console: "Hi, Steven!" But in the following example, the condition is not met, and nothing ends up getting printed to the console at all:
let otherName = "Luna";
if(otherName === "Steven") {
    console.log("Hi, Steven!");
}
In this next example, the condition isn't met, but a default else block is provided, meaning the first message doesn't get printed, but the second does:
let name = "Steven";
if(name === "Luna") {
    console.log("Hi, Luna!");
} else {
    console.log("Hi again, Steven!");
}
You can confirm all of these examples on your own, in the template file provided. In that same template, practice writing some conditional statements of your own. In each of the following tasks, you are given a structure of a conditional statement. For each task, write out a complete conditional statement structure that matches the description given. Each example you write out should feature conditions and comparisons using variables you declare and relate to a real-world conditional situation. For example, examine the following task and solution:
Task: A conditional statement that has one if() condition and a default else block
Solution:
let age = 20;
if(age >= 21) {
    console.log("You are old enough to drink.");
} else {
    console.log("You are not old enough to drink.");
}
In the above example, the supplied condition is based on legal drinking age in the United States; if the value of the variable age is at least equal to 21, then we print an affirmative statement to the console, but if that condition is not met, then we print a negative statement to the console.
For each of your solutions, create a conditional statement that reflects a real-world scenario like this. Each solution should involve a comparison using a variable you define. Inside of each code block ({ }), use console.log() to print a message to the console that is relevant to each condition being matched or unmatched. (Feel free to get creative with your solutions!) The tasks are given below:
- A conditional statement that has one
if()condition that evaluates totrue - A conditional statement that has one
if()condition that evaluates tofalse - A conditional statement that has two conditions (with
if()andelse if()), where the first condition evaluates totrue - A conditional statement that has two conditions (with
if()andelse if()), where the first condition evaluates tofalsebut the second condition evaluates totrue - A conditional statement that has two conditions (with
if()andelse if()) AND a defaultelseblock, where one of theif()conditions evaluates totrue - A conditional statement that has two conditions (with
if()andelse if()) AND a defaultelseblock, where both conditions fail and thus theelseblock runs - A conditional statement that has at least 3 conditions (with
if()andelse if()); theelseblock is optional, and it's up to you to decide if any of the conditions succeed or fail
In each of your solutions, make sure you understand the logic behind which blocks of code run and which ones get skipped over. (What are some ways you can tweak the conditions in each solution to change the outcome of each conditional statement?)