Fundamentals of CSS
Introduction
Up to this point, we’ve learned about how we can use HTML to represent the structure of content in a document. Importantly, we’ve noted that we should only ever use HTML to represent the contents of a web document, and never the style of those contents. When we want to change how our contents are visually rendered in appearance, in terms of things like background color, font size, or how much space some content takes up on the page, we should never embed such instructions inside of our HTML markup. Doing so violates a fundamental principle of web design: separating content from style.
If we shouldn’t embed style information inside our HTML, then how will we tell the browser how to change the appearance of our content? The answer to this is CSS, or Cascading Style Sheets. In this demonstration, we’ll learn what CSS is, what kinds of changes it can apply to our documents, and the basic code pattern for giving instructions to the browser.
A style sheet is like a remote control
CSS stands for Cascading Style Sheets. We’ll come back to the word cascading a little later on, but for now, the most important part of this term is style sheets. Here, style refers to any type of visual appearance, such as the color of our text, or the font family of a paragraph, or what happens to our hyperlinks when we hover over them with our mouse cursor. The next word, sheet, refers to the fact that when we write CSS, we are essentially giving the browser a sheet of instructions for how to render the contents in our HTML. The style sheet we produce will act as a remote control for the visual appearance of our page, but unlike the remote control that comes with a television, our style sheets will be overpowered in their ability to change nearly anything we want to change in our document.
CSS changes appearance through style properties
Before we begin, it’s helpful to have a sense of what kinds of changes we can make to the appearance of our content. In CSS, we call the kinds of changes we can apply to HTML content style properties. A single style property is a standardized name in CSS, such as font-family or font-size, which controls a specific aspect of visual appearance and the value of which can be modified to our liking. For every valid style property in CSS, there is a limited set of valid values we can assign it. For example, the font-family property changes what font is used to render some text, and the only valid values we may assign this property are the names of one or more fonts like Arial, Times, or generic default families of fonts like serif or sans-serif. (Do you know the difference between a serif and sans-serif font?) Meanwhile, the font-size property, which controls how big or small some text is, accepts a range of many different possible values across many different possible units of measurement. For example, we can express font size values in pixels (e.g., 12px, 48px), points (10pt, 14pt), em units, (1.0em, 1.3em), rem units (1rem, 2rem), percentage (100%, 150%), or even named sizes (small, medium, large). These many different units give us incredibly fine-tuned control over something as seemingly simple and mundane as the size of text.
There are hundreds of different properties in CSS, each of which we are able to control. Most of these available properties won’t ever matter to us, but the ones that do matter to us — particularly ones relating to text, colors, and spacing in layouts — are complex enough on their own!
How do we know which properties are available for us modify? A little bit of exploration can help us with this question.
CSS Zen Garden
This part of the demonstration is an optional activity, but you may find it extremely helpful to at least briefly explore the website introduced here to get a sense of just how much of the visual design of a web page we can change through CSS.
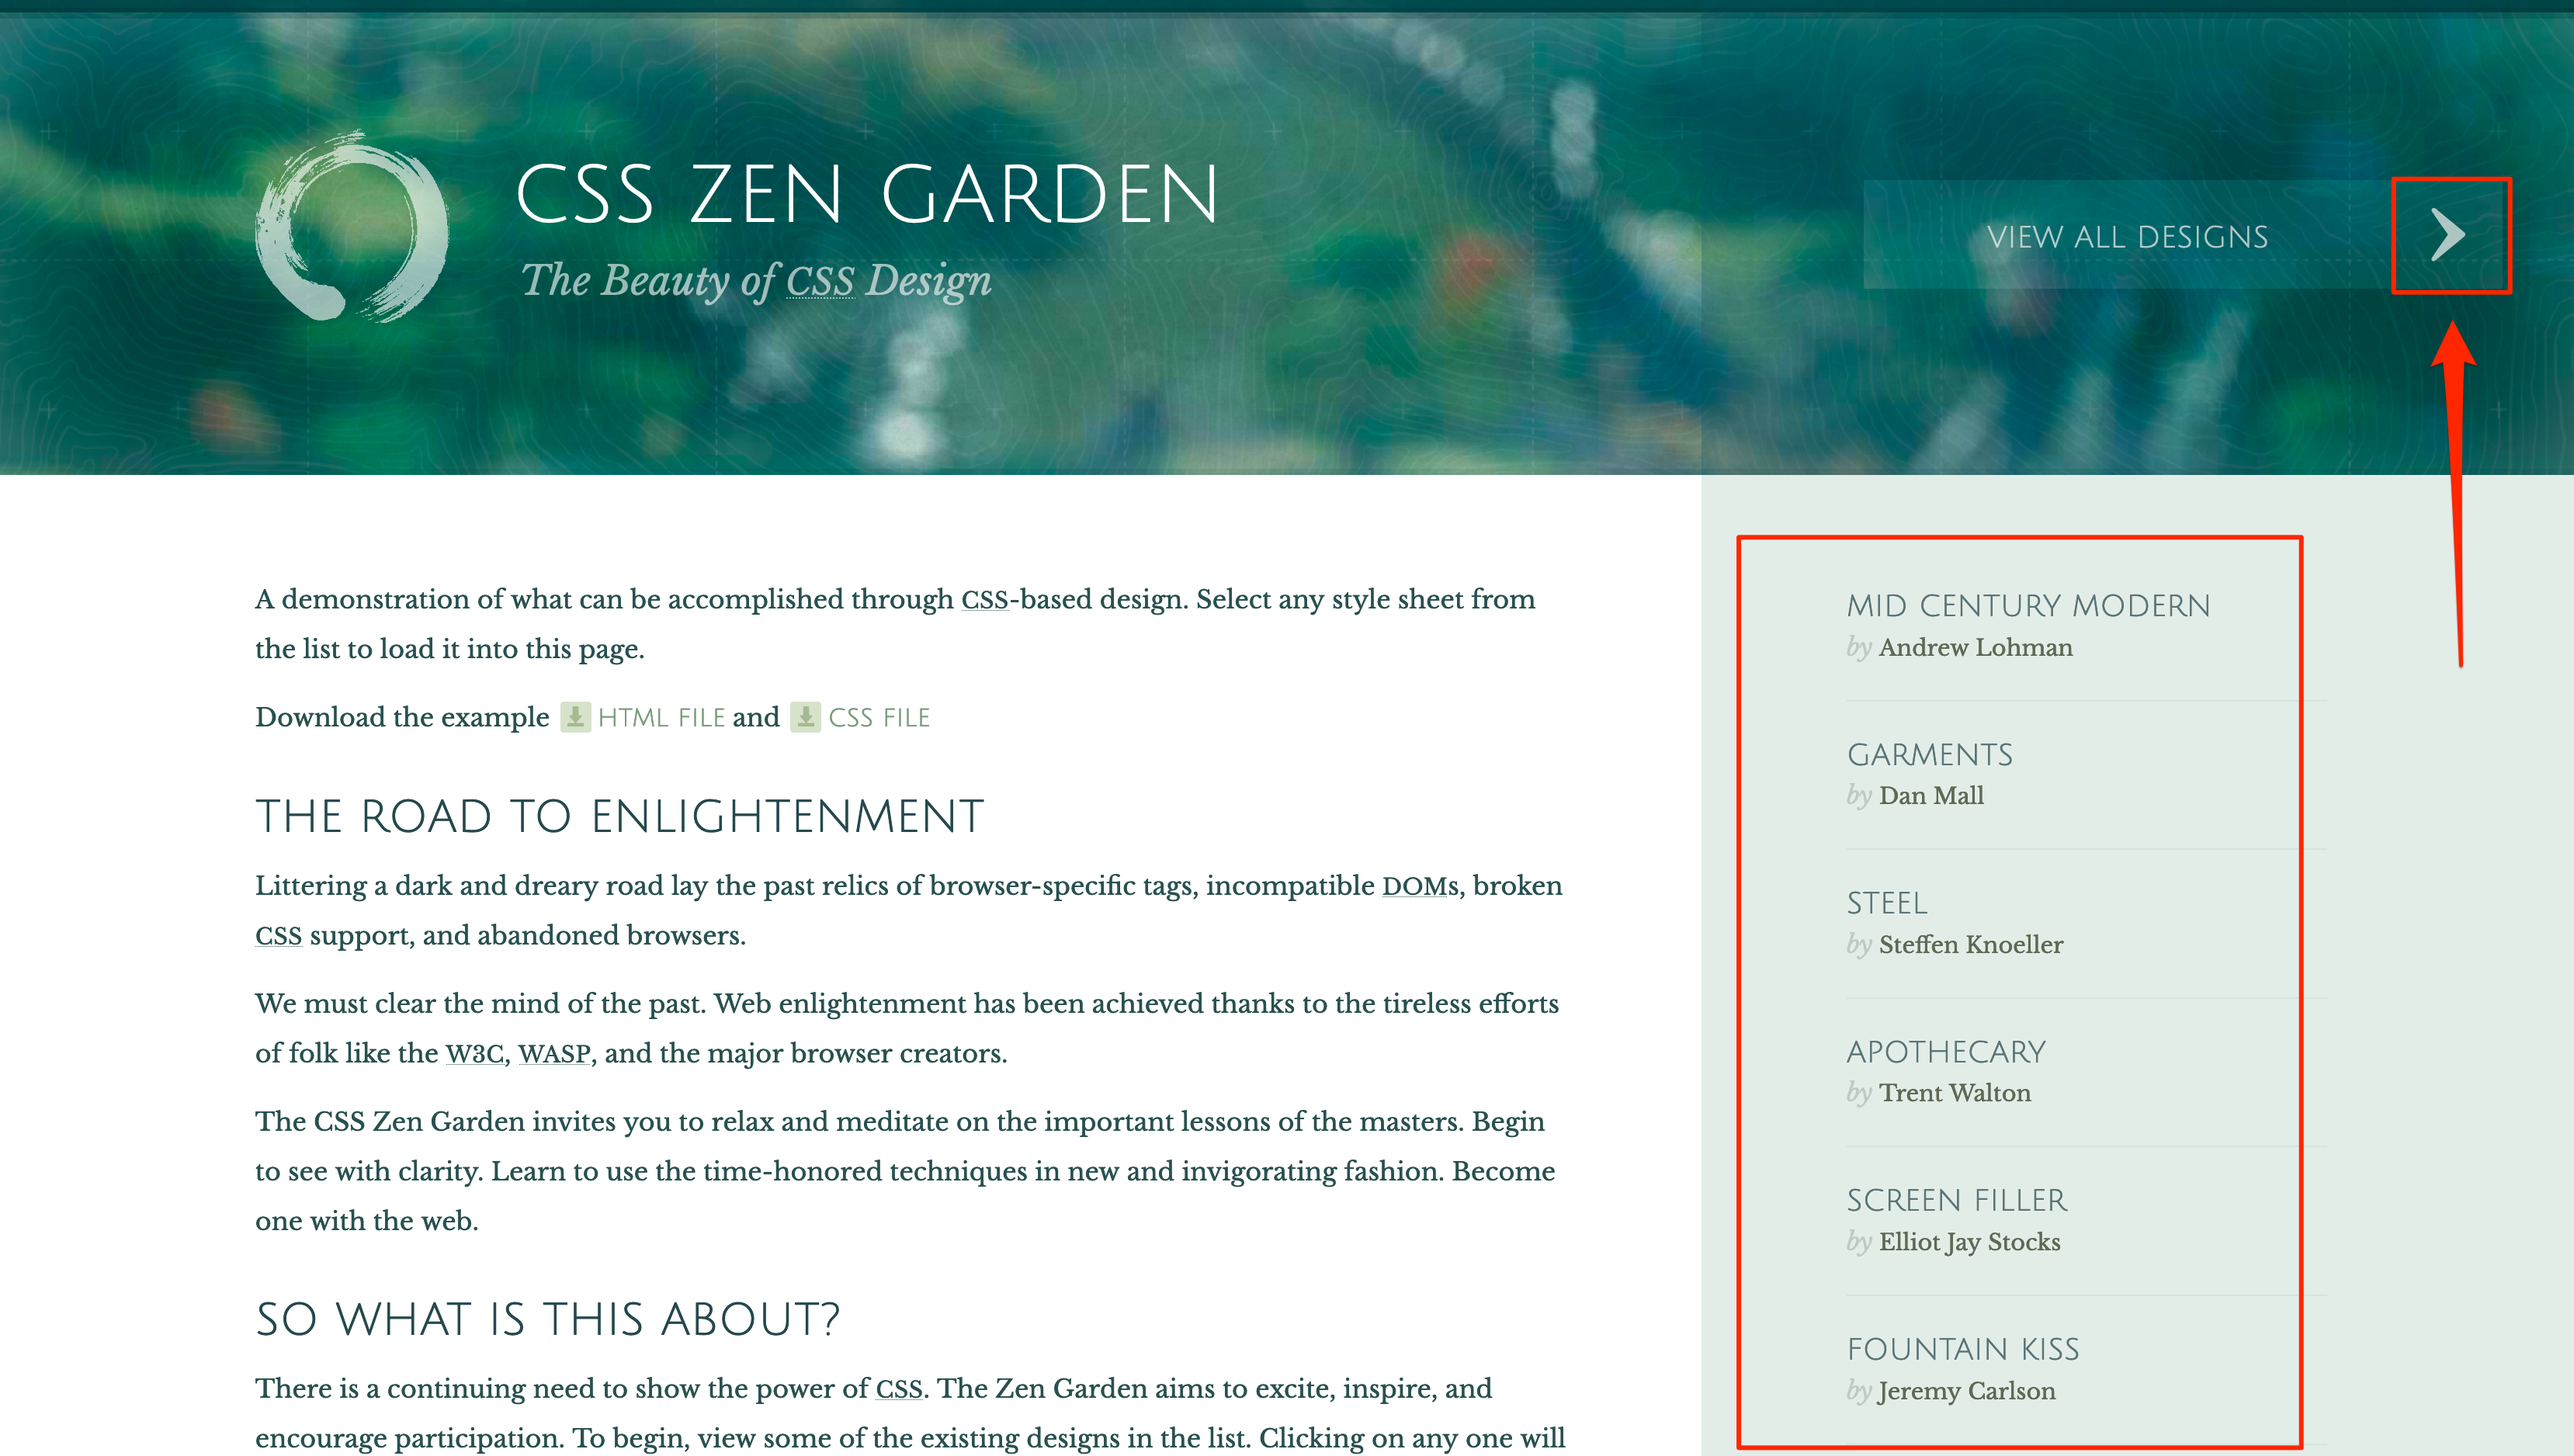
Go to the CSS Zen Garden website at http://www.csszengarden.com. This is a website that displays the same HTML content that has been visually rendered over many different designs. Each design is made through changing CSS style properties, meaning that the only thing that changes across designs is the visual style, not the content.
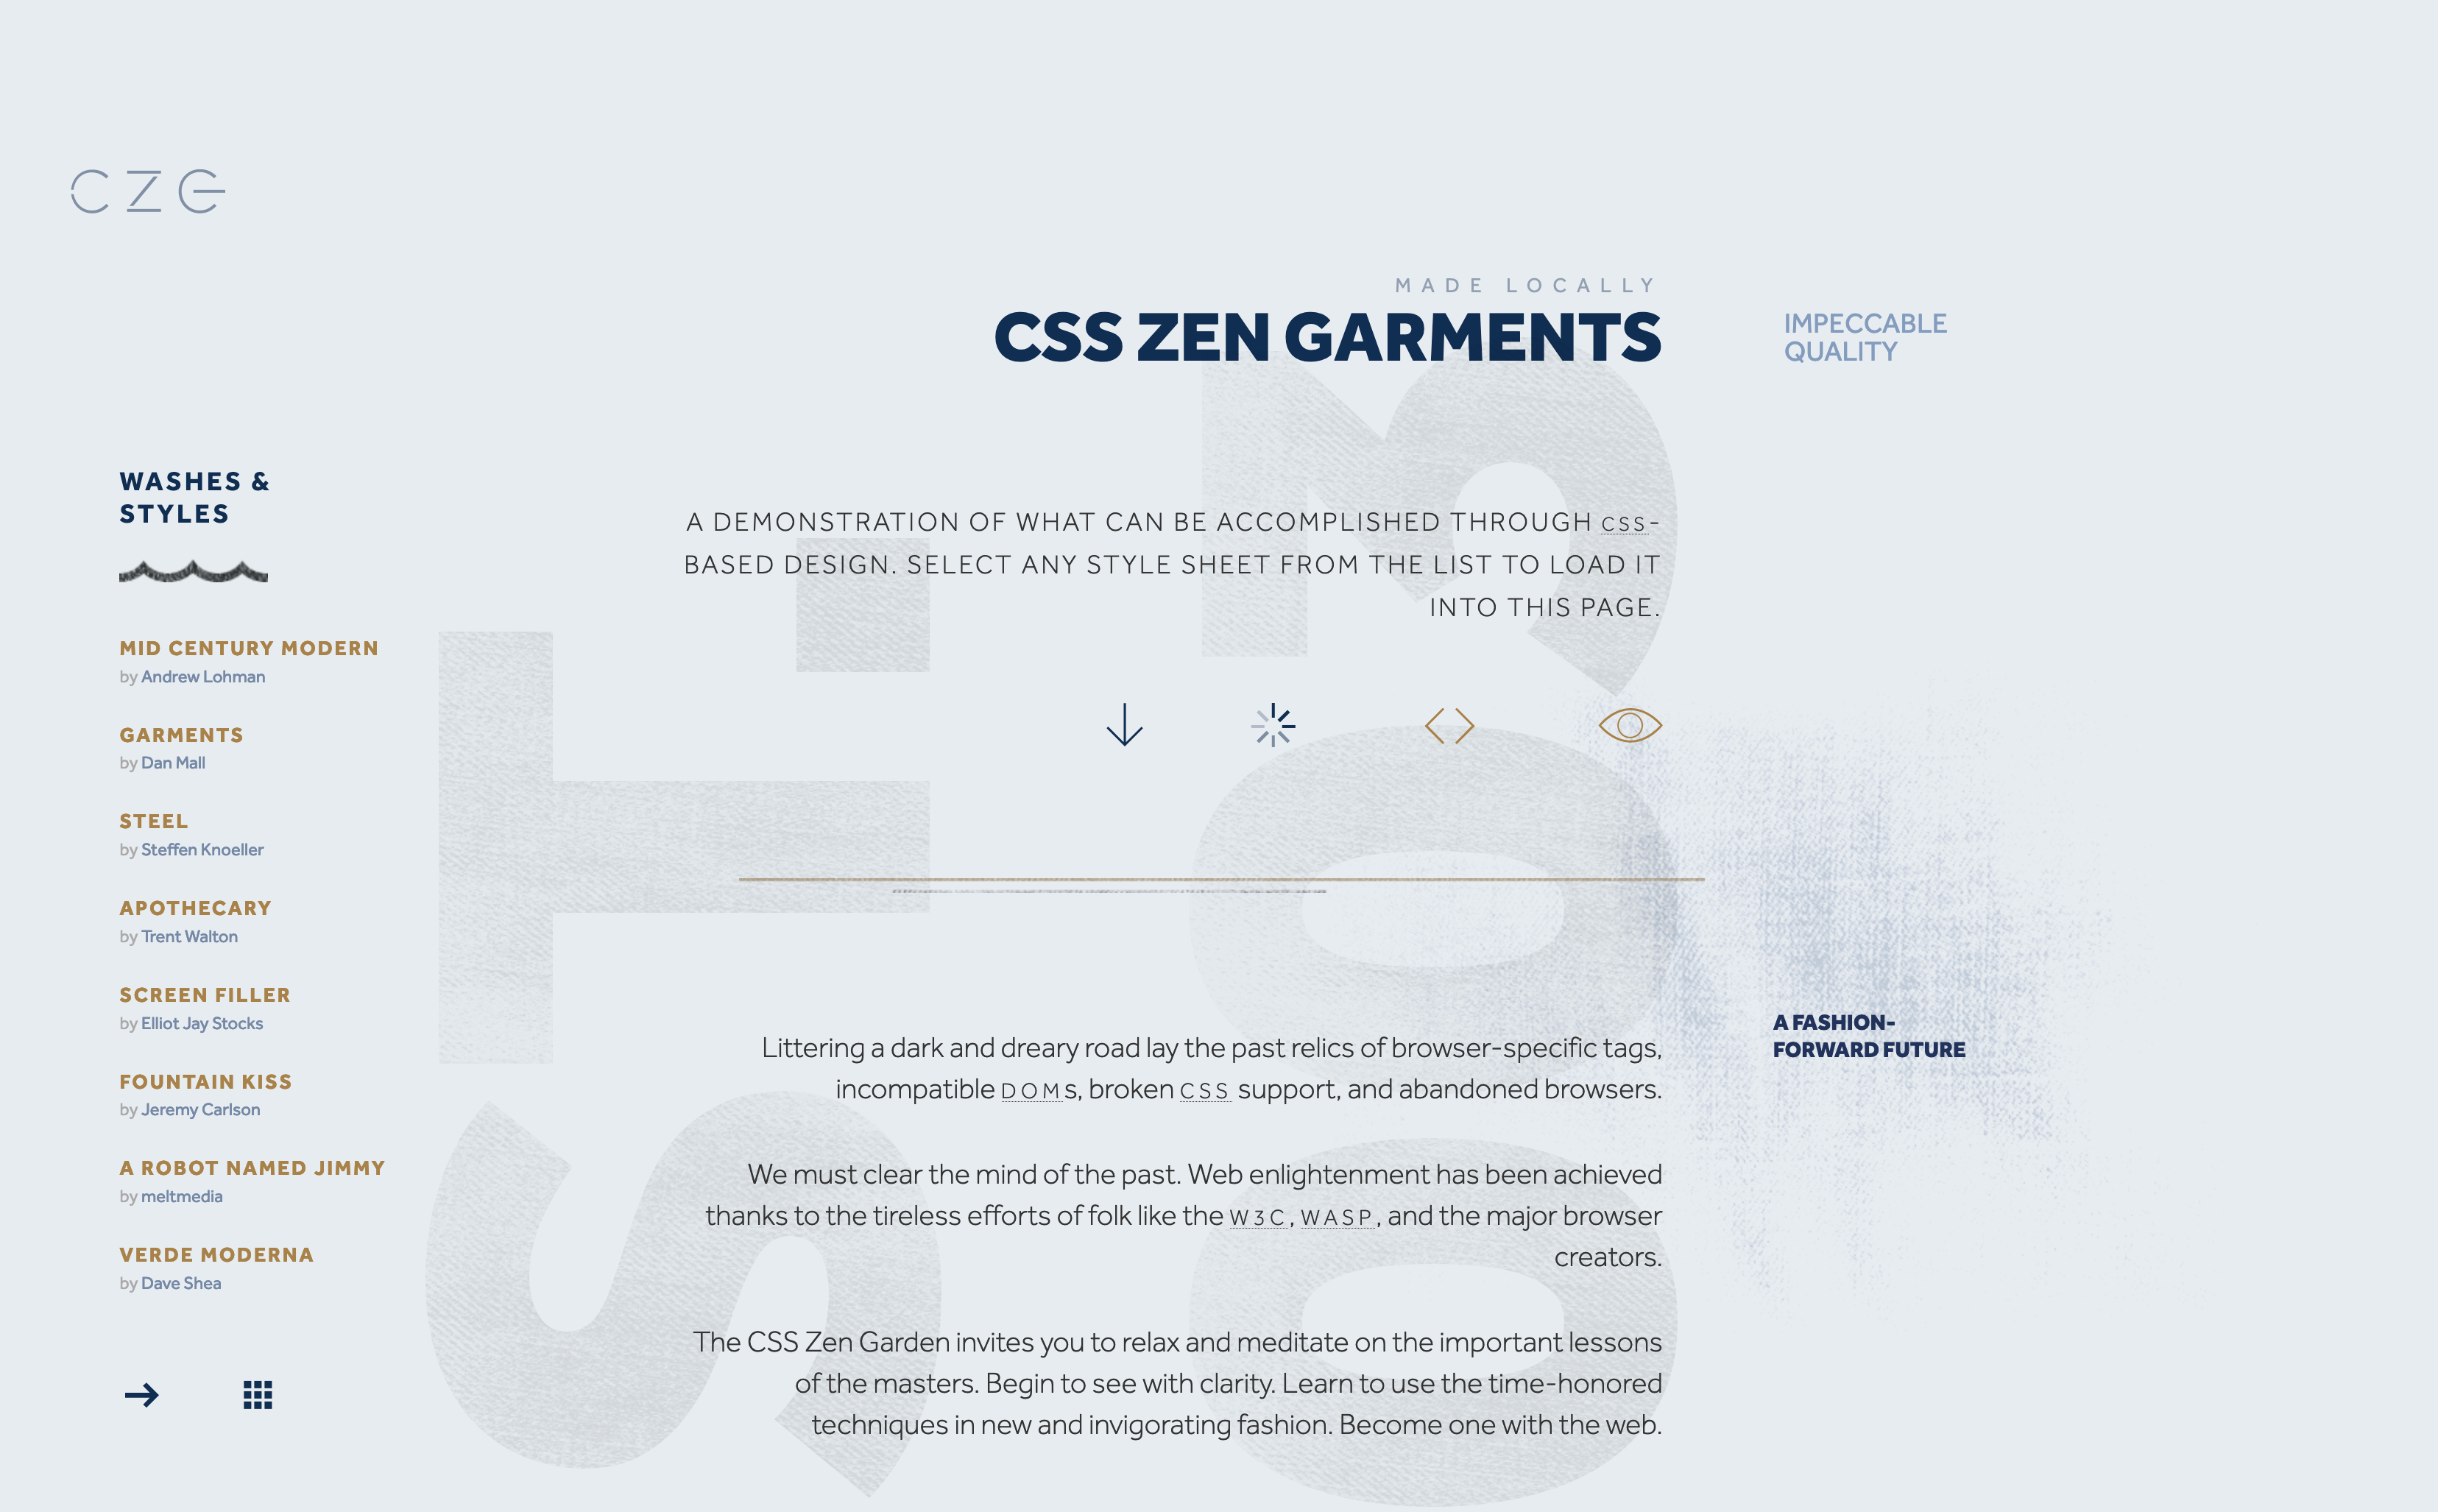
Through this website, you can explore many different CSS designs for the same web page. To explore different layouts, examine the list of designs on the right side of the screen (e.g., “Mid-century Modern,” “Steel”, etc.). You can view additional designs by clicking the arrows that appear next to the button that says “View All Designs” (Note: at the time of this unit, the “View All Designs” button is not working on this website). For example, if you click the link for the design named “Garments”, you are brought to a new page. You should notice on this new page that the content (in particular, the text) is the same as the previous page, but it looks visually different! This new layout is entirely controlled through changing the CSS.
Explore the CSS Zen Garden website. After looking at the design of the homepage, choose 3 other different designs to closely examine. For each design you choose, do the following:
- Indicate which design you are examining (what is the name of the design?)
- Identify a minimum of 3 aspects of the visual style you notice has changed in the design, compared to the previous one you viewed. For example, is the color of something changing? (The color of what?) Is the spatial arrangement of the layout changing? (Which elements of content are changing in location or position?) What else do you notice? Be as specific as possible.
Optional: Include your responses in the text entry portion of the assignment on Canvas.
CSS rules
In the previous exercise, you likely noticed that a lot of things about the visual appearance of the pages were changing with each design link you followed. We can be extremely specific and particular about how we change this appearance, resulting in a seemingly limitless number of possible designs! How do we put these changes into action through CSS? The answer is through chunks of code called CSS rules.
A CSS rule is a single instruction we give to the browser about how to change the visual style of the page. That single command can modify the appearance of a single element in our HTML, or multiple elements; it can modify a single style property of those elements, like the size of text, or multiple style properties, like the color of the text and how much space is placed around it and between other elements.
We will write CSS rules in the CSS language. This language is different from HTML in terms of the actual symbols and words we will use, so we will see some new ways of writing code that will feel distinctively different from what we've seen already. But on the flip side, just like HTML, the CSS language will consist of its own collection of valid 'words' and rules of syntax that will dictate how we can express ourselves through those words.
The pattern for writing a CSS rule is very simple. Every rule that we write will consist of two functional pieces that are stitched together through CSS syntax rules. The first of these functional pieces is called the selector, which will tell the browser which element(s) to apply new style properties to. The second of these pieces is a list of style properties and their values, which are the specific changes to appearance we want to apply. We will call each property and value pair a declaration, and the list of property-value pairs will be called the declaration block. (This word declaration comes from the fact that CSS is what we call a declarative language, in which we [literally] declare what we want to change on the screen and how we want to change it.) We can apply one or more style property change in any given CSS rule. And in a single document, we can have as many individual CSS rules we want (or none at all!).
The syntax for a single CSS rule looks like this:
selector{property:value;property:value;property:value;...}
Note a few critical things about this syntax. First, curly braces { } surround the list of properties and values; these indicate the start and end to a CSS rule, similar to what opening and closing tags do in HTML. Second, every property and value pair inside the curly braces is separated by a colon :, and the pairs themselves are separated from each other using semicolons ; at the end of each line. These syntax elements must be included, otherwise the browser will not be able to understand our CSS, causing our style changes to never be applied.
This pattern is a template for literally all CSS. We just need to know how to fill it out! For example, the following are three CSS rules written based on this pattern:
p{font-size:16pt;font-weight:bold;color:orange;}
.container{width:50%;margin:20px;}
#main{padding:10%;background-color:#FEFEFE;border:1px dotted #CCCCCC;position:relative;box-sizing:border-box;}
These all are different rules, but they are all constructed in the same way! In each example, the stuff that comes before the curly brace is called the selector; here, the selectors for each rule are p, .container, and #main, respectively. Then, in each example, the list of properties and their values is called the declaration block. Each rule has a different list of properties, and also a differing number of properties. It doesn’t matter what the selector looks like or how many properties are declared; as long as the template is matched, the browser will interpret our code as valid CSS.
The Document Object Model
In the previous section, we encountered these things called selectors. While we can modify hundreds of different CSS style properties to customize the look of our page, these changes to properties are meaningless if we aren’t able to tell the browser which elements should be modified. This is where selectors come in: we will use selectors to identify which elements to modify in appearance.
The key mechanism behind this process – matching specific elements to modify in appearance – relies on something else called the Document Object Model, or DOM. Whenever a web browser loads an HTML page, it creates an internal representation of the HTML contents that encodes information about varieties of content and how that content is structurally related. This representation is called the Document Object Model, and it resembles a family tree in the way that it tells us how individual elements are "related" to one another.
Open the template file provided with this demonstration. Inside the template document, you'll find lots of content, through a mixture of common tag names. On the right, you'll find a tree-like representation of the structure of this document, including information about how the elements of this document are structurally related to each other through nesting. To reinforce this notion, the colored tabs indicate levels of nesting depth: lighter orange indicates more "shallow" levels of nesting, and darker orange indicates "deeper" levels of nesting. Compare the HTML in the template file with this representation; do you understand how the HTML and the DOM representation are related?
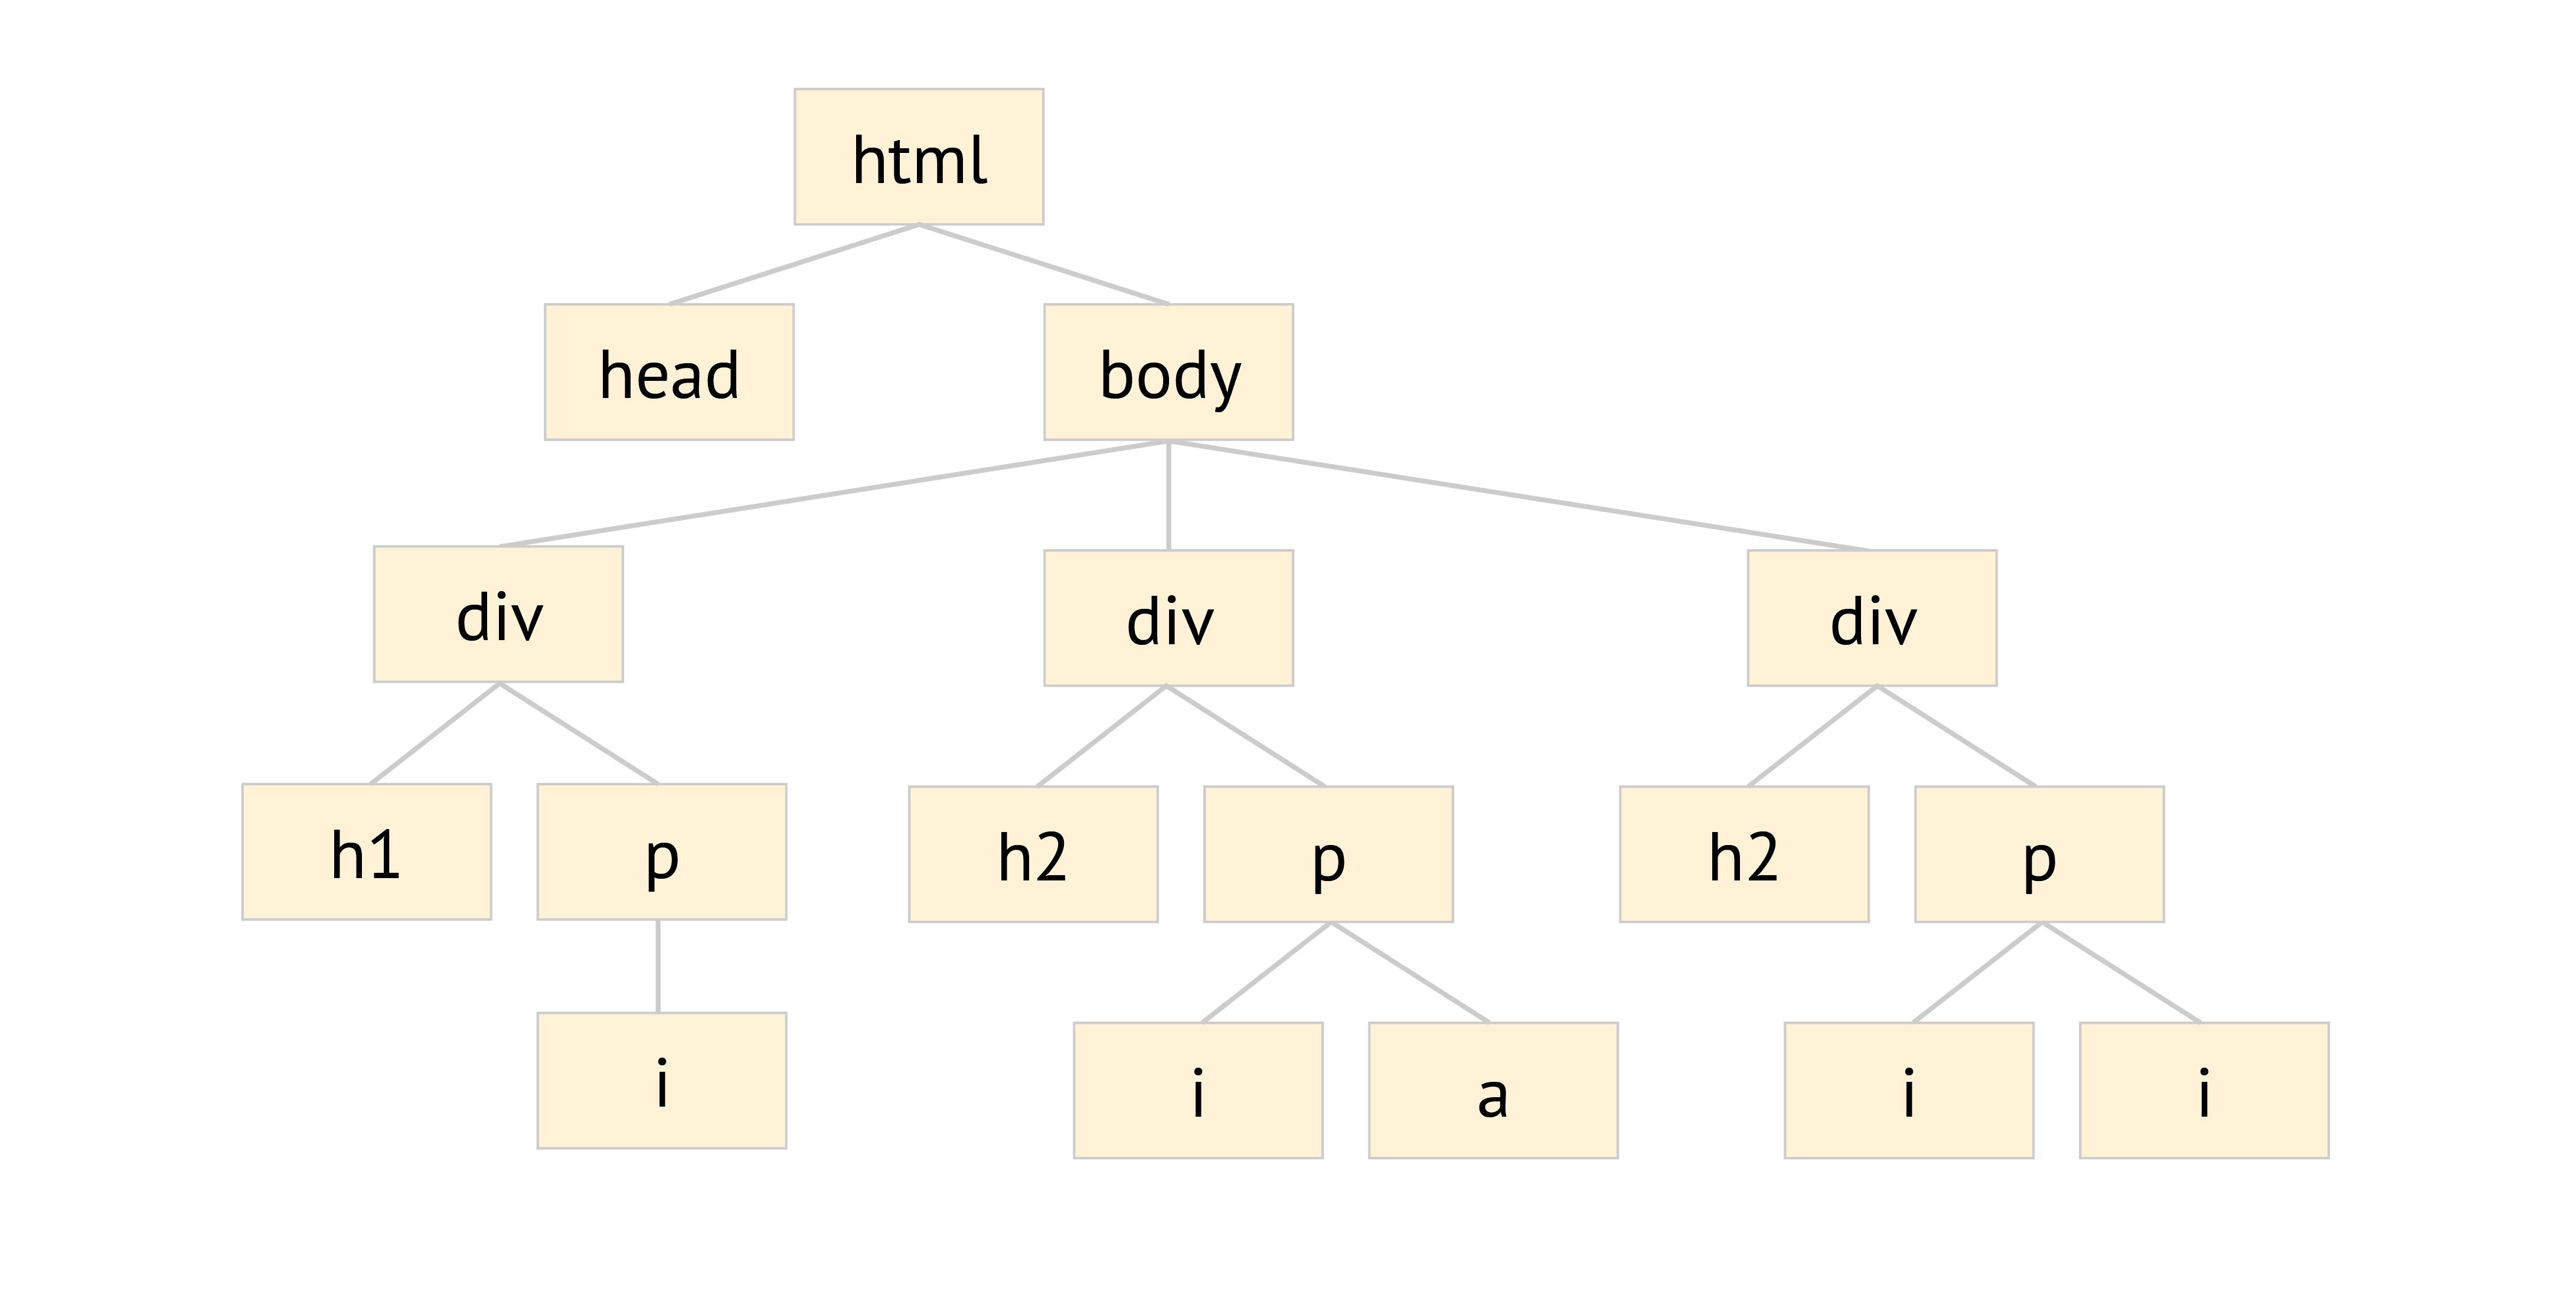
You'll notice that this DOM structure is extremely similar to the actual HTML for the document itself – but it only shows tag names for elements, and nothing about the actual contents. This is because the DOM is primarily a representation of the structure of our document, and secondarily about the contents. Another way to visualize the DOM is as a tree showing the "lineage" of elements through the structure (much like an actual family tree). An example of what this looks like is shown below for a small slice of the document (not the entire document!). Notice how each "node" in the tree is a tag name of an actual element in the document. The links between nodes indicate where nesting occurs; for example, inside the first div element (bottom left), we find the elements h1 and p, and inside the p element, we have an i element.
Through this structure, there are certain kinds of structural relationships between elements that we will care about in our work with CSS (and later, in D3 and JavaScript). Each of these types of relationships has a particular name.
Ancestors and descendants
The first kind of relationship we will care about is between ancestors and descendants. When one element is nested anywhere inside of another element, we say that the nested element is a descendant of the container element; we call the container element an ancestor of the nested element.
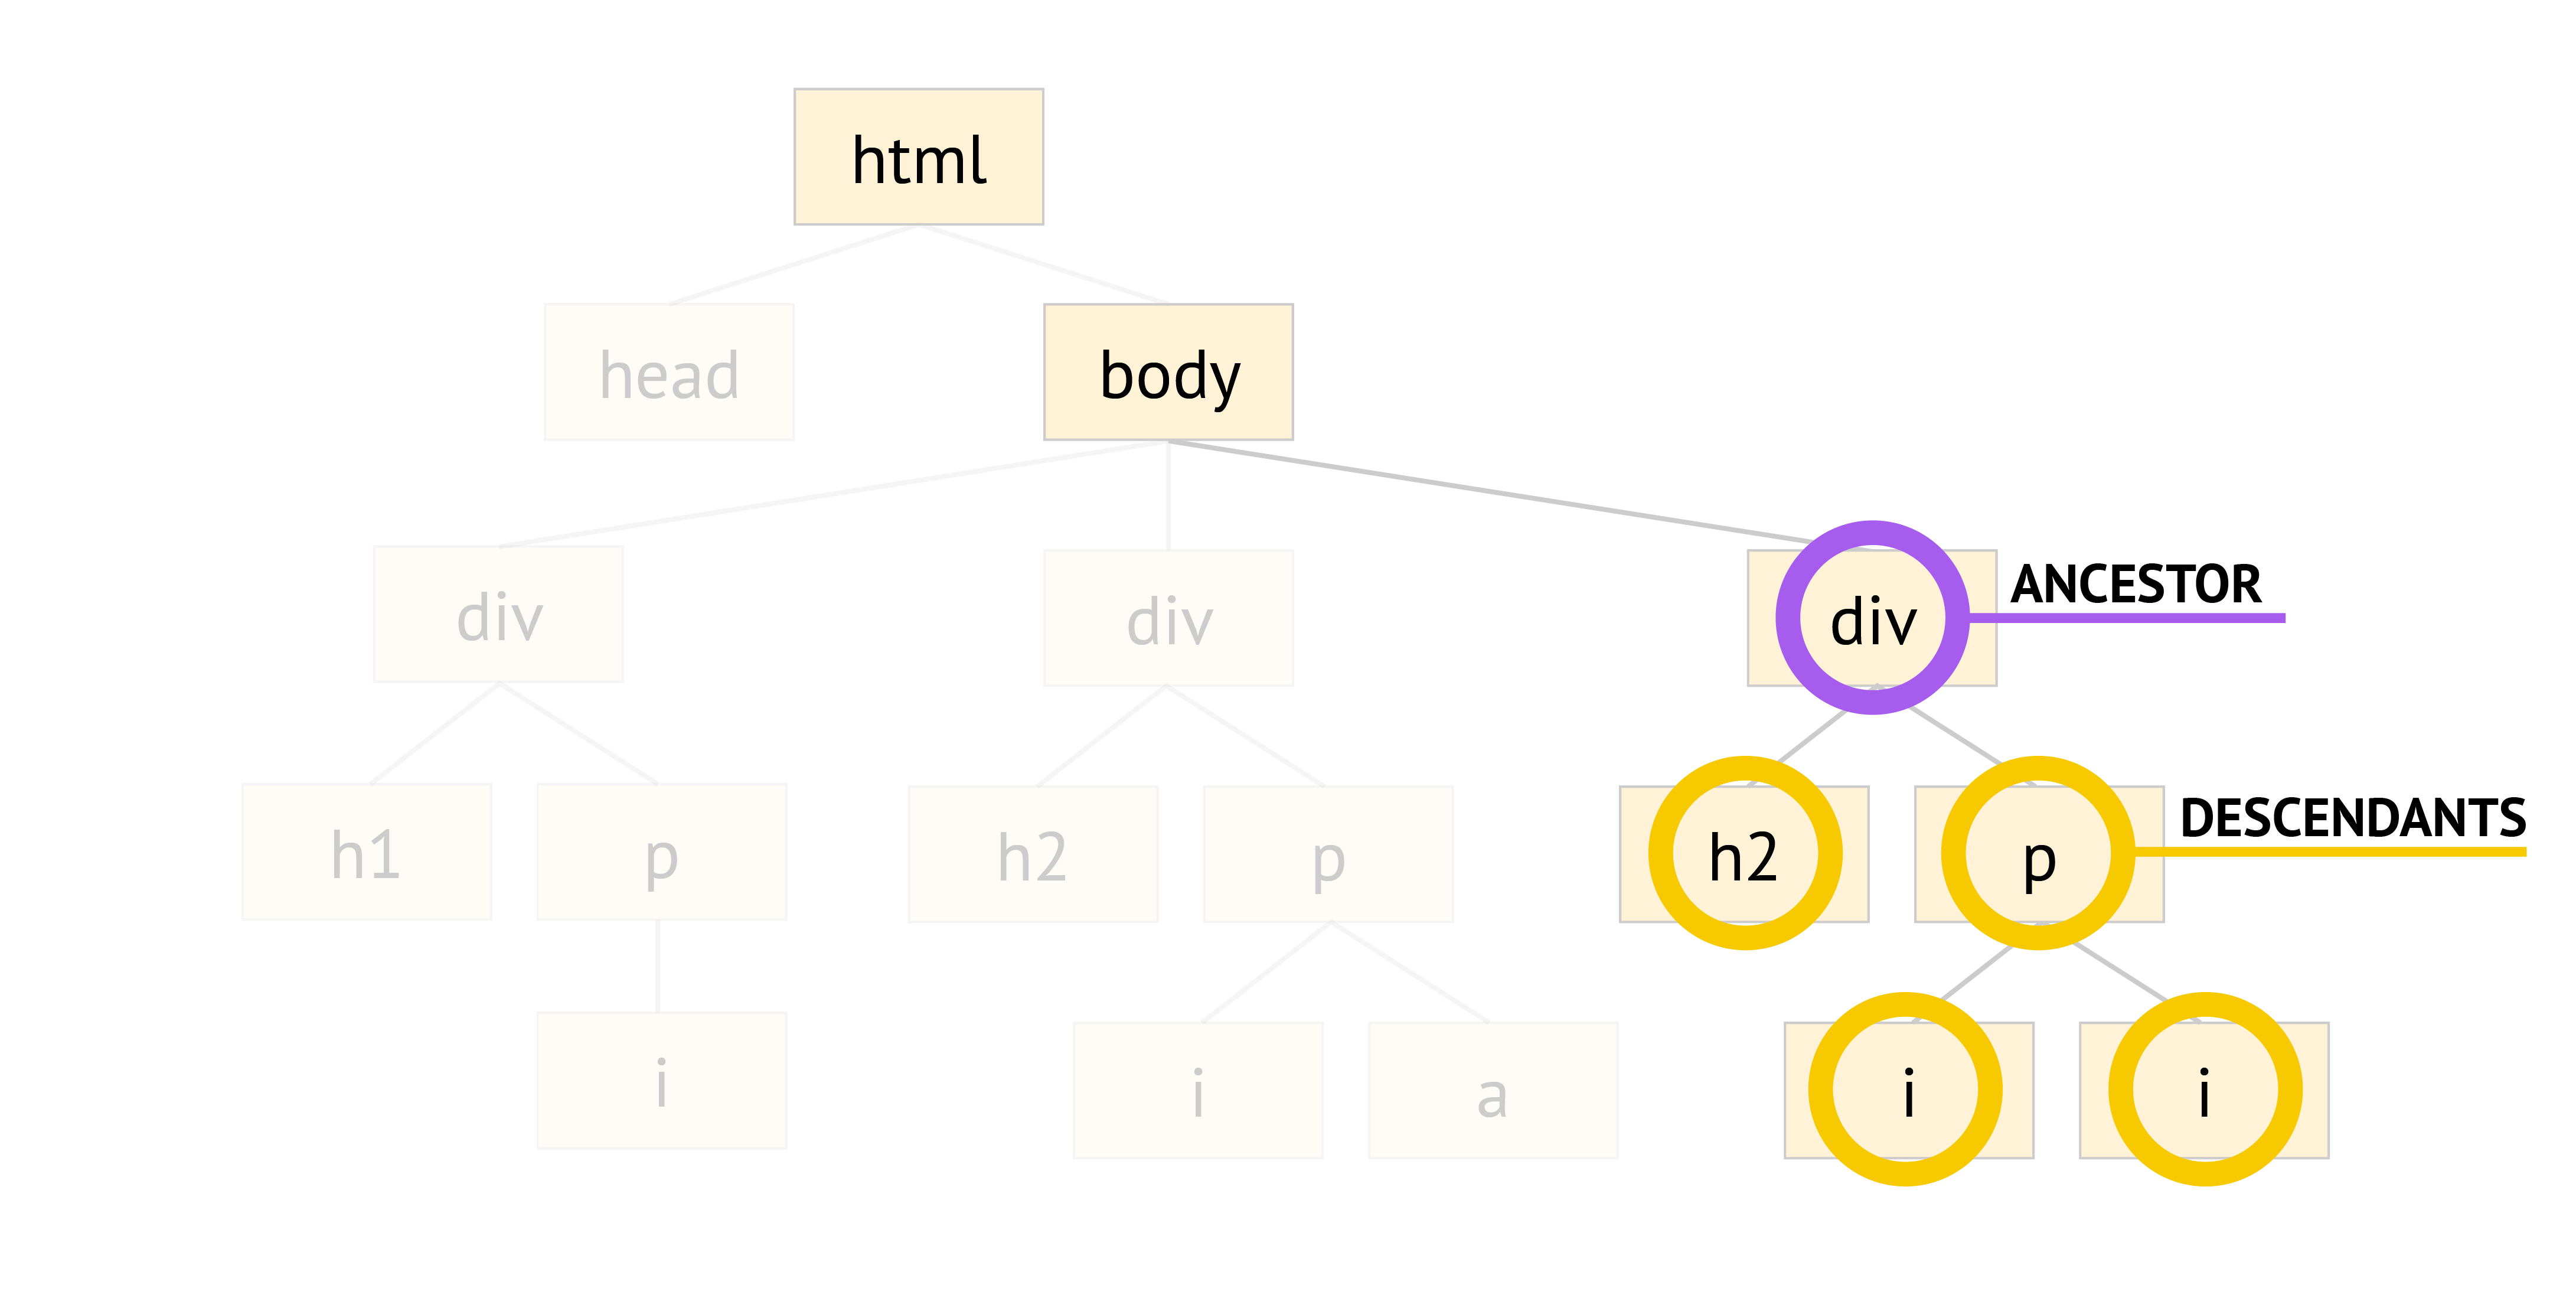
Importantly, ancestors and descendants can be related to one another at any degree of distance. In the structure at the right, some examples of ancestors are highlighted in purple, and examples of their descendants are highlight in yellow. Notice that for some of these relationships, there are several "links" of distance between ancestors and descendants. The distance between nodes doesn't matter; the only thing that defines this relationship is whether two elements are nested relative to one another.
Parent and child
When an ancestor and descendant are separated by only one degree of distance, we call this a relationship between a parent and child element. In this case, the parent element is the container element, and the child element is the element nested inside the container, immediately one level deep into the container element.
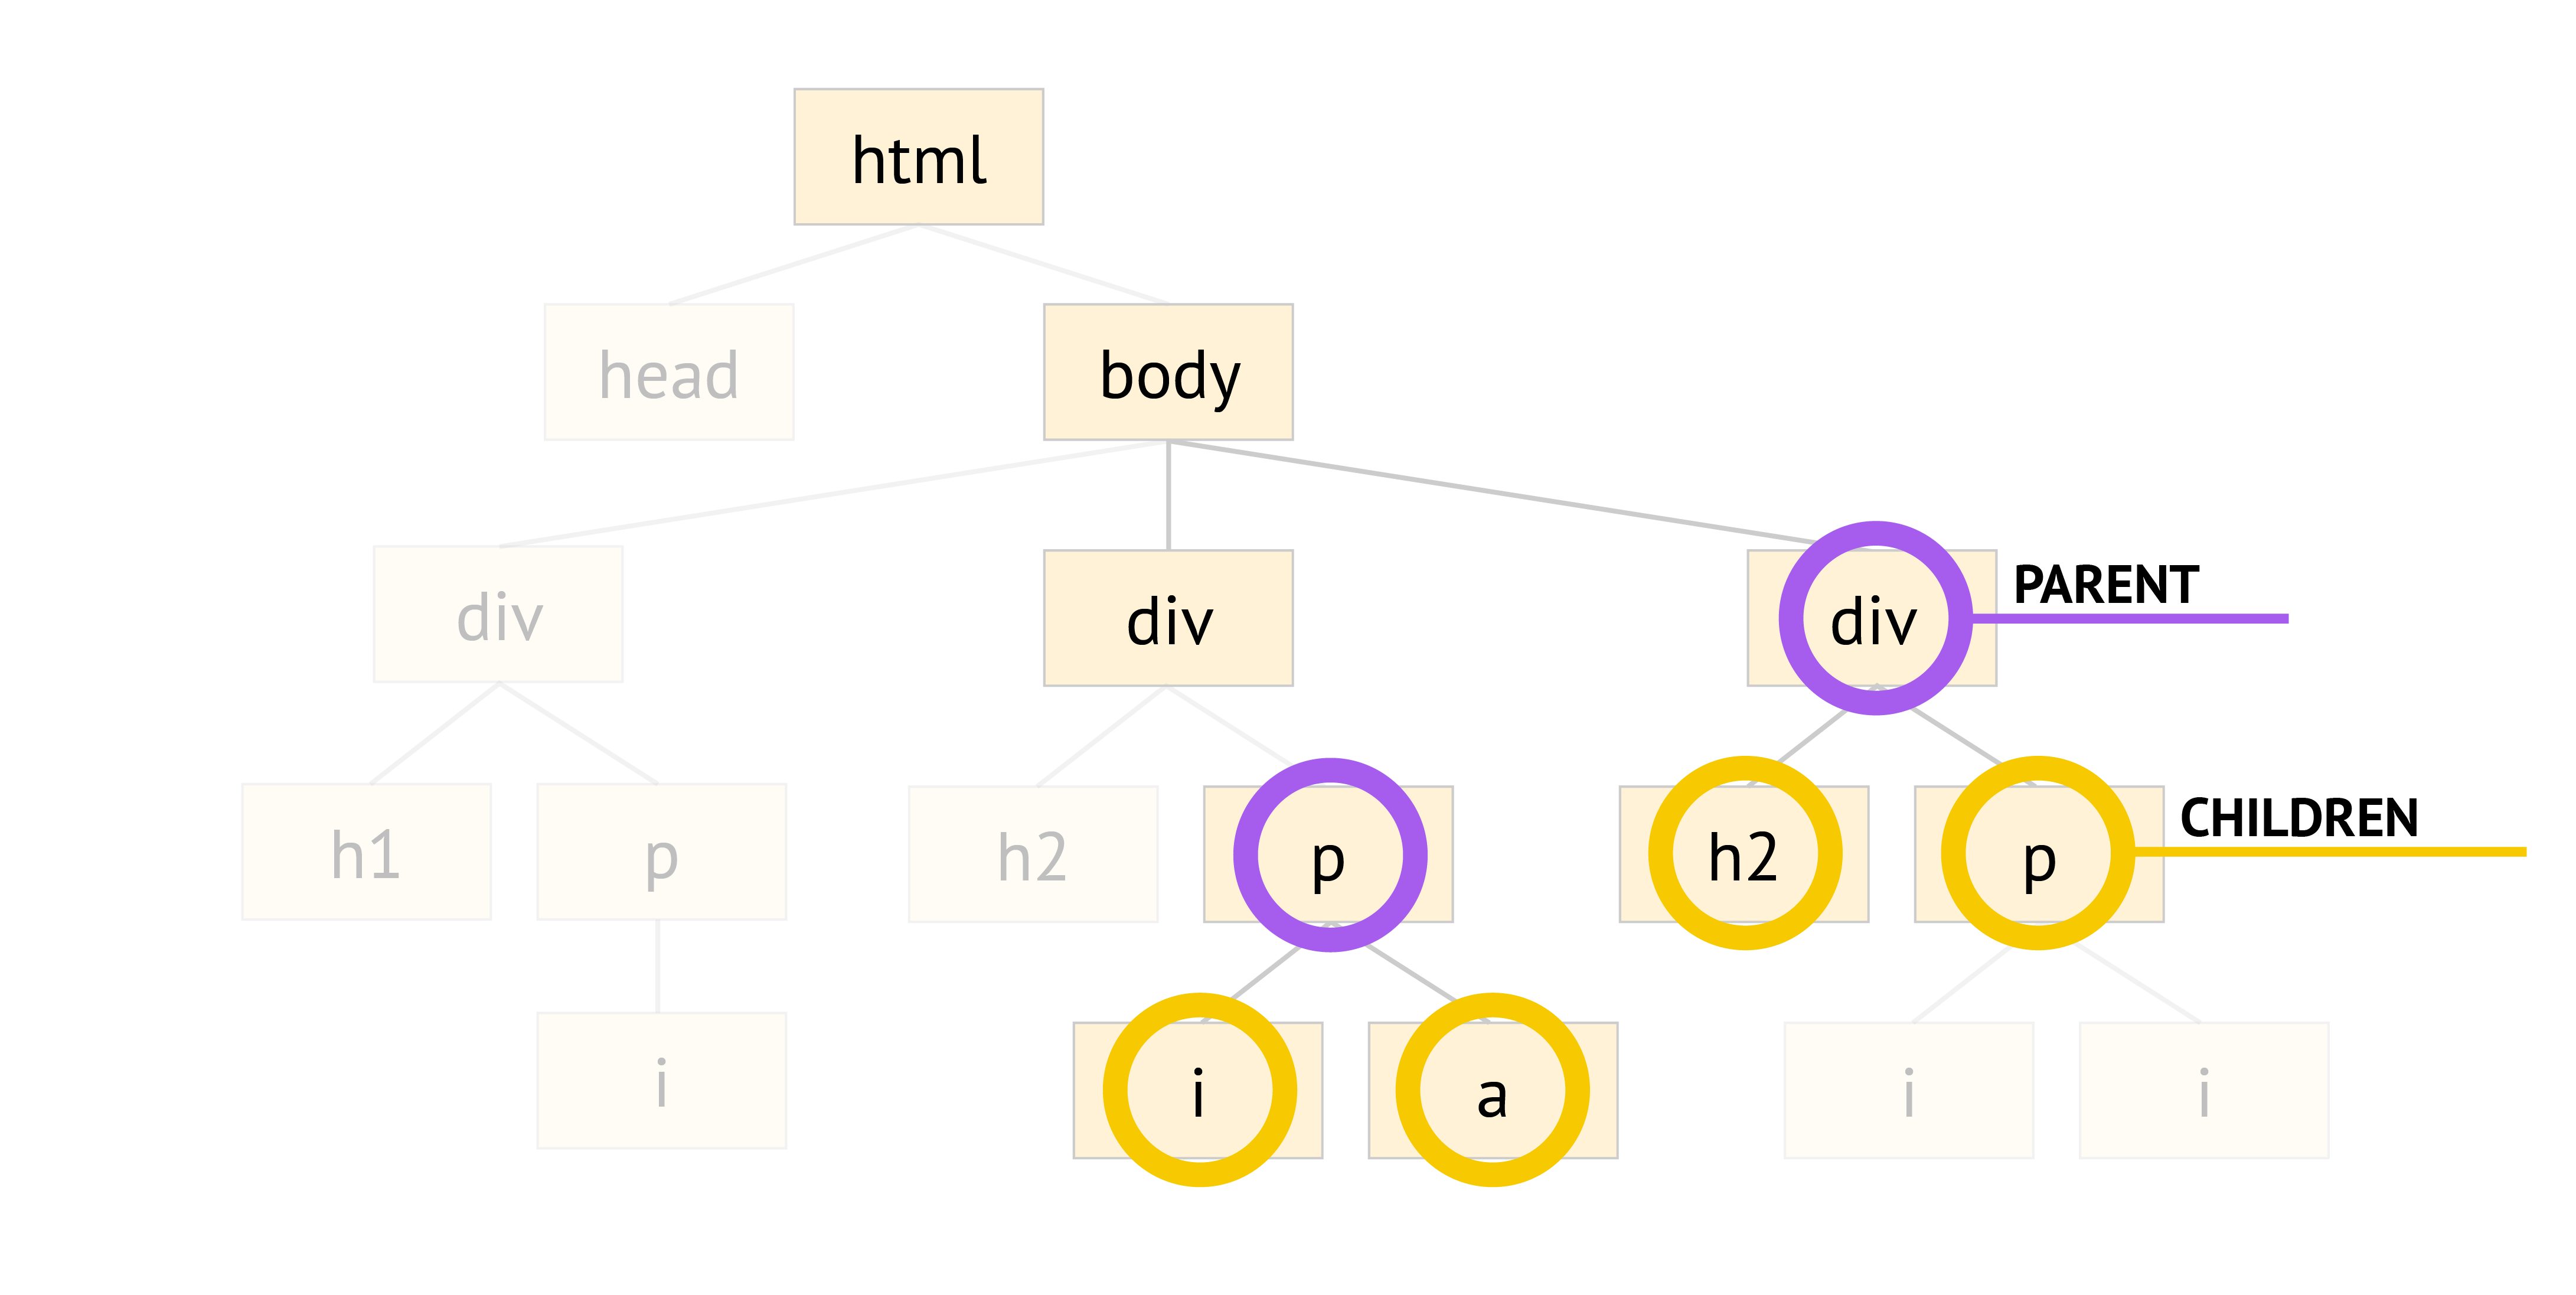
In the example at the right, some examples of parent elements are highlighted in purple, and examples of their children are highlighted in yellow. Note that a parent element can be a child element of another element; likewise, a child element can be a parent element of another. These kinds of relationships are determined relatively through the HTML structure.
Siblings
Lastly, when two elements have the exact same parent element, we call the elements siblings. Elements that are siblings will both be child elements (children) of the same parent element. Put another way, siblings are elements that are located at the same level of depth in the DOM structure.
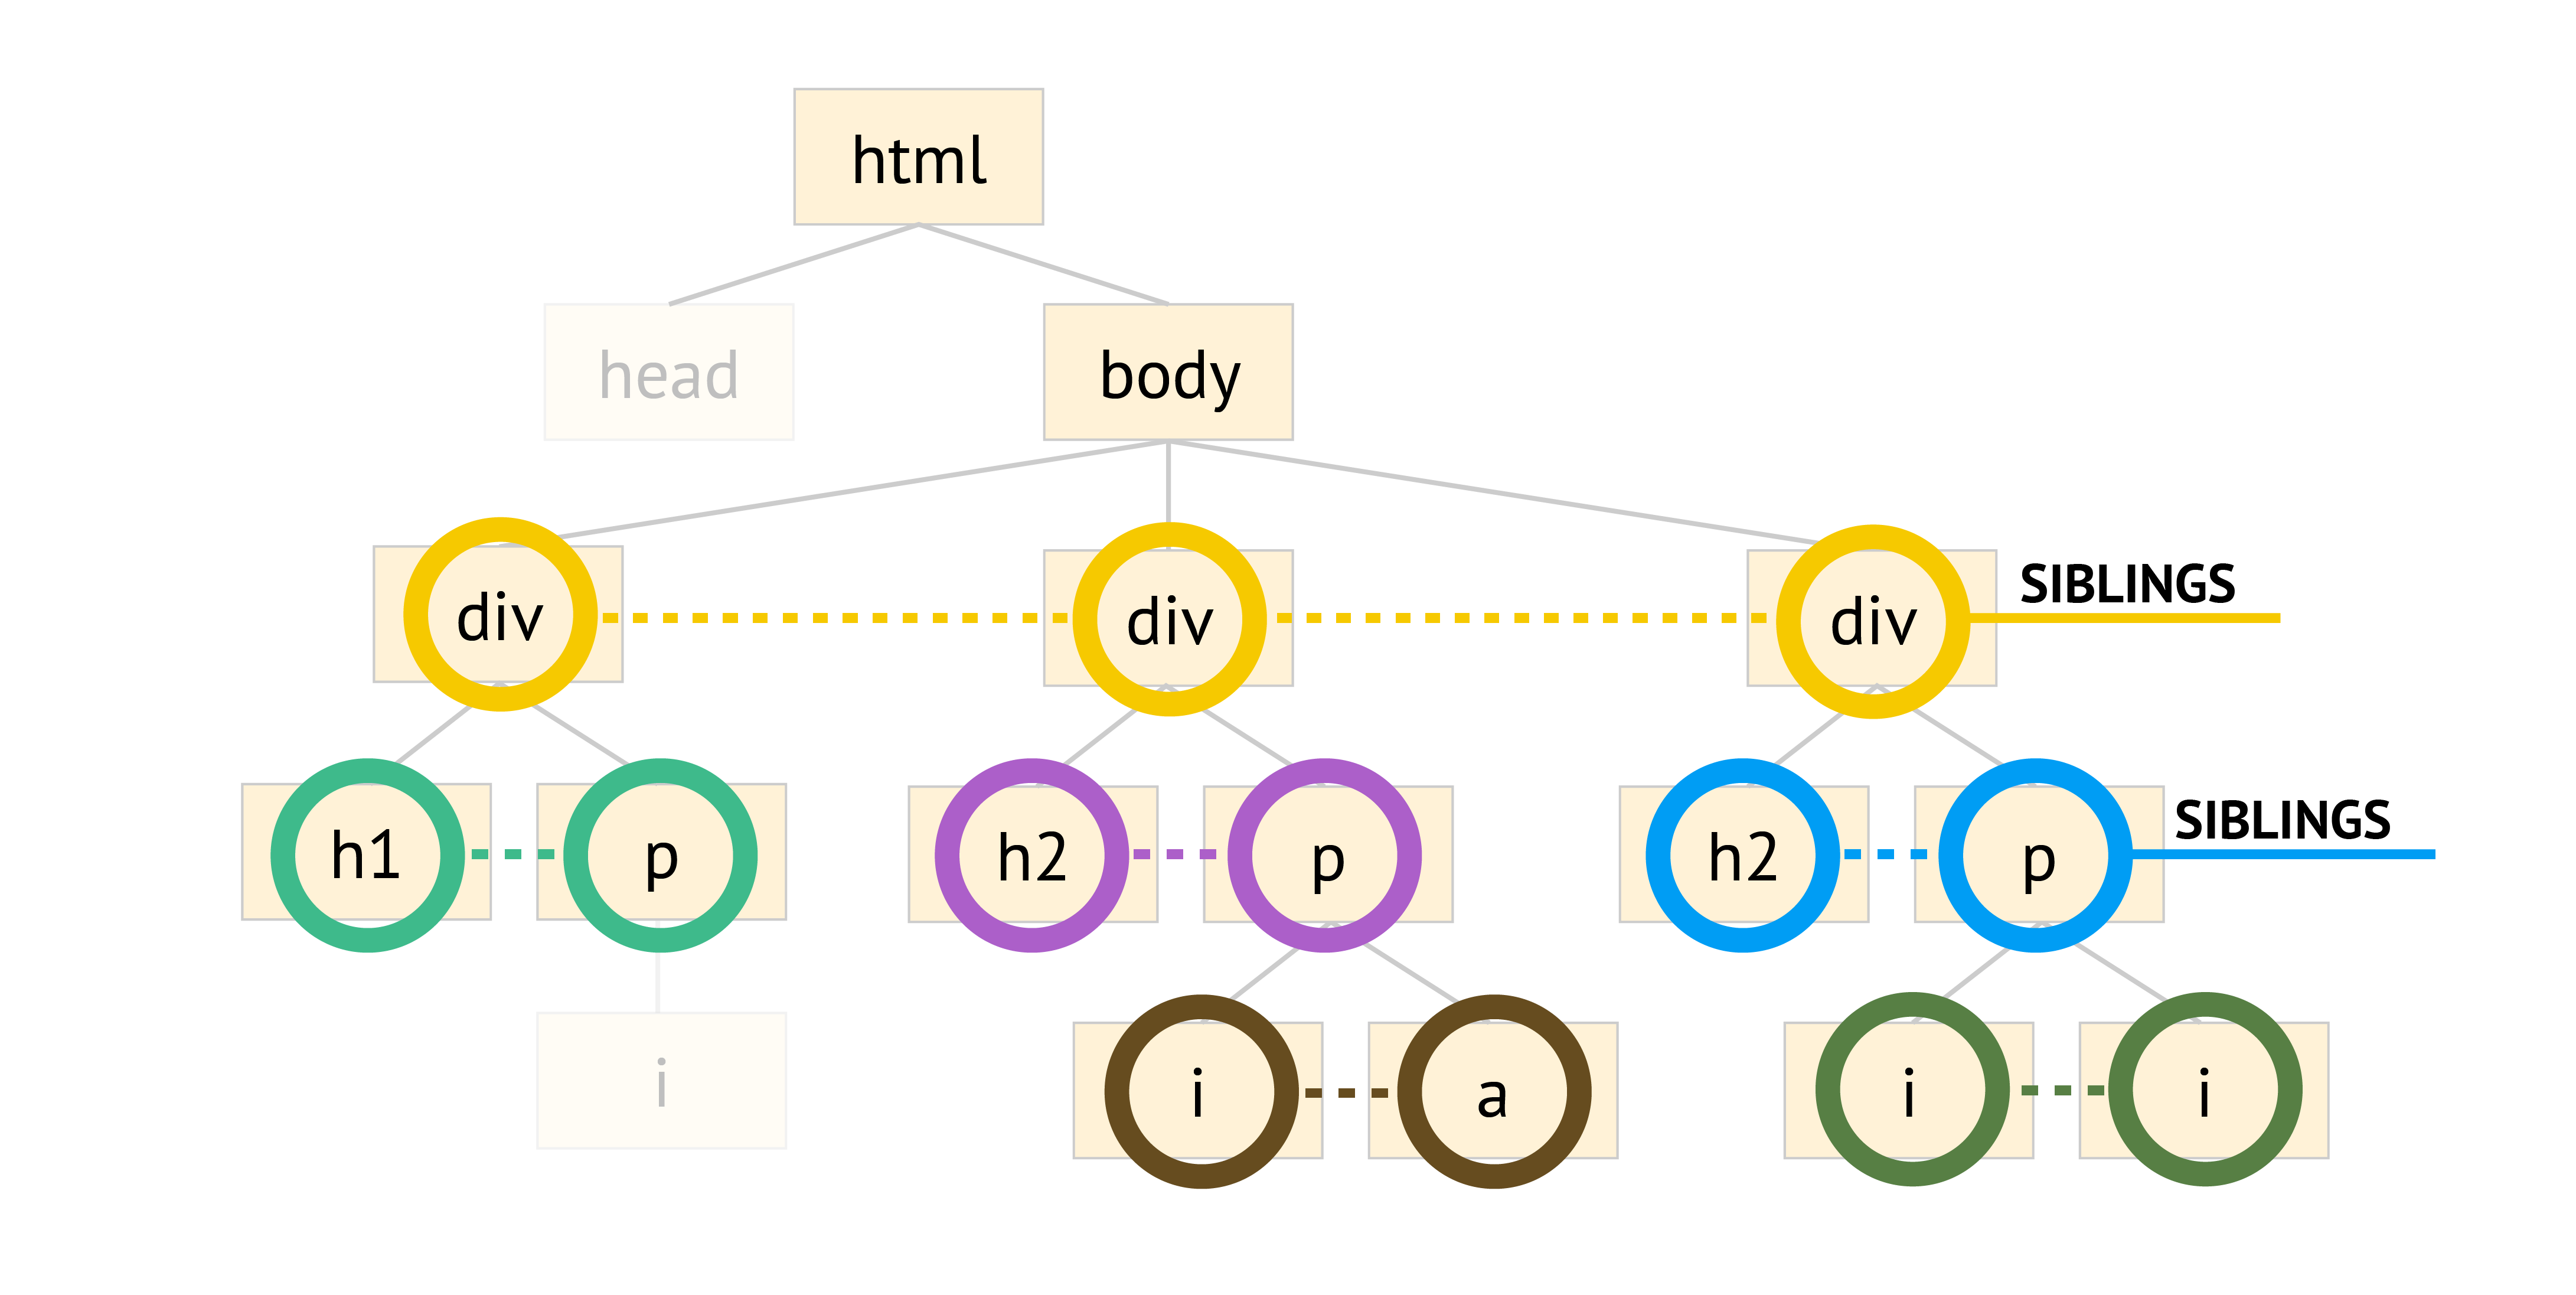
In the example, examples of elements that are siblings of one another are highlighted the same color. Note that sibling relationships are contained within the boundaries of their respective parent elements; in the diagram above, the blue siblings are siblings of each other, but not also of any other color of siblings.
Types of selectors
Why do we care about the Document Object Model? When CSS applies style properties to HTML elements, it must first match specific elements in the document to modify them, and CSS accomplishes this matching through the DOM. Every element in an HTML document will have one or more "hooks" by which CSS can grab them and apply new style properties. These hooks can be several different things – tag names, attributes, relative location in the document – and we will write CSS rules in a way to grab these hooks.
More specifically, we will hook onto our elements with CSS selectors. There are different kinds of selectors. Each kind is written in a slightly different way and matches elements through slightly different mechanisms. For our purposes, we will only care about three types of selectors in particular: simple selectors, multiple selectors, and combinators. Each of these is described in the next section.
We put CSS in the <head>
First things first: you may be wondering where our CSS code will go. Great question! When we write CSS rules, we have a couple of different choices about where we can put them in our document. For now, we will care about one location in particular: the head element. We will place any CSS that we write inside a new kind of element — the style element — and then place that entire style element, with all of the CSS inside of it, inside the head of our HTML document. Your template file demonstrates this; inspect the code to see for yourself.
In the following sections, each type of CSS selector will be demonstrated in code. As you follow along, make sure that you are placing your code in the style element provided in the template.
Simple selectors
The simplest of the possible CSS selectors we can use is called, quite appropriately, a simple selector. A simple selector can match any element based on one of three things. The first of these is the tag name. For example, consider the following CSS rule:
p{font-family:Georgia,'Times New Roman',serif;font-size:14pt;line-height:22pt; }
The selector in this rule, p, matches any element in the document whose tag name is p. Those elements may be located anywhere. All that matters is that if an element has the tag name p, then it will be matched by this selector, and it will receive the style properties assigned to it.
We can write a simple selector like this using any kind of valid HTML tag name: p, img, div, ul, li, a, etc. (We can even apply styles to the html and body elements!) This gives us some variety in what kinds of properties we can assign in a document, but our creativity is limited by what HTML tag names are valid. The two other kinds of simple selectors expand our horizons.
One of these is a simple selector based on the value of the attribute named class. Recall that HTML elements may have zero or more attributes, and these attributes describe additional properties of any given element that tell us more about the contents inside of them. An important attribute that is available for any kind of element is named class. We can use the class attribute to indicate what category or group an element belongs to, independent of its tag name. The value we assign to the class attribute can be any valid word, or sequence of letters, numbers, and special characters, that we make up ourselves. We can then match these elements through a simple selector that matches based on the value of the class attribute.
We indicate a class-based selector using a dot (.). The dot comes immediately before the value of the class attribute we want to match. For example, consider the following rule:
.myClass {
    ...
}
The word “myClass,” which comes immediately after the dot, indicates the value for class we want to find in the document. If we look inside the HTML, we see we have some elements whose class attribute has a value of "myClass." These are the elements that will be matched by this selector. Also note that there is another element in the document that also has a class attribute defined, but its value for class is "sidenote"; this value of "sidenote" is not the same as "myClass", so this element will not be matched by the selector .myClass.
Lastly, there is one more important type of simple selector: a selector that matches based on the value of the id attribute of elements. In addition to class, another attribute that is available to any element is called id. While a "class" is typically used to generally define the group to which an element belongs, an "id" is typically much more specific. For example, as members of the Northeastern community, we each have an NUID, a sequence of numbers that is unique to each of us individually. This NUID uniquely identifies us among the campus community. Our "class" might be defined by things like literal class year, college, major, or faculty versus student status; as a result, more than one person can belong to any of these categories simultaneously. In contrast, our "id" (NUID) will never be shared with anyone else on campus; for every possible value of this ID, there will only ever be one corresponding member of the Northeastern community with that ID.
This same idea applies to HTML elements. Ideally, if we assign an id to an element, the value of that attribute should be distinct and unique to only that element. If we then use this id to match elements through CSS, then this means only a single element will be matched.
We indicate a selector based on the value of the id attribute by using the pound sign #. The word or characters that immediately follow the pound sign indicates the value of id that we want to search for in the document. For example:
#introduction {
    ...
}
In this selector, we are searching for any element whose id attribute has a value of "introduction". We’ll note that there is indeed an element in the HTML that matches this condition. This element will be matched by this selector, and its appearance will be modified by the properties we define inside the rule.
Fill out the template provided with the CSS rules demonstrated at the right. Periodically save your HTML file and refresh the page in Chrome. For each rule, notice the following:
- Which elements are changing in appearance, and how does this connect back to the selector indicated?
- What do you think each of the properties inside the rule is doing to change the appearance of those elements?
Some property names may cause changes that are expected, based on their name; others might seem more mysterious in what they are changing. Take note of what you observe. Also, try changing the values of properties to see how they change what gets displayed in the browser. Does anything surprise you?
Multiple selectors
After simple selectors, the next most common kind of selector is called the multiple selector. A multiple selector is simply two or more individual selectors that have been joined together in a single CSS rule. We use a multiple selector when we want to apply the same list of style properties to multiple HTML elements at the same time, but when those elements cannot all be matched by a single selector. For example, say we have multiple h1, h2, and h3 elements in a document, and we want them all to be the same size font. Since these are all different tag names, we cannot write a single simple selector to match them all simultaneously, so we can use a multiple selector to match them all together and apply a common set of style properties to them.
We indicate a multiple selector by writing two or more valid individual selectors and placing commas between them. Note that the individual selectors may be any kind of selector, whether that is a simple selector or something more complicated. We read a multiple selector as “find any element that matches either this first selector or this second selector (or this third selector, etc.) and apply the following style properties to those matched elements.” For instance, the following CSS rule features a multiple selector, based on the heading element example from the previous paragraph:
h1,h2{ ... }
The selector above reads "find any and all elements whose tag name is either h1 or h2, and apply the following style properties to them."
Note that using a multiple selector is simply a shorthand that helps us avoid writing the same CSS over and over again! Instead of using a multiple selector for two different kinds of HTML elements, we could write two separate CSS rules, giving each a different selector but the exact same list of style properties:
h1{ ... }h2{ ... }
This is perfectly valid, but it produces redundancy, which can make our code less efficient and more prone to errors. If we want to change the font size across all the headers, we would have to individually change multiple separate CSS rules, whereas if we use a multiple selector, we only have to change this property value at one location in our code.
In the example at the right, we are creating a multiple selector to grab and then style all ol and ul elements in the document. Notice how the properties assigned here are the same as the properties we assigned in the p selector from above. Why do you think we are doing this? What do you notice about the font of the bulleted and numbered lists in the document before adding this new CSS rule? You may be surprised to see that the text of the lists doesn't change automatically to match the style of the text in the p elements. This is a reminder that CSS rules are extremely specific in which elements they match and thus apply style properties to!
Combinators
Finally, there is one more kind of selector that we will care about: combinators. A combinator matches elements based on their structural relationship with other elements. Most commonly, this means matching based on nesting relationships.
Combinators can be difficult to understand, so let’s proceed with an example. We indicate combinators by listing two or more individual selectors and placing spaces between them. For example, examine the following rule, which features a combinator selector:
ol li {
    ...
}
We read a selector like this from left to right:
-
Find any element that matches the selector
ol; this means any element whose tag name isol(i.e., an ordered list) -
Then, look at any and all elements nested inside of those matched elements from the first selector. If any of those nested elements matches the second selector (tag name
li), then those nested elements receive the applied style properties.
There are a couple of critical notes about this. First, the nested element we are searching for can be anywhere inside of the outer element, and at any level of depth. In other words, the nested element must simply be a descendant of the ancestor in the selector. (Here, ol is the ancestor, and li is the descendant). Second, only the nested element(s) gets styled. In other words, only those li elements that are matched by this selector receive the style properties; the ancestor ol element(s) do not receive the style properties also. This is critical! If we also want to style the ol elements with the same properties, we must create a separate CSS rule that matches the ol elements independently.
What do you think the style properties at the right are doing to change the appearance of these lists?
Bonus styles
Let us reiterate: there are hundreds of CSS style properties we can play around with. Just like HTML, CSS can be infinitely variable, allowing us to mix and match different properties to different visual effects. In this last part of the template, you'll find some bonus CSS rules. Can you guess what these rules are doing inside the document?
We'll see more style properties as time goes on.
Mixing and matching selectors
These three kinds of selectors can be mixed and matched in any way. For example, we can use class- and id-based simple selectors in multiple selectors and combinators:
.myClass p{ ... }#introduction .myClass{ ... }#introduction, .myClass{ ... }.myClass p, #introduction{ ... }.myClass p, #introduction a, p img{ ... }
As you might imagine, this can get very complicated very quickly. (Can you figure out what each of the above selectors will match?) When we create such complex selectors, we are really creating Boolean search expressions that match elements using Boolean operators like AND and OR — much like the database search techniques you may have learned from librarians who help you find scholarly articles for the works cited section of a research paper! If you remember the days of drawing Venn diagrams, we are essentially constructing Venn diagrams through CSS. Certain elements will fall inside or outside our regions of selection in our document, resulting in very complex operations.
Key ideas
We will get more practice with CSS in class and through the homework for the coming week. For now, the absolutely critical ideas you should be able to take away from this are the following:
- HTML should only be used to represent the contents of a document; if we want to change the visual style of those contents, then we use the CSS language
- To apply style changes to contents in HTML, we write CSS rules to tell the browser which elements we want to change in appearance and how to change that appearance in terms of visual aspects like size or color
- Every CSS rule consists of a selector, which determines which elements to change in appearance (based on matching elements in the Document Object Model), and a list of style properties and values (a declaration block), which determines how to change the appearance of those elements
- Selectors can be of different types, but the most important types we will care about are simple selectors, multiple selectors, and combinators
Finding properties
There are hundreds of CSS properties available to us; in this demonstration, we've only seen a tiny handful of especially useful ones. We will only care about a small percentage of all available properties, but if you are interested in seeing more, you can explore the list at the W3Schools CSS Reference: https://www.w3schools.com/cssref/default.asp