First steps with HTML
Background: Meaningful partitions
A useful place to start understanding programming for the web is the language that forms the foundation of the internet: HTML. An HTML document is a web page whose structure and content is described through HTML code. Every time you go to a URL with a .html extension, you are viewing an HTML page; whenever we load an HTML page inside of a web browser (Chrome, Firefox, Safari, etc.), what we see is a visual rendering of the HTML code.
HTML stands for hypertext markup language. A markup language transforms plain content into structured content, and this structured content is what gets interpreted by a machine. By "plain content," we mean things like plain text with no visual formatting, or image and video files; by "structured content," we mean content that has been organized and described in a systematic and structured way.
The vast majority of content we see and encounter in the world is structured in some way. For example, we are accustomed to seeing web pages as they are, namely well-formatted content that has been designed for human reading. But behind what we see is plain content that a machine (such as a web browser) has organized for our consumption. In reality, a lot of things are happening behind the scenes whenever we load a web page in our browser. This seemingly simple act is a series of smaller actions, featuring a relay of requests and responses passed between the browser and the server to which the URL points. The details of this process are not important, but there is one thing we must pay attention to: when we write HTML code, we are writing a series of instructions that will tell a browser what contents need to be loaded into a web page and how they are structured. If a web page has text and images, or any other variety of content, we must indicate this to a machine through HTML.
Why is this necessary? Content can be many different things, and humans are great at telling the difference between these things, even when given no information about what we are looking at. Machines, on the other hand, are terrible at this. Without being given explicit, detailed instructions, they are extremely limited in their ability to partition the contents of a document into meaningful parts.
This is where HTML comes in. We use HTML to give machines (in particular, web browsers) specific instructions about how to meaningfully partition a document, i.e., divide a document into units of meaningfulness. Here, “meaningful” is based on two primary observations:
- the contents being described are distinct in type or variety
- there are structural relationships between the units of meaningfulness, and those structural relationships themselves are also meaningful

Let's consider a real-world example. The image to the right displays a particular scene — a desk. What kinds of objects are in the photo? We have pieces of furniture, decor, electronics, papers, and books. We might identify specific kinds of furniture, such as the desk, or classify ambiguous items by another category, such as the desk lamp. These items are distinct, not only in terms of physical nature but also in terms of their function and utility. In addition, there are spatial relationships between these items. Some of the papers are inside of the magazine file; certain books are placed in certain stacks, and those stacks are positioned in front of or behind one another.
In order to fully represent what is inside of these scenes, we must include information about the variety of items and how they relate to each other, in structure and in space. But while structure and spatial relationship may seem straightforward, deciding what kinds of items we have is deceptively difficult. For example, is each individual book a distinct item, or is a stack of books an item itself? We can ask the same question about the papers in the magazine file. And is there a difference between a book, a pamphlet, and a collection of papers stapled together? Aren’t these all some kind of paper with a binding? Do these questions even matter?
When interacting with these kinds of items in the real world, we typically don’t have to think about these questions, nor do we care. But when translating the real world into a machine-readable representation, these questions are essential and unavoidable. Certainly, some partitions make more sense than others; we’re unlikely to care about counting each individual page in a book as a separate item, since they are part of a book — and we tend to relate to books as whole objects, not as collections of individual pages bound together. The book as a complete object has a functional significance that is more meaningful than the individual pages in isolation.
In HTML, we encounter the same questions, but with different kinds of objects. Instead of representing furniture, pens, or books, we'll be asked to represent digital artifacts like paragraphs, bulleted lists, and images. Most of the time, these distinctions will feel obvious, but sometimes, we'll be challenged to decide whether our content should be a bulleted or a numbered list, or if some text should be captured in a heading or in a paragraph.
Fortunately, the folks who have developed HTML have thought a lot about these questions and have created mechanisms for dealing with them. It turns out that we do not need a whole lot of mechanisms for describing literally any kind of document possible.
In this demonstration, we'll get hands-on practice reading and writing simple HTML code, observing how these questions get wrapped up in how HTML has been designed itself.
Key principles
Before we proceed, let's briefly note some key principles of HTML, since we will encounter these in our demonstration. These concepts will be explored in greater depth in the demonstration (next section). For review, please refer to the slides provided on Canvas for this unit.
HTML is composed of elements
We use HTML to describe and represent different chunks of content. We do this by creating things called HTML elements. An element is a block, chunk, or unit of meaningful content, whether that be a sentence, paragraph, image, hyperlink, or anything else.
A single HTML element is comprised of an opening tag, some contents, and a closing tag. Each opening or closing tag is a sequence of some special characters, a tag name that describes the type of content, and optionally, some attributes that further describe specific properties of the content. We will see examples of these below.
Elements can be nested
Elements exist in structural relationship to each other. Sometimes elements will sit side-by-side, but other times, we will place one HTML element inside of another one. We call this process nesting, or say that one element is nested inside of another one. Here, "nesting" means complete encapsulation; any "crossing of tags" between nested elements is not allowed. (In terms of syntax, the closing tag of a nested element must come before the closing tag of the container element.) Nesting tells us information about structure and hierarchy, or how different elements are related to each other.
Elements are block-directed
Every HTML element occupies a rectangular region of space when rendered in the web browser. Since the size of this space is dependent upon the size of the content of the element (e.g., a long paragraph versus a single sentence), the proximity and order of different-sized elements affects how the content gets laid out. Because of this, we say that HTML is block-directed, which is just a technical way of saying that larger content takes up more space on the screen than smaller content.
Getting set up
In this demonstration, we're going to create our own basic HTML document. To make this work, we need to understand how to use an IDE (an integrated development environment) and what it means to open an HTML file in the IDE versus opening it in the web browser.
Download the provided zip folder (available on Canvas). This folder includes template files for following along with the demonstration below. In this demonstration's template folder, you'll find two primary items: an HTML file named index.html, and a folder named images, inside which you'll find an image file named nu.jpg. Notice that the index.html file has an extension of .html: this extension indicates that this file is an HTML file. Typically, computers do one default thing when they encounter anything with a .html extension — they try to open the file in the web browser. If you double-click the file on your computer, most likely it will be opened in your default web browser (e.g., Chrome, Firefox, Safari, etc.).
This is helpful for seeing what the HTML file looks like, but we can't do anything else with it! If we want to modify the contents of the file, we need to open it in software that allows us to edit the file as plain text. To do this, we can use an IDE, or integrated development environment, which is another word for "code editor." In our case, we will be using Visual Studio Code as our code editor, so we need to open our template files in that software. There are a few ways you can do this, including using the File > Open... menu option in Visual Studio Code and selecting the file of interest from the file browser, or right-clicking the file in the file system explorer window and selecting Open with... from the context menu. These approaches will open a single file, but for our demonstrations, we'll often have more than just one file and will need to move between those different files. So we're going to follow a different approach: using VS Code to open up the entire directory of files as one group.
There are two methods for opening a directory of files. In this case, we want to open the entire "week1-html" template folder in VS Code. One way to do this is to drag the folder name itself (not anything inside of it) from the system file explorer directly into the VS Code application icon (e.g., the dock on Mac OS). Another way is to select File > Open... from the VS Code main menu and then select the name of the template folder ("week1-html") to open, without selecting any of the files inside of the folder itself. When you open the template folder through VS Code, a new workspace window will open, with all the contents of the folder visible on the left side of the screen.
Once you have opened the folder in VS Code, click the index.html file from the directory listing to open the editor window for this file.
The terribly annoying save-refresh cycle
When you open index.html, you'll notice it is nearly empty — there's just one line of code inside of it! This is intentional. We are going to build our first simple HTML document from the ground up. However, we also will want to see the results of the changes we make in the plain HTML. To do so, we will need to open our HTML document not only in VS Code but also in our web browser.
Go ahead and open index.html in Chrome. (You may use another favorite default browser, but all demonstrations this semester will rely on Chrome.) You should now have two copies of the file open, one in VS Code (the HTML document itself), and one in Chrome (the file as a web page).
As we work through the demonstration, we'll need to repeatedly save the changes we've made in VS Code and then subsequently refresh the page in Chrome. We'll need to do this every single time we want to see the result of our changes in VS Code. This cycle of saving and refreshing will get tedious and annoying, but we don't have any other way around it — yet. Later on, we'll see a shortcut to make this process less tedious.
If you make a change in VS Code and don't see the change reflected in the browser, or if something isn't working as expected, make sure you double-check that you've saved the file and/or refreshed the page in Chrome.
Basic HTML structure
In the next section, we'll begin with an exploration of the basic structure of an HTML document, including all the minimum pieces we need to make a valid document. Then, we'll fill this document with simple kinds of content, exploring some of the most common and basic tag names available for describing content through HTML.
The document type declaration
Before we can describe any content through HTML, we need to tell the browser that we will be writing code that should be interpreted as HTML. To do this, we begin our document — at the very top, on the very first line — with what is called the document type declaration. This is a standardized line of code that tells the browser to “read the following code as HTML.” The sequence of characters and capitalization is important, as is the presence or lack of spaces. This declaration is given already at the very top of your index.html file; practice typing it yourself. (This declaration should only occur once in any HTML document.)
This specific declaration indicates the document is written with HTML version 5; previous versions of HTML used to have different declarations. We must include this line at the top of every HTML document.
Working with elements
After the document type declaration, the rest of the document will be composed with elements. An HTML element is a chunk of content that we want to describe in the document. Every element consists of an opening tag, which indicates the start of a chunk of content; a closing tag, which indicates the end of a chunk of content; and some contents, which is the stuff we want to describe (text, images, hyperlinks, etc.)
Both the opening tag and closing tag of an element is written as a combination of some special symbols or characters and a tag name. The tag name describes what kind of content is being represented. Different tag names have different meanings in HTML. Some tag names provide purely structural information. These varieties of tags are described in the next section.
The <html> element
Following the document type declaration, the next essential piece we need is the html element. The tag name of this element is "html." This is also known as the root element; all of the stuff we want to be described in the document must be encapsulated inside of this element. Like the roots of a tree, this element forms the foundation of the entire document.
Notice that the closing tag for this element is identical to the opening tag, with one exception: there is a forward slash before the tag name. This forward slash indicates that the element is being closed. Don't forget to include this! Otherwise, our page may not render correctly.
Nesting elements
In addition to representing what kinds of content we have, we also need to represent how those elements are related to each other in terms of position, structure, and hierarchy. In HTML, this is accomplished through nesting.
Nesting simply refers to placing one HTML element inside of another HTML element. A good metaphor for this is nesting dolls: every time you open the outer layer, you find another doll inside, and this discovery is recursive, meaning the same procedure happens over and over again (open a doll, find another doll inside; open that doll, find another doll...) In terms of our HTML code, this means that the inner element's closing tag comes before the closing tag of the outer element. The inner element is completely encapsulated inside of the outer element.
The html element has two other elements nested inside of it: head and body.
The <head> element
The head element is the first element inside of html. We will use this element to encode metadata about the page, such as the title or character set of the web page. The contents inside of the head are not visually rendered by the browser as contents inside the page. Instead, we will use this part of the document to control how the document is visually styled and how it gets crawled by search engines.
The <body> element
The body element comes second, after the head, and is the core of the document. This element holds all of the document’s contents that will be visually rendered by the browser. If we want something to show up in our web page, we must put it inside the body.
Adding a title
The title tag is used to declare the title of the document. Remember that markup in the head element is used to encode metadata, and never contents to be rendered on the page. If you add the title element to your HTML document, save in VS Code, and then refresh the page in Chrome, you'll see that nothing appears.
Although the stuff we put inside the title element doesn't appear in the viewport of the browser window, browsers will by default display this title elsewhere in the window: as the name that appears in the tab or the window itself. In Chrome, you should see this title reflected in the currently active tab. If you change this title and refresh, you'll see the new title appear.
Adding comments
There are other ways we can add stuff to HTML in a way without making them render in the browser. One of these ways is through comments. In any coding language, a comment is some sort of extra annotation (or comment) we can insert into code without it being interpreted as though it is actually code. This is useful for a variety of reasons, such as explaining why we wrote code in a certain way, providing instructions to someone else reading our code, or citing code that we found from a source on the internet. Every coding language has a slightly different convention for how to declare comments, and unfortunately, HTML's approach is ugly and awkward.
The example to the right demonstrates this. Notice the sequence of characters:<!-- PUT SOMETHING HERE -->
The stuff we type into PUT SOMETHING HERE doesn't get displayed or rendered in the browser. In this example, we are inserting two comments to simply remind ourselves that the head element holds metadata about the page, and the body element holds the contents that will be rendered in the browser. Comments are completely optional, and we can put comments anywhere in our code, except inside of opening or closing tags.
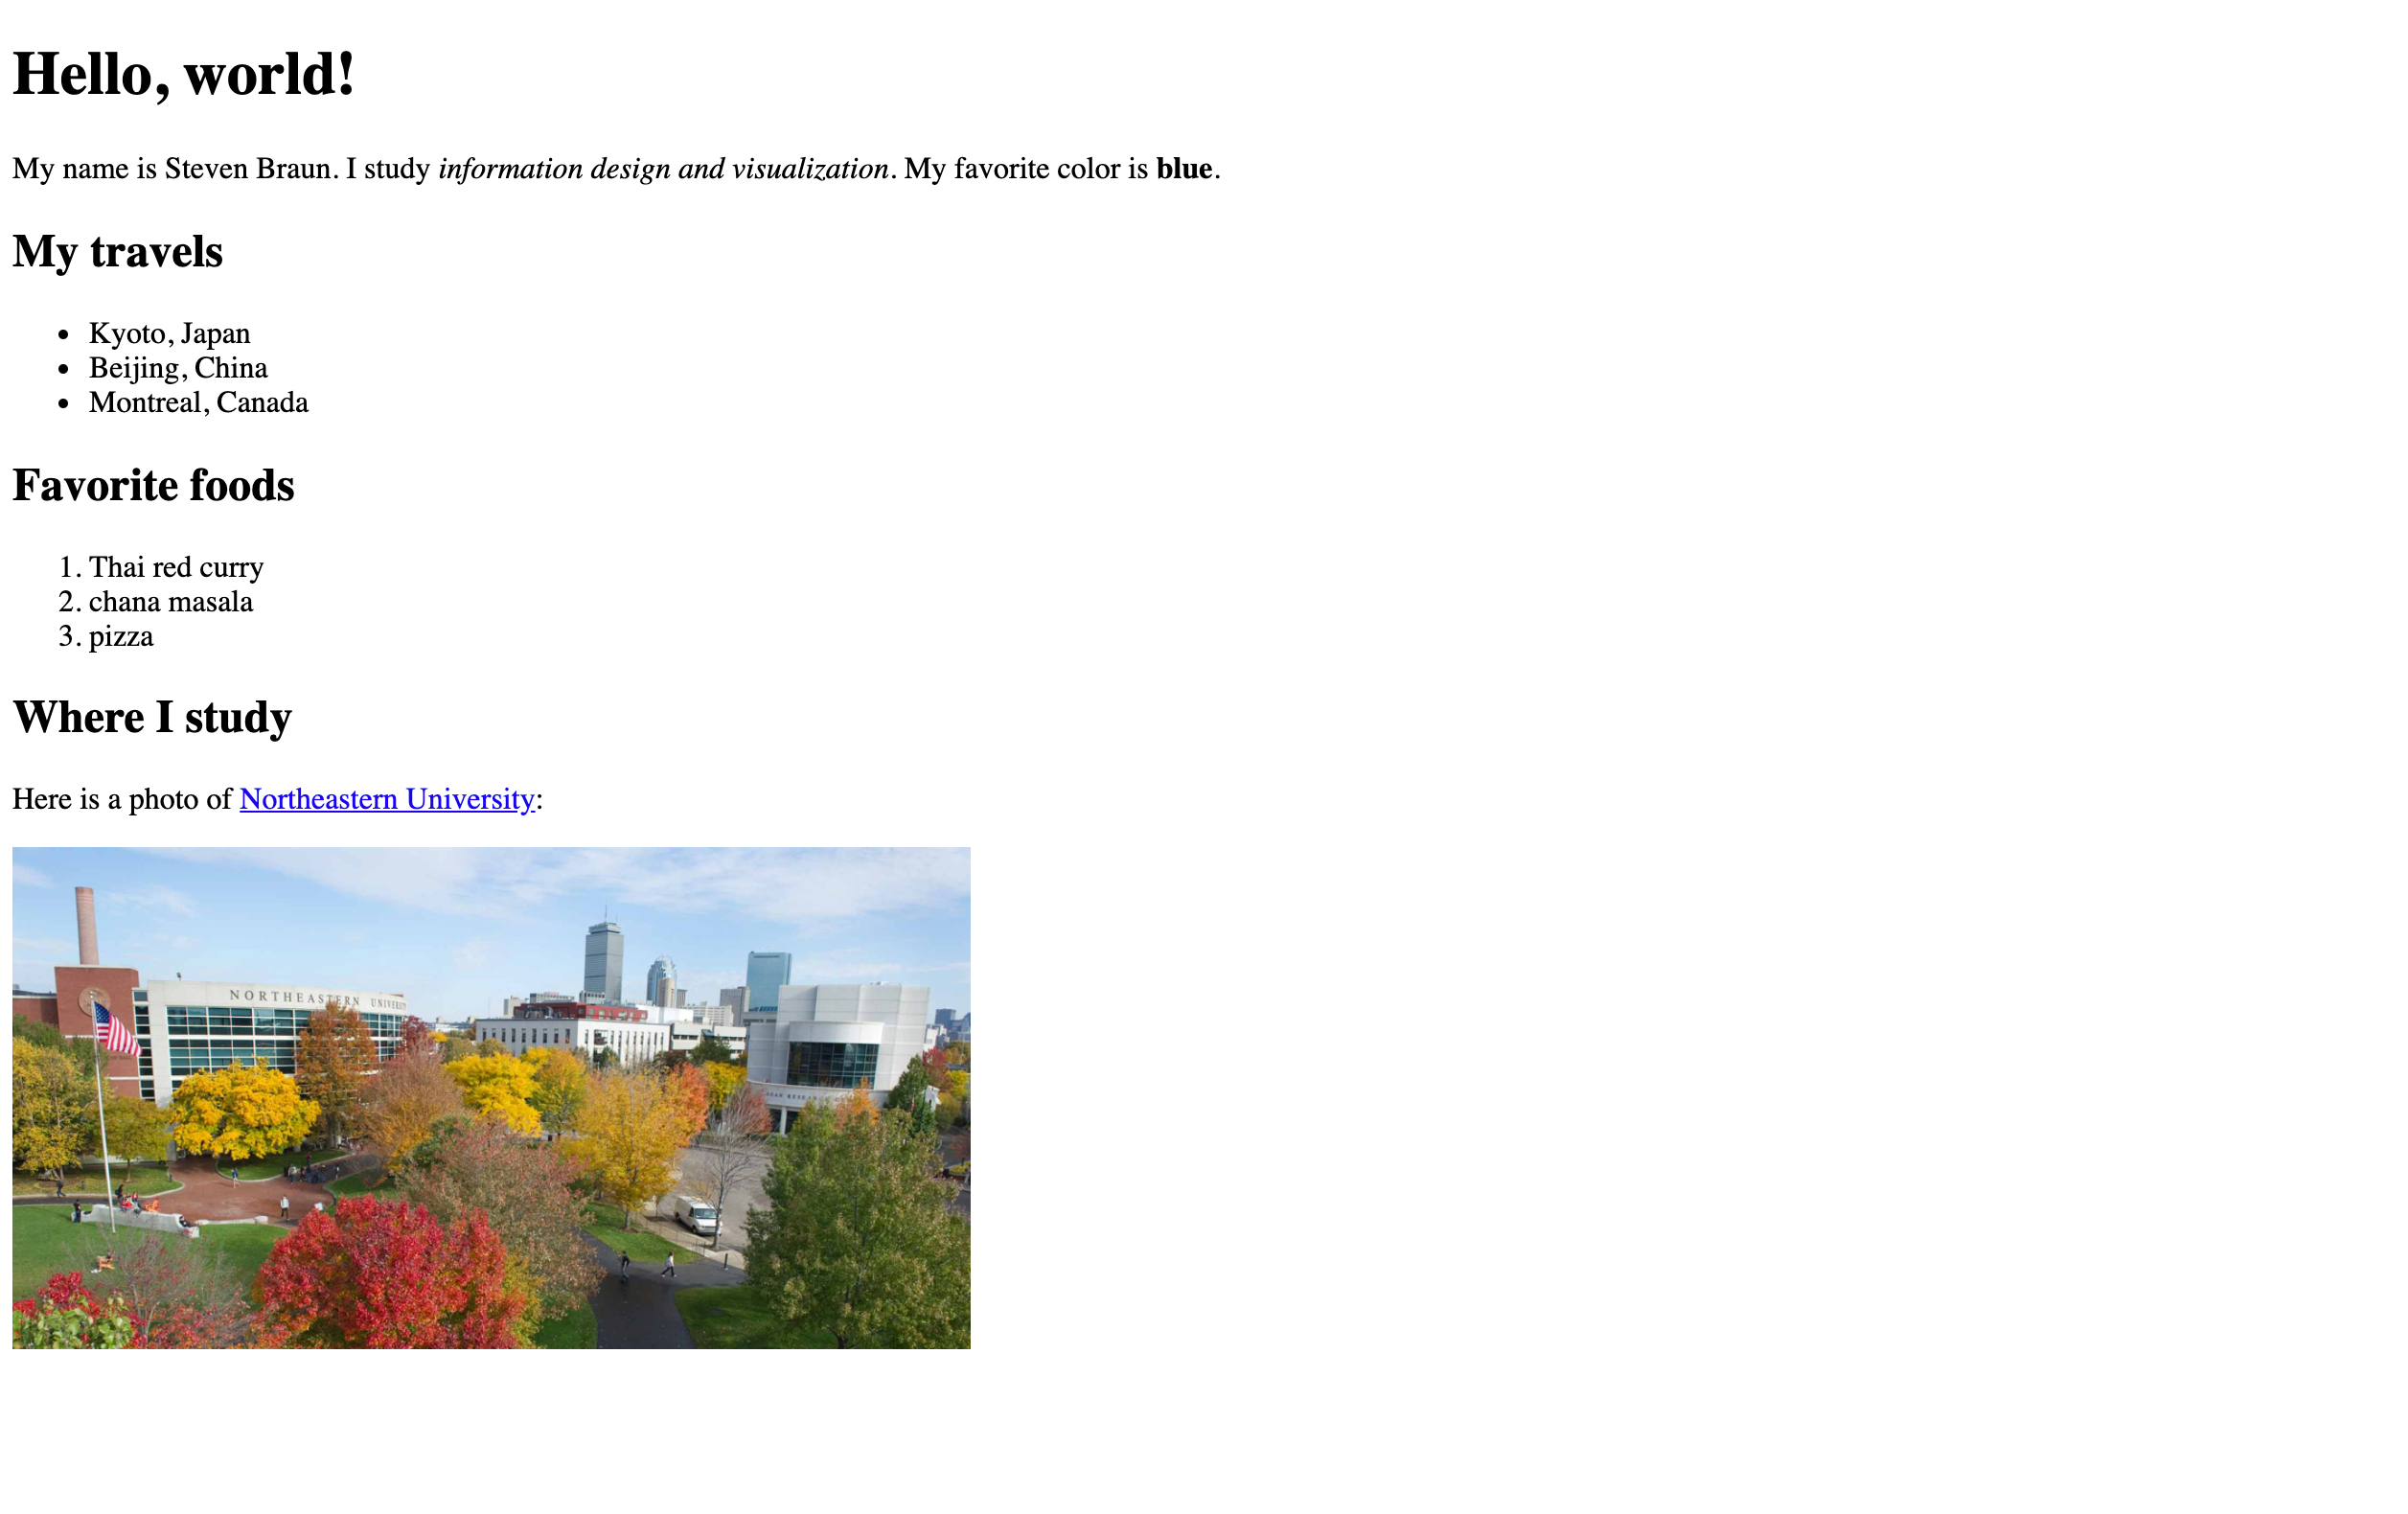
Hello, World!
The above elements make our HTML document minimally complete. (Note that the comments are entirely optional; they aren't required to complete an HTML document.) But if we save and refresh the page in the browser, there's nothing to see! Let's populate our HTML document with some basic kinds of content.
We will start by inserting an element with the tag name h1. The 'h' stands for 'heading,' and the '1' indicates the highest level of precedence for the heading. In HTML, there are 6 basic heading tags (h1, h2, ... , h6), each of which corresponds to a descending rank of hierarchy. The h1 tag is used to describe a top-level heading of a document.
Anything we put inside of this element will by default be rendered by the browser in large font size, taking up a large amount of space on the screen.
Our first paragraph
After creating our heading, let's create some paragraph text. In HTML, we use the p element to describe a paragraph (hence the 'p'). Insert this paragraph in your document, replacing the content with your name, what you study, and your favorite color.
We can have as many paragraphs as we want in an HTML document. For every paragraph, we simply need to insert a new p element, wrapping our text inside of it.
Bold and italic
We can embed additional tags inside of a p element to provide more detail about various properties of the text. For example, the b element and i element are both used to represent text that should be made visually distinct. Unfortunately, these tags do not communicate much in the way of semantic value, but browsers have come to render them in a default way: as bold and italic text.
Notice that these b and i elements are nested inside of the p element! One way to think about this is that the text being made bold or italic belongs to the larger p paragraph text. Nesting is a way of expressing belongingness.
Another header
We noted before that there are 6 basic levels of headings in HTML. Previously, we created an h1 element to indicate a highest-level heading in the document. Here, we will create another heading using the tag name h2, which describes a second-level heading.
Heading levels also indicate levels of hierarchy. Imagine you are writing a paper for a class. Your paper has a title, and several sections, each of which has headers. Inside of those sections, there may be sub-sections, which themselves have headers. In this example, the title would be a first-level heading (h1), the section headings would be second-level (h2), and the sub-section headings would be third-level (h3).
An unordered list
In this next part, we're going to create a list of items. In HTML, there are two types of lists: ordered and unordered.
We will begin with an unordered list. An unordered list is a list of items in which there is no rank ordering of items. In other words, it doesn't matter what order the list items appear in. In HTML, the ul tag name is used to define an unordered list. By default, browsers display an unordered list as a bulleted list.
Adding list items
When we create a ul element, all we are doing is create a container to hold a potential list. Unless we specify what should be in the list, nothing will appear on the screen. In HTML, we use the li element to define a single item in a list (the 'li' comes from 'list item').
The contents we put inside an li element are what we want to see in the list. Every single bulleted list item must be encapsulated in an li element. In this example, use this tag to list at least 3 places you have traveled to.
Favorite foods
Next, we'll add a second h2 element. Remember that HTML headers encode hierarchy. In this case, this second h2 exists at the same level of importance as the first h2 we wrote above.
An ordered list
Under this second heading, we are going to create a list of our favorite foods, ranked in order of preference. The second kind of list in HTML, an ordered list, is perfectly suited for this.
An ordered list is a list of items in which there is a rank ordering of things. In other words, it matters what order we list those things in. In HTML, we use the ol element to define an ordered list (the 'ol' stands for 'ordered list'). By default, browsers display an ordered list as a numbered list.
Adding list items, again
We add items to an ordered list in the same way we do with an unordered list: using the li element. Use this tag to create a list of at least 3 favorite foods, ranked in order of preference.
When you save your code and refresh in the browser, you should notice that these two lists are displayed differently! We will learn more about why this is the case when we talk about CSS in the next unit.
One final header, and some paragraph text
We will add one more section heading to our document using the h2 element. Like before, this heading exists at the same level of importance as the previous h2 heading elements. (Imagine these are all the titles of sections in our term paper example from above.)
We'll add another p element after this header, introducing where we study.
Adding an image
So far, everything we've added has been some kind of text. We can add images to our HTML using the img element, which is short for 'image.'
The img element is special in a couple of ways. First, this element requires certain attributes in order for it to display anything on the screen. An attribute is a property that we can define for an element that provides additional information about the element itself. There are many different kinds of attributes, and they all have different names; some attributes can be applied to any kind of element, while others can only be applied to certain kinds of elements. In the case of img elements, one attribute in particular is crucial: the src attribute.
The src defines where the file for the image is located. The value of this attribute will always be the filename of the image we want to display, including the file's path. The path of the file explains where to find the filename, and this path may either be an absolute path with a complete address, or it may be a relative path, defined relative to the current HTML file.
We will be working a lot with relative paths. A relative path is based on the file structure of a project. In our template folder, notice that there is a folder named images, and inside of this folder, there is a file named nu.jpg. This means that the file nu.jpg is located one folder away from the index.html file we are currently editing. If we want to embed this image in our HTML file, then we must point the browser to that folder relative to where the HTML file is currently located. We can indicate this action of "go down one folder level" using the notation "./[NAME OF FOLDER]/[NAME OF FILE]", which we are doing here with this example.
Add this attribute with the path given to your img element. Don't do anything with the other attributes quite yet. Save your HTML file and refresh the page in your browser. What do you see? The image is huge!
Without us giving any additional information, the image will be rendered by the browser in its original dimensions. This may not always be useful, especially for large images. In this case, we need to scale the image down a bit to fit inside our page. To do this, we can define another attribute: the width attribute. This attribute takes a value whose dimensions are assumed to be in pixels. In this example, we have defined the width of the image to be '500,' or 500 pixels. If we define the width of the image but not the height, the height of the image gets automatically scaled, using the same aspect ratio of the image. (The same happens if we define only the height of the image, using the height attribute, but not the width.) If you save your HTML and refresh the page, you should see the image is resized correctly.
Attributes serve a lot of useful functions. Some of these, like width, define presentational properties of an element. Other attributes can be used to define metadata. In our img element, we will add one last attribute named alt, which defines alternative text for an image. This is text that gets read by a screen reader, or text that gets displayed if the image can't be displayed (e.g., if the image can't be found or loaded). This attribute is technically optional (the image will still display even if we don't define it!), but it's considered required by the HTML5 specification.
Adding a hyperlink
In our template, we haven't added one of the most important types of content on the internet: hyperlinks. In HTML, the a element defines a hyperlink to another URL. (The 'a' comes from 'anchor.') Similar to the img element, this element requires at least one attribute to work correctly. That attribute is the href attribute, whose value is the URL we want to point to. In our example, we will wrap the name of Northeastern University in this tag name, and point the hyperlink to the Northeastern homepage.
Grouping content with divs
By this point, we've seen all of the key varieties of HTML elements. Most of these have been focused on specific kinds of content, but there are many other elements in HTML that are used for purely structural purposes. The most commonly used of these structural elements is the div element, which defines a grouped chunk of thematically-related content. This may sound very abstract, but it's really just an element for grouping together related, similar, or like content.
Let's return to our unordered list of places we've traveled. We might note that this section of our document consists of not only the bulleted list (the ul element) but also the heading element that says "My travels" (the h2 element). We might want to group these elements together to indicate in our HTML that they are part of the same section. We can do this by wrapping these elements inside of another element, using the div tag name. Notice that when we do this, both the heading and the bulleted list are now nested inside of our div container. This new element is purely a container; it holds or groups other elements together. We can use these elements in a lot of useful ways, which we'll learn more about this semester.
Whitespace
Throughout all of this, we've been careful about whitespace. Although the browser doesn't care about whitespace or indentation, they matter a lot to us as human readers. Imagine trying to read the HTML without using indentation to indicate nesting, hierarchy, and structure. It would be maddening!
The code at right is colored based on this indentation. This coloring mimics the coloring you should see in VS Code, using the Indent Rainbow extension you've installed. The coloring also indicates hierarchy and nesting. At right, elements that are indented with the same color all exist at the same level of hierarchy or nesting. In this way, indentation is an extremely useful tool for helping us as humans see and read how elements are structurally nested in our document.
Inspecting what we've made
We've completed our demonstration of basic kinds of HTML elements. If we save our document and then refresh our page in Chrome, everything should appear as expected. If something doesn't look right, review the code above again and see if you can figure out what the issue is.

As a last step in this demonstration, we're going to look at one more tool that we'll be using heavily this semester: the web inspector. This is a tool that's built into any web browser, and it gives us the ability to investigate what elements are inside of any web page. In Chrome, we can open the web inspector by selecting View > Developer > Inspect elements from the main menu. When we do this, a panel opens on the bottom of the screen that displays tabs with lots of information about the page we are viewing, including what HTML elements are inside of it.
The information the web inspector gives us can be quickly overwhelming. We will focus on using the inspector to investigate what's in the Elements tab only. In that tab, you should see code that looks identical to what we've typed in VS Code. All of these things are elements! If you hover over the elements, parts of the page should highlight, indicating where the contents of those elements are located in the page. If you click the arrows next to select elements, you'll see the element expanded to show what elements are inside of it.
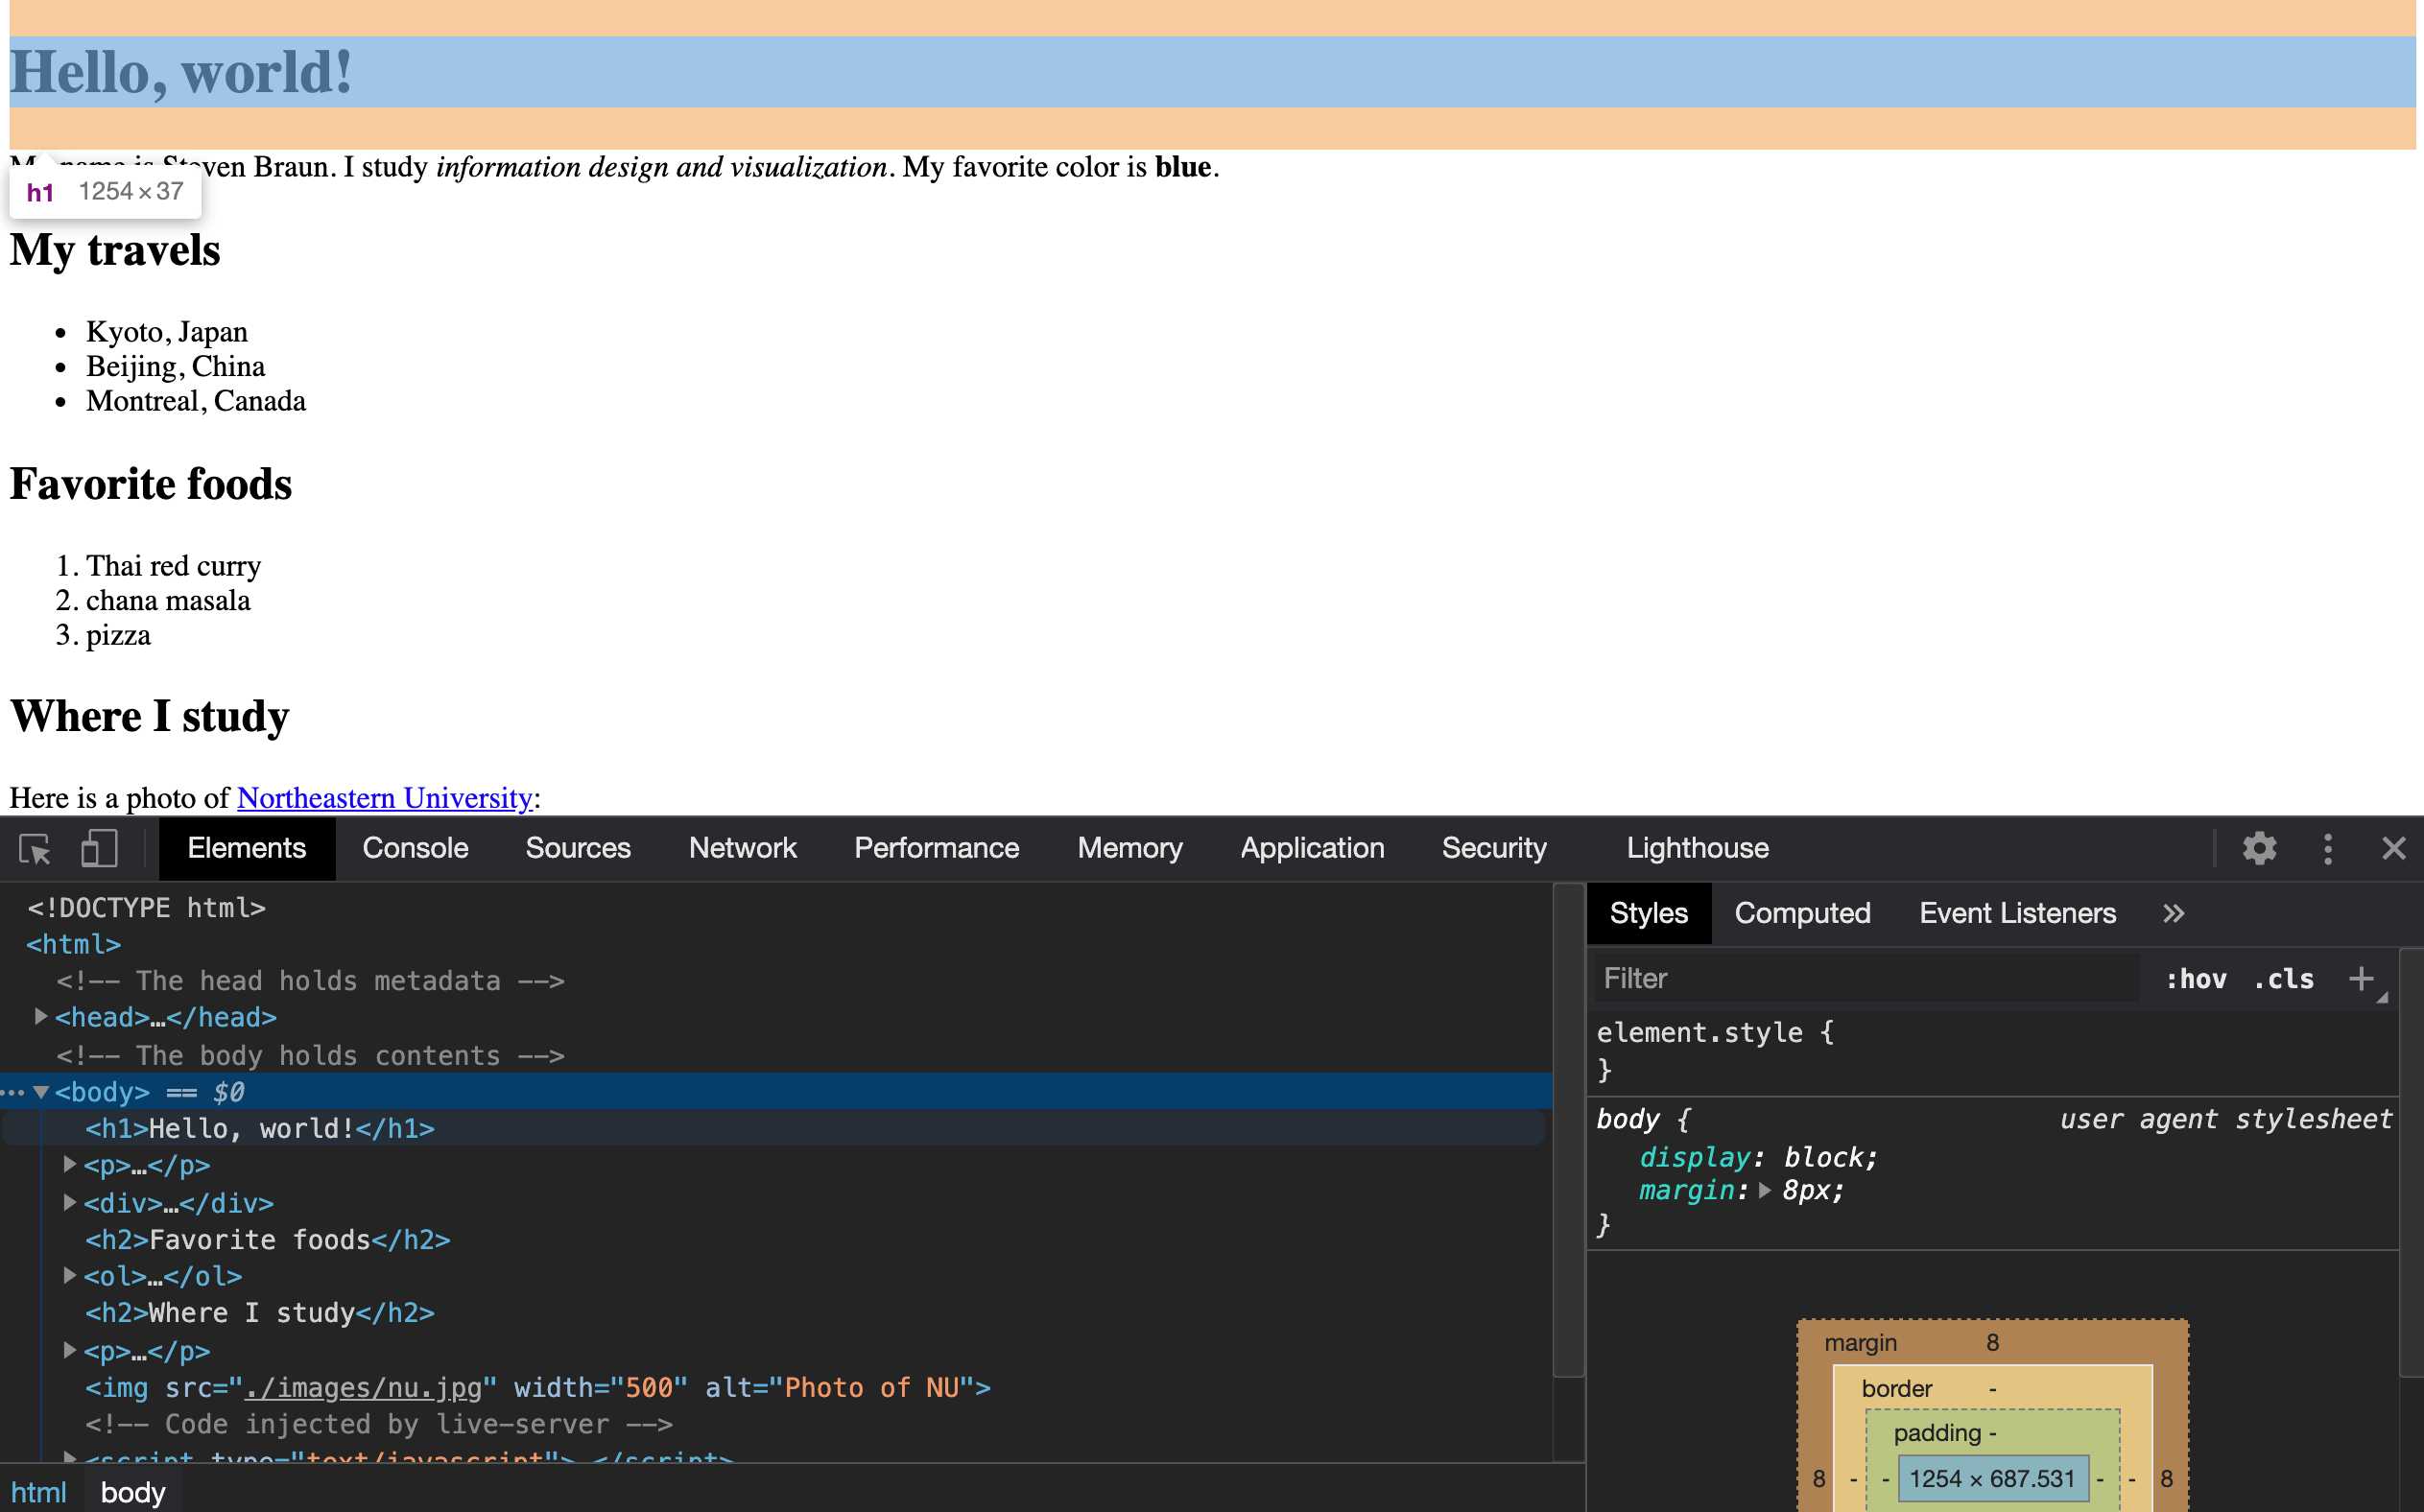
Play around with this inspector. Do you notice all the tag names we wrote in our demonstration above? Can you identify all of the elements we created? What do you notice happens to the content inside the page when you hover over different elements in the inspector? Feel free to explore and tinker; we'll be returning to this tool with every demonstration.