JavaScript Fundamentals
A new kind of code
The kind of code we have seen and written so far – HTML and CSS – has been mostly focused on declaring what it is we want to see. With HTML, we have some content of different varieties, and we want to represent the structure of that content in a way that is readable by ourselves and our machines; with CSS, we want our content to look a certain way, so we list out what visual style properties need to be changed and how. In all of these cases, our work has been primarily motivated by the necessity of translation, where we have some existing content in a real-world form (e.g., a news article) but need to wrap that content in such a way that a machine will be able to understand it. Through HTML and CSS, we learn how to "speak" about the same content in a mutually shared language between human and machine.
But such translation work is largely static in composition and one-directional in conversation. If we want to change some content in a page, we need to manually modify the HTML markup; if we want to change the visual design of that content, we need to manually modify the CSS. Every time we do this, we save our modified code, from which point it now exists in a new but still static form: whatever we save the code as, that code will always make our content look a certain way, at least until we go to change the code again. Eventually, we will want to make our content more dynamic, interactive, or responsive to user input. To make this possible, we will need to turn to a new language: JavaScript.
While HTML and CSS form an important foundation for our work moving forward, we will spend the vast majority of our time writing in the JavaScript language (and in D3, which is another expression of JavaScript) to design creative applications that do more than simply present some content. JavaScript is a new kind of code that we will use to fully leverage the dynamic and interactive potential of the web browser, and it will interact with our HTML and CSS code to augment what each type of code can do on its own.
Before we begin, we need to accept that JavaScript will be more difficult to learn than HTML and CSS. While the code patterns we have seen so far have been simple and produce predictable and straightforward outputs, our work with JavaScript will force us to bend our thinking in sometimes uncomfortable ways. Thus, as we begin our journey, I encourage us to affirm the following:
- Learning JavaScript is fundamentally about learning many different patterns of code, the kinds of contexts in which we can use them, and how to modify them to fit them into new contexts;
- In all such patterns, the code may sometimes be simple to write, but the concepts behind them will be complex, and a rigorous understanding of how those patterns work will be premised upon an ability to articulate those concepts precisely;
- As a result, we are going to care tremendously about vocabulary, because we will learn a lot of new words in JavaScript whose precise meaning is tightly connected to subtle differences in their behavior; and
- If we can focus our efforts on unlocking the meaning of the vocabulary we learn, and how that meaning animates the patterns of code we will encounter, then we will discover that much of working with JavaScript will feel like a process of piecing together elementary building blocks of code that in various arrangements produce seemingly infinite possibilities.
All of this will require one thing: practice, practice, practice. By practicing writing JavaScript, and grappling with understanding what is happening in JavaScript code that appears in new contexts, we will gradually discover the bounds of what we do and don't understand. Although things may feel fuzzy in our early exploration, clarity will slowly emerge as we learn new ideas that help us piece together in more concrete ways old patterns. In the meantime, the two best assets we can bring into this next study of code are patience with ourselves and the new language we are learning, and creativity to solve problems through code in unexpected and sideways directions.
Following a recipe
As with HTML and CSS, let us begin our journey in JavaScript with a metaphor. Consider the following scenario.
Say I asked you to provide a list of steps for making a chocolate cake, based on a recipe such as this one. This list is a sequence of steps you would give to someone who has never before baked anything at all. Suppose that in this process, I asked you to create a flowchart that shows the sequence of steps required to make the cake. How would you go about doing this?
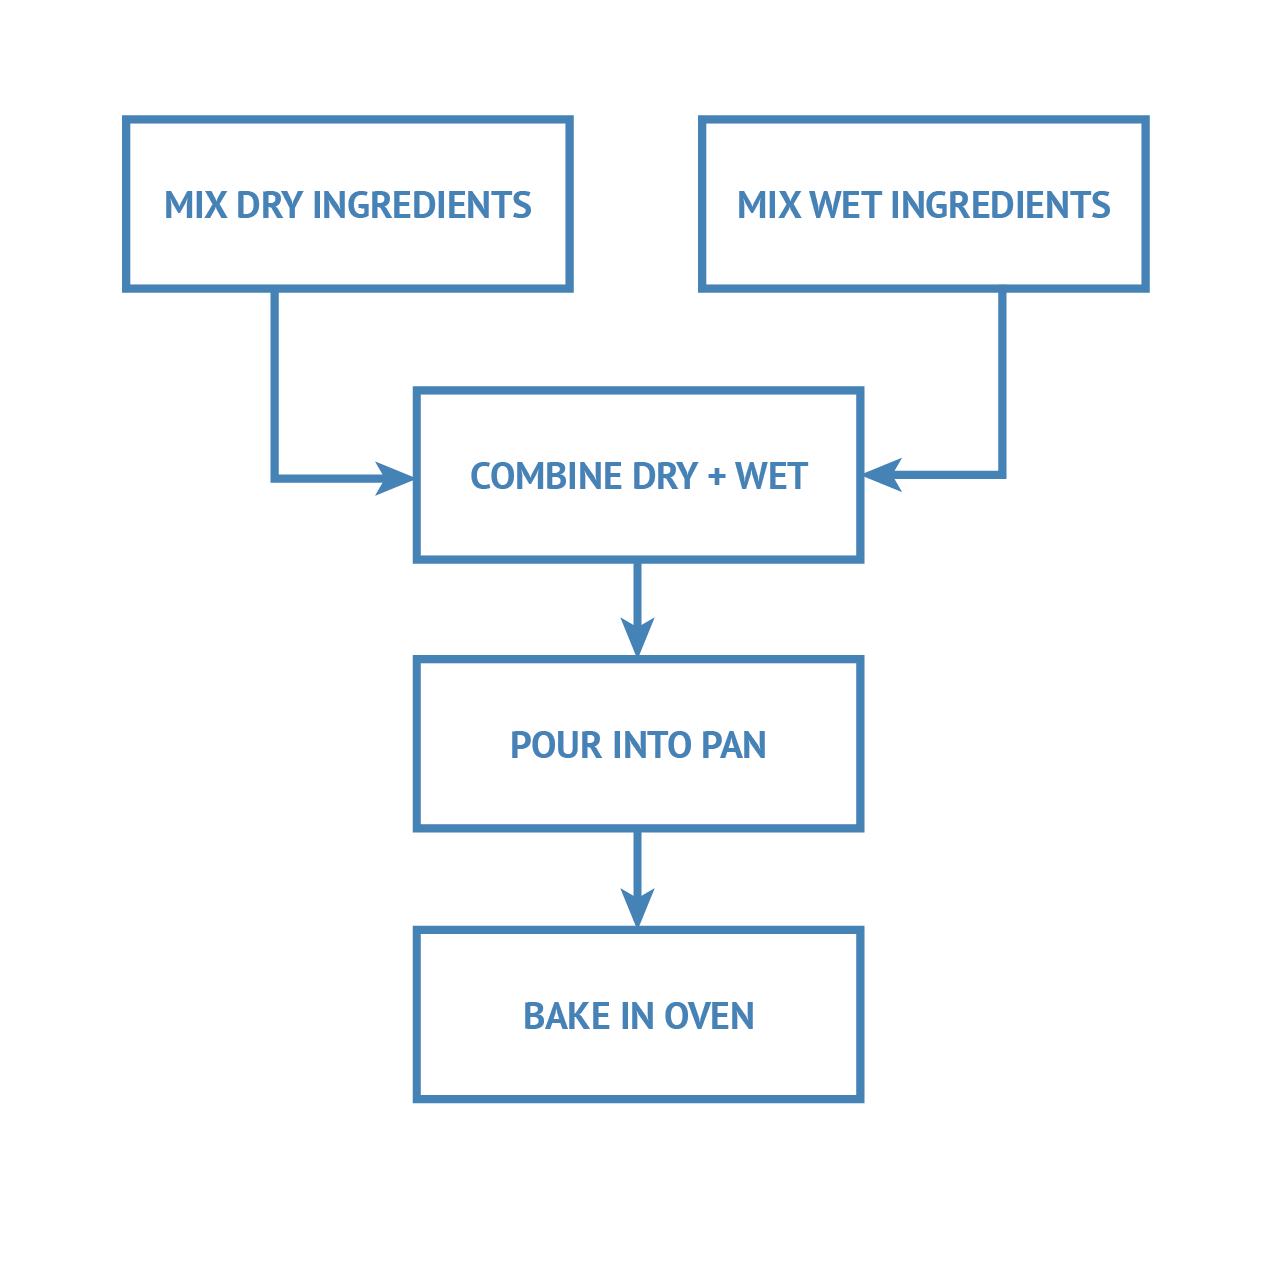
With a recipe provided such as the one in the previous paragraph, you might think that this request would be easy to pull off – just take each numbered step in the recipe, and turn each step into a block in the flowchart. But upon further reflection, you might find yourself asking some tricky questions. How explicit do your steps need to be? If the person you are giving the instructions to has never baked anything before, what kinds of actions do you assume to be understood, and what kinds of actions need to be spelled out in literal ways? Can you collapse some steps into larger actions, or do certain steps need to be articulated in extremely specific ways? Is there anything we can assume about the knowledge of the person making the cake?
The illustration provided here shows one possible flowchart we might use to articulate this process. Note that this flowchart presents a highly oversimplified representation of baking a cake. Even so, it reveals certain observations about the process itself that are worth noting.
Small steps are collapsed within large steps
The seemingly simple steps captured in this flowchart actually contain several sub-steps within them that get collapsed into higher-level abstractions. For example, the simple step "Mix dry ingredients" actually represents a sequence of smaller steps: retrieve the ingredients; measure the ingredients; sift the ingredients; retrieve a bowl; place the ingredients in a bowl; and then mix the ingredients with a whisk. Typically in a recipe, we collapse all of these smaller steps into one larger step, with the assumption that the person reading the recipe will know they need to do all of these things without them being explicitly stated.
Some steps are repetitive
If we look even more closely inside of these subtasks, we will see that some of them are repetitive – we repeat the same kind of action over and over again. For example, the subtask of "Place ingredients in a bowl" is actually a series of smaller steps: take the first ingredient and place it in the bowl; then take the second ingredient and place it in the bowl; then take the third ingredient and place it in the bowl, etc. Again, these steps are never explicitly stated, but they're assumed to be understood.
Order (does not) matter(s)
If we zoom out a bit, we see that in some parts of the flowchart, the order in which we do certain steps matters, whereas in other places, that order does not matter. For example, the first two steps – "Mix dry ingredients" and "Mix wet ingredients" – do not imply a temporal ordering. We can choose to mix the dry ingredients first and then the wet ingredients, or we can choose to mix the wet ingredients first and then the dry ingredients. Neither step is dependent upon the other; they are separate steps that can happen in parallel. In contrast, the steps that follow mixing the ingredients must happen in the order specified. We can't combine the wet and dry ingredients until after we have mixed them separately; we can't pour the batter into the pan until after we have combined the wet and dry ingredients; we can't bake the batter in the oven until we have poured it in the pan. These steps require certain things to happen before them in the process.
Conditional actions
In these temporally-ordered steps, there are additional conditional actions that must be satisfied before proceeding. For example, before baking the batter in the oven, we must first preheat the oven; if and only if the oven has been fully preheated, then we can place the pan in the oven. Otherwise, we must wait until this condition has been satisfied.
Input – Process – Output
Lastly, if we look at the flowchart as a whole, we can see that itself is situated within a larger structure. The recipe represents a process of making a cake, but that process requires certain inputs (ingredients and equipment); on the other end of the process, we receive back an output (i.e., the cake itself). The process itself does not yield anything unless we provide an input and have some way of capturing the output!
As we learn JavaScript, we will find ourselves encountering the exact same kinds of phenomena. We will be challenged to use JavaScript code to provide a sequence of instructions to the browser for what to do and how to do it, and these instructions will often need to explicitly state out extremely granular steps, like those in our recipe, in order for the browser to understand what we need. We will encounter places in our code where the order of our code does and does not matter, or where changing the order of things changes what happens on the page; we will encounter many situations where we will want certain things to happen in certain conditions, and other things to happen in other conditions. And as we learn more about different kinds of code patterns in JavaScript, we will find that many of these will accept inputs we provide, do something with those inputs, and then give us something back.
Writing JavaScript will feel a lot like writing a recipe, one that reveals itself as we learn new kinds of "ingredients" to create new kinds of "outputs."
Getting set up
In the demonstration that follows, you will be asked to follow along with the provided template file. Note that this template file is an HTML file (with .html extension), inside of which you will find a <script> element embedded within the <head>. It is inside this <script> element that you will place your JavaScript code. Much like the <style> element in CSS, the browser will only understand the code we write in JavaScript if it is placed inside of a <script> element like this.
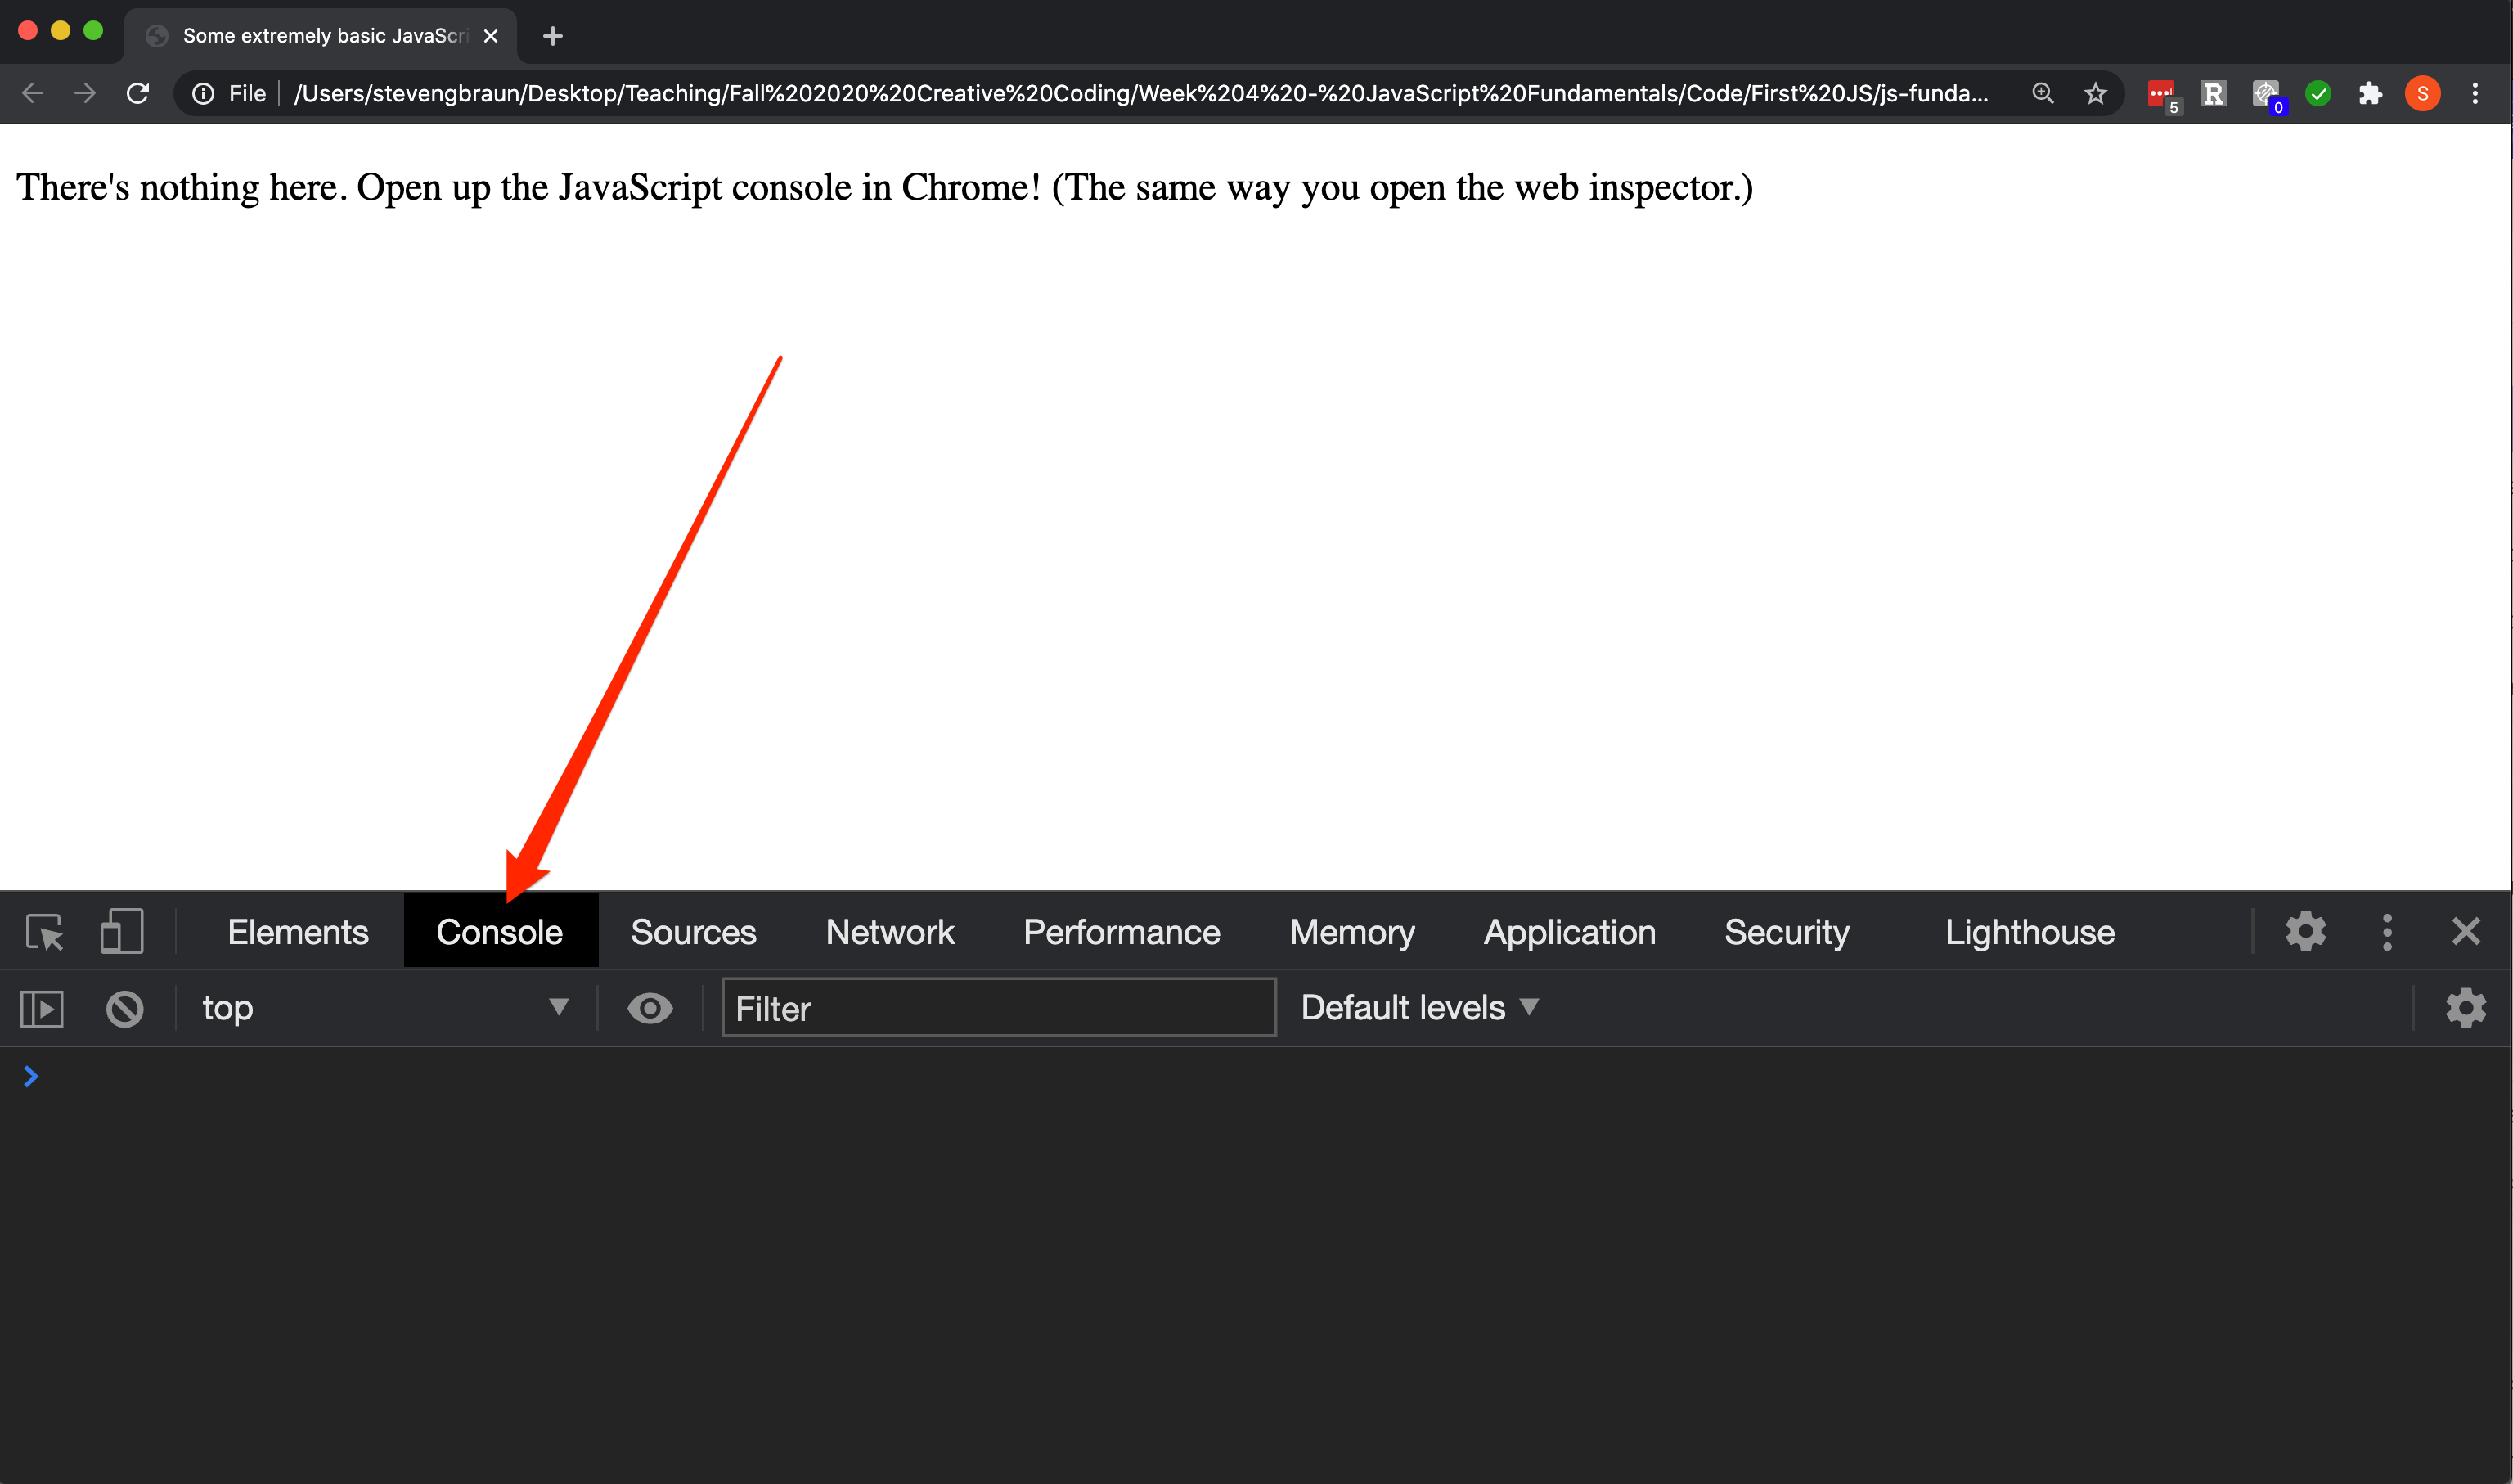
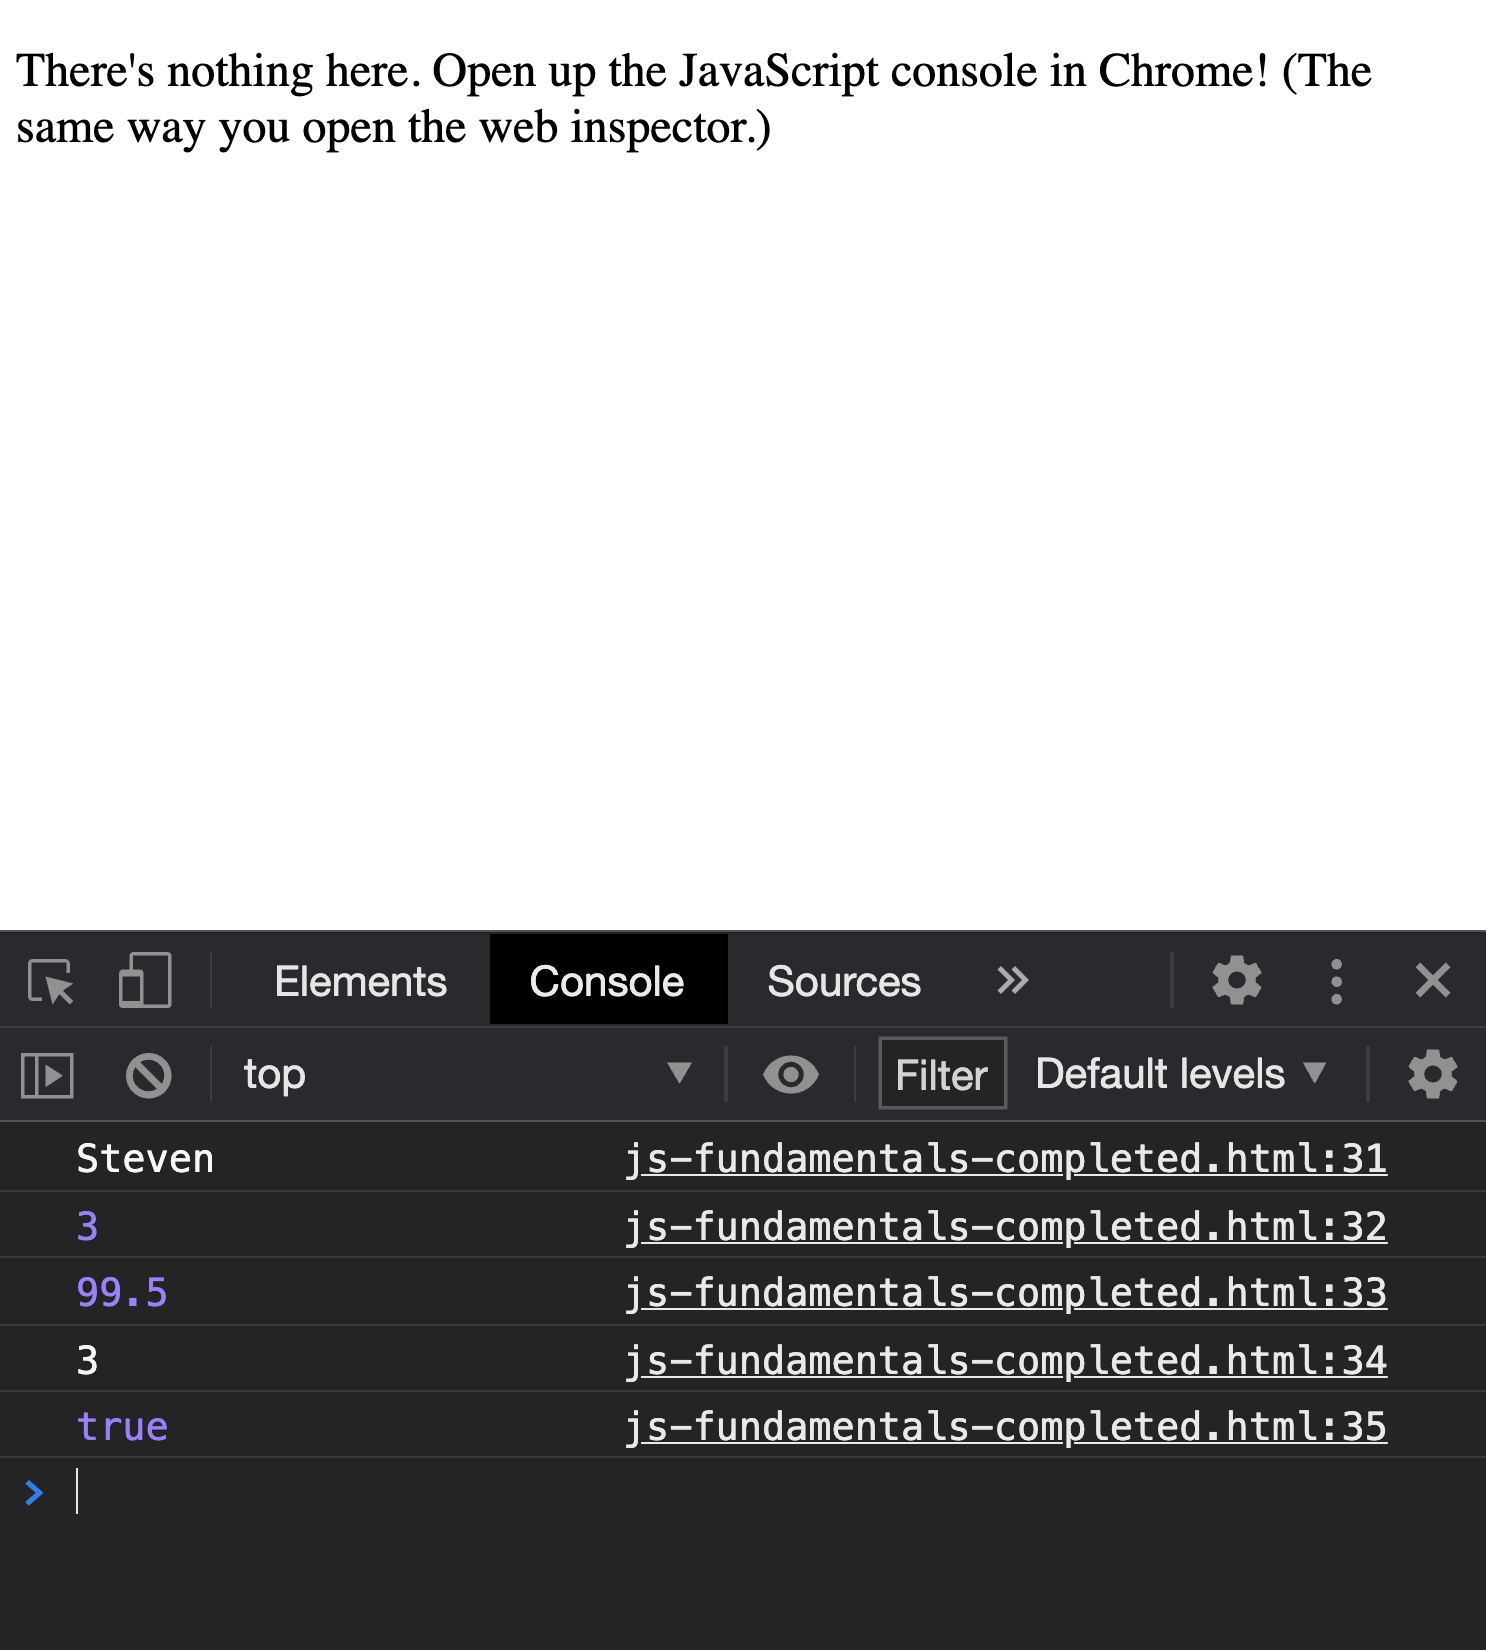
As you follow along, you will need to open the same template file in both Visual Studio Code and Chrome. After you type some JavaScript code in the template file and then save the template file, you will be asked to inspect the output inside of the Chrome web browser. To do this, you'll need to open up the JavaScript console. The way you open the console is exactly the same you open the web inspector. Instead of looking at the Elements tab, however, you will want to look at the Console tab. This is where we will see all of the output of our JavaScript code for this demonstration. Confirm you can open and find the console before proceeding.
After you type some new code, save, and refresh, you will see output printed out in the console, line by line. Such output will look like the screenshot below. Pay particular attention to the text at the right-hand end of each line in the console; this tells you what file and which line number of code is generating that specific output you see. This feature of the console will be extremely useful.
Occasionally, you may type some code incorrectly, causing the browser to misunderstand your code. When this happens, you may see an error message appear in the console. This will appear as red text that will be close to impossible to interpret (what in the world is this error trying to tell me?). In any case, this means that there is something wrong with your code, and before the browser is willing to proceed running the rest of your code, you must fix the problem. To do this, try to retrace your steps in the demonstration, and make sure you are typing things exactly as you see.
First steps with JavaScript
In the next section, we'll begin with an exploration of some of the most basic building blocks in the JavaScript language. As you read through the following demonstration, have the template file provided open in Visual Studio Code, and follow along by typing the code examples given. (You may change certain parts of the code to your own interests where noted.) Pay very careful attention to syntax! A misplaced semicolon or dot, where the browser isn't expecting to find it, can mean the difference between code that runs from beginning to end and code that stops halfway through and throws a red, angry error message at us. If you type some code and don't see what you expect to see in the browser, go back to the demonstration and carefully check your code to make sure you have followed along exactly as shown.
Variables
The very first building block we will encounter in JavaScript is something called a variable. This is also one of the most useful building blocks we will ever use in our coding. As we unpack what a variable is, we will have our first encounters with several new ideas, such as new syntax, things called "keywords", processes called "declaration". As you proceed, at the same time you practice writing in this new language, pay attention to what you notice by way of patterns. This noticing of patterns will help us as we move forward.
When we write code, we will often want to functionalize whatever it is that we are trying to create through values that can be moved around and dynamically modified to different effects. For example, when we draw things with D3 and SVG, we may want to draw new shapes relative to the position of other shapes, without having to rely on explicit and absolute values for x- and y-pixel locations. This kind of dynamic coding is the purpose of variables.
A variable is like a container that holds a single value, such that we can store that value for later reference (or to change it later). To create a variable, we need two things: a value to be stored, and a name in which to store it. We call this process of storing a value in a name variable declaration.
In JavaScript, there are multiple kinds of variables we can declare. In any variable declaration, we begin with a JavaScript reserved keyword that tells the browser "I am about to declare a variable." This keyword can be one of three words: const, let, or var. Each keyword has different properties that determine where a variable can be used in our code and if its value can be changed.
For now, we will only care about the keywords const and let. The const keyword is used to declare a variable whose value cannot change; if we try to change a const variable's value later in our code, we will get an error message saying we can't do that. Conversely, the let keyword is used to declare a variable whose value is allowed to change. In either case, the general pattern for declaring a variable will be the same:
constNAME = VALUE;letNAME = VALUE;
In the demonstration to the right, we are using the const keyword to declare a variable whose name is myName, and inside of that name, we are storing the value of "Steven" (including the quotation marks!). Every single piece of this line of code is important and serves a functional purpose in constructing the instruction we are giving to the browser. To end the instruction, we place a semicolon (;) at the end of the line. This semicolon indicates the end of a statement in JavaScript, or a single instruction.
When declaring variables, we can give the variable any name we want – within limits. There are a few rules that restrict what can be a valid variable name. For example, we can't start a variable name with a number, such as 123myVariable; we can use numbers inside of variable names, as long as they don't start the name (e.g., myVariable123 is allowed). If we want to use special symbols inside of a name, we are limited to the symbols $ and _ (e.g., $myVariable2 and _myVariable2 are allowed). We also can't use reserved keywords as names of variables, such as var. As long as we follow these rules, then we can decide what we want to name a variable, and from that point forward, we will refer to that exact name to retrieve its value.
Type the example at the right, and replace the value inside the quotation marks ("Steven") with your own name. Do not change the name of the variable itself (i.e., myName should stay as myName). Make sure to include the quotation marks in the variable value.
Congratulations, you've written your first JavaScript!
Data types
With this, we have created our first variable. Importantly, we have noted that the value of this specific variable must include quotation marks. The reason for this is that we have not simply declared a new variable; we have also stored in that variable a specific type of value.
In JavaScript, we call this specific "type" of value a data type. In this language, there are a few fundamental data types we need to know. A data type is a variety of a value that determines what we can do with it.
The basic data types in JavaScript include Number, String, and Boolean values. In our example above, our variable myName stores a value of the String type. A String is any mixed sequence of letters, numbers, or symbols. Most often, Strings will include values that are words, or sentences, or paragraphs, such as a name of a person or description of a product. It can also be more abstract things, such as the ID number of a product in a catalogue that might be encoded as a mixture of both letters and numbers. More generally, a String is simply a value that can't undergo any mathematical operations like addition or subtraction; its value is what it is. We represent String values by placing them inside of quotation marks. It doesn't matter at this point if we use single or double quotation marks, but whatever we choose, we must have matching quotation marks before and after a String value is given.
A Number type is any numerical value; these could be positive or negative numbers, integers, or decimal values. They can be expressed using decimal notation, or using scientific notation and exponentiation. Whenever we want to interact with a variable as a number, we must declare it as a Number type. Numbers can undergo numerical computations like addition or subtraction. To declare a Number type, we simply give a numerical value; we don't need to use any quotation marks.
If we do place what we think is a number inside of quotation marks, it no longer behaves like a Number type – instead, it turns into a String type! In the example at the right, the value of "3" we are storing in the variable otherNumber looks like a number, but when the browser sees this, it thinks it is a String because we have placed it in quotation marks. This distinction may seem incredibly subtle, arbitrary, and irrelevant, but in reality, it can mean a world of difference between our code working as expected and it breaking apart completely. In short, data types matter a lot in JavaScript.
The last data type shown here is a Boolean type. The possible values of a Boolean data type are true or false. In fact, these two "words" are keywords in JavaScript, and they are interpreted in a way that is similar to Number types. Just like Numbers, we don't need to put these values in quotation marks (and if we do put them in quotation marks, we change how the browser understands what to do with them). Also importantly, the capitalization matters: these values must be all lowercase to be interpreted correctly.
Practice writing the variables demonstrated on the right; swap in different values of your choice.
console.log(): Our new best friend
So far, all we've done is store some values inside of some variables. While these variables now exist in the browser's memory, they are just kind of sitting there, waiting for us to do something with them.
Variables are really only useful if we actually do things with them. One simple thing we can do with them is report their value back to us. Why would we want to do this? By reporting the value of a variable back to us, we can confirm or examine the lifecycle of a variable through a longer and more complex script. In our case, we will report the values of the variables we created above, to confirm that we have successfully declared them.
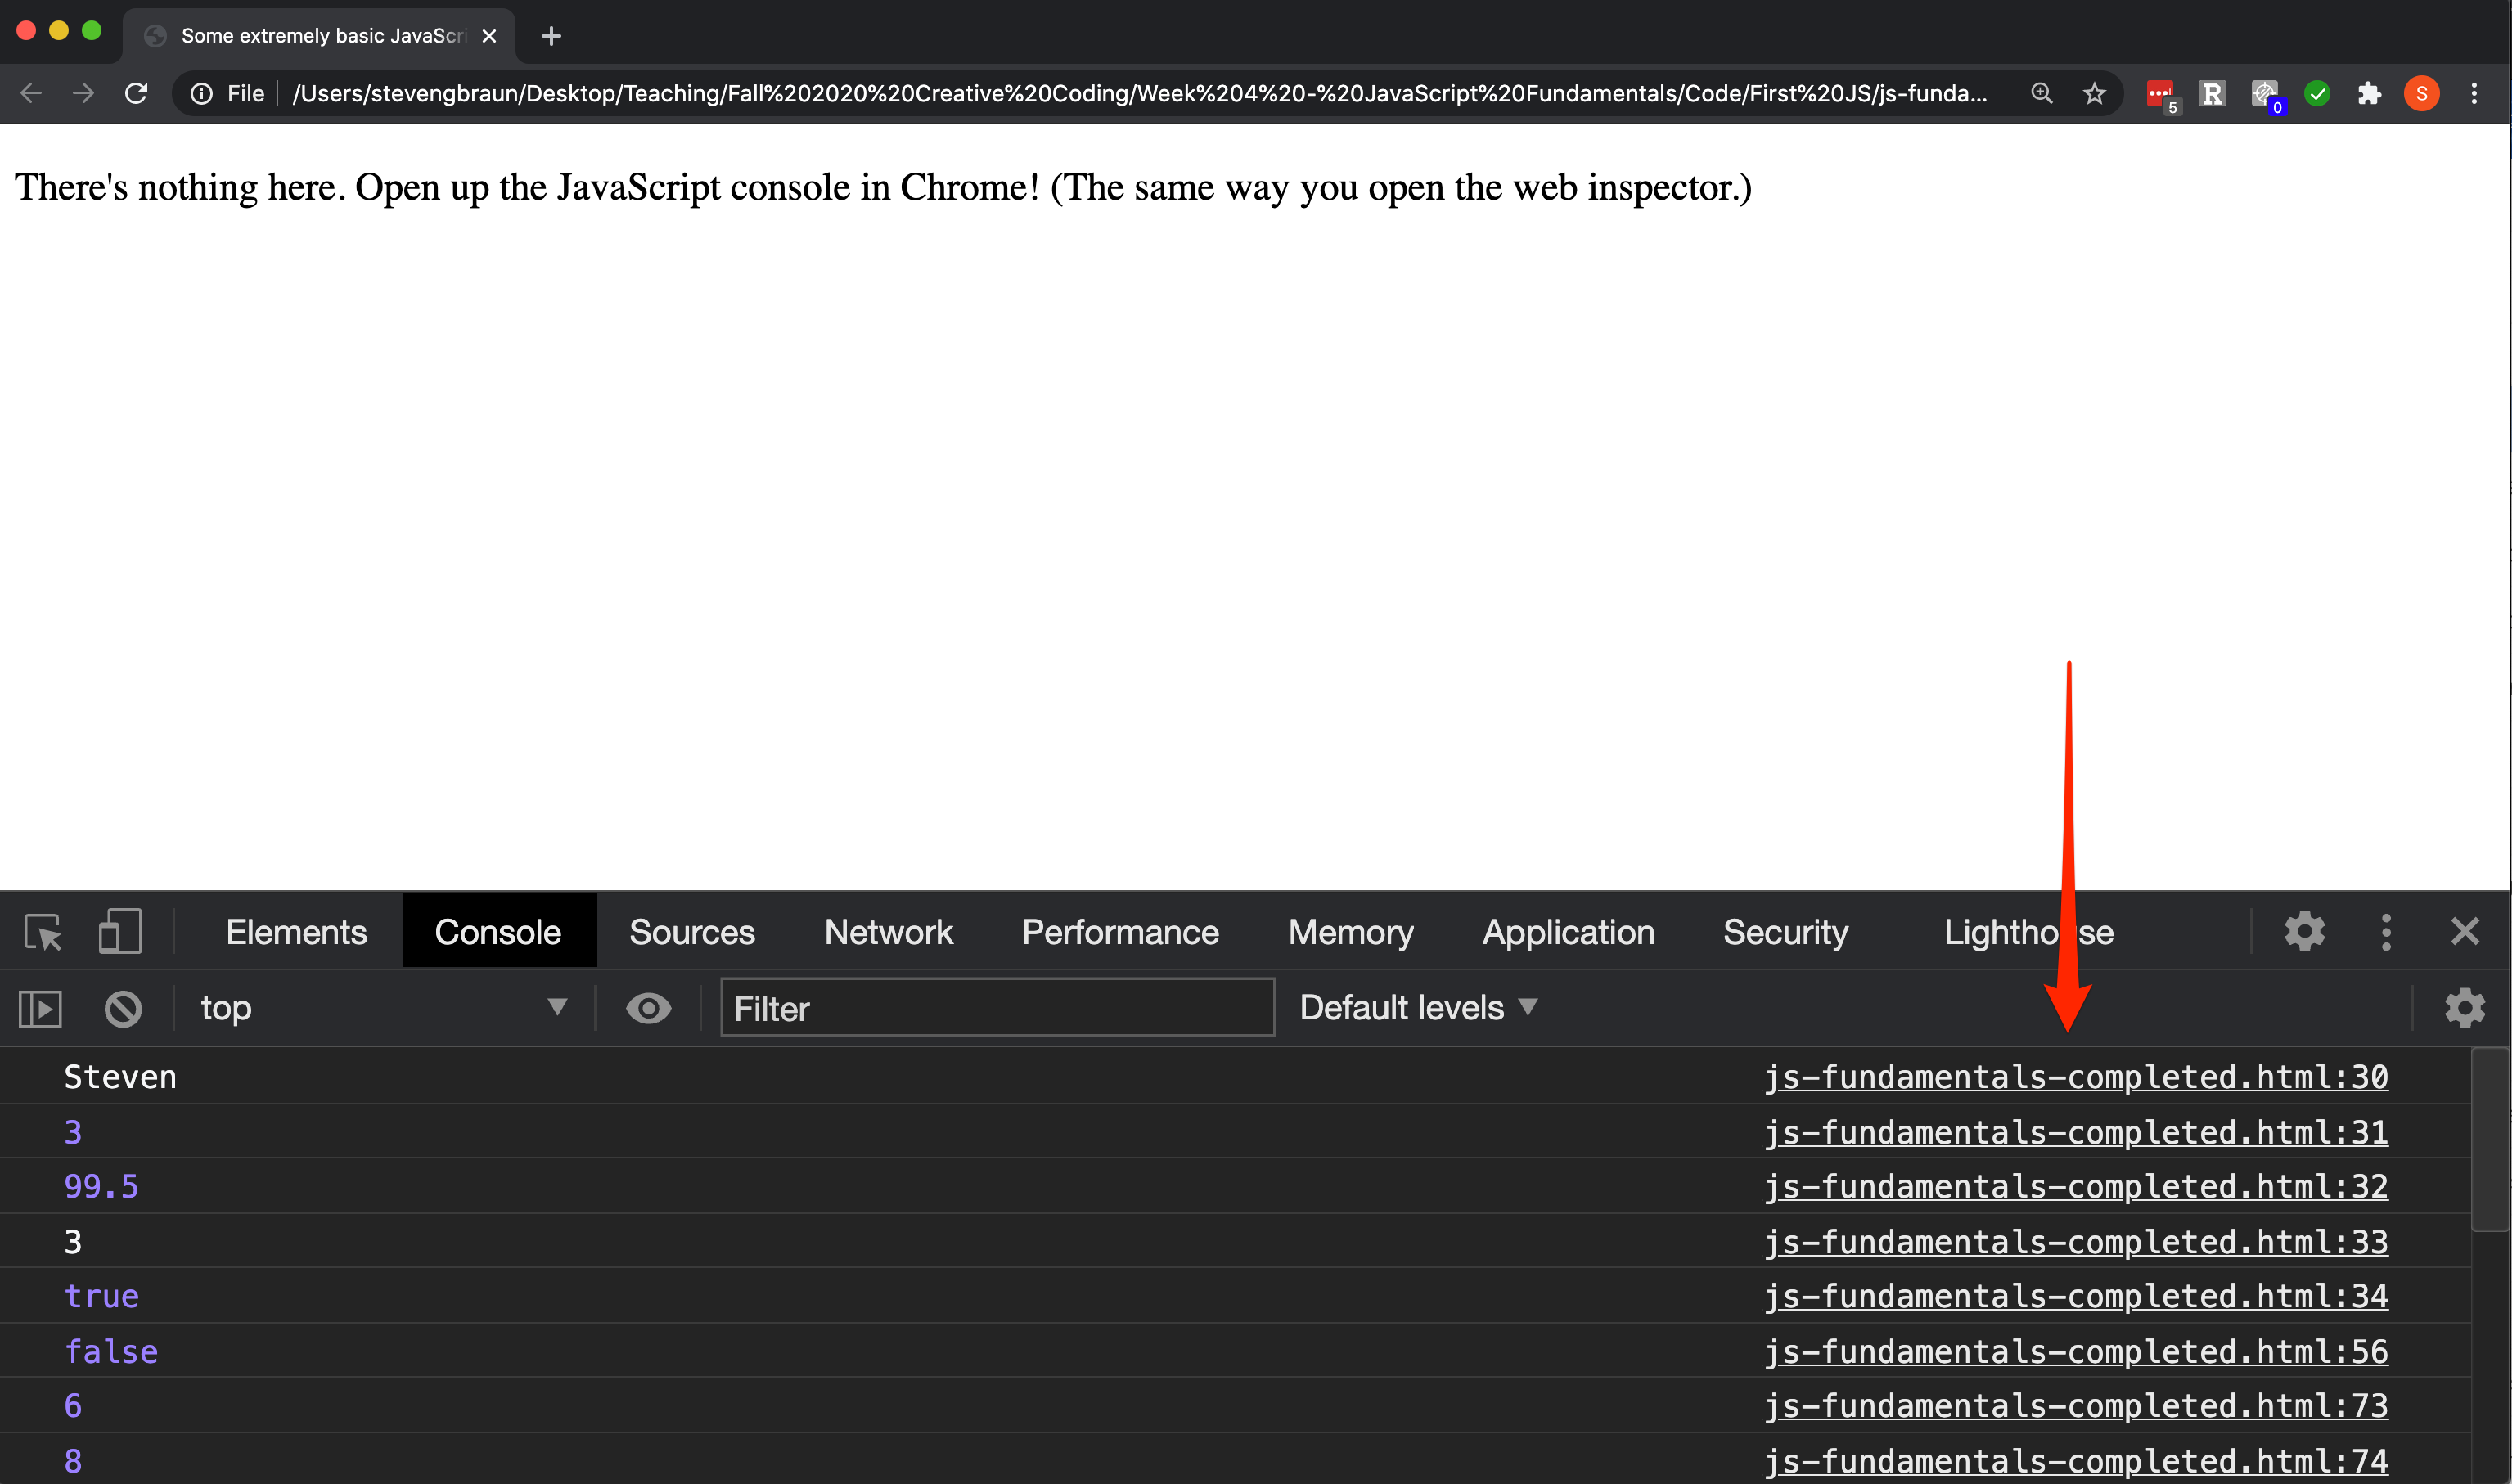
JavaScript has a built-in code pattern to help with this reporting: console.log(). We can place this pattern anywhere in our code, on its own line, to see what's going on with a variable. In the parentheses, we will place the name of a variable that we have already declared (i.e., it needs to be something that the browser knows exists already!). In the examples at the right, we are using this pattern to report all of the values of our variables from the previous section. Note that the name of each variable appears within its own console.log() pattern, in the parentheses of each command. Also note that each console.log() is on its own line, followed by a semicolon at the end of each line. Type all of the commands you see at the right in your template document.
When we put something inside the parentheses of this pattern, it gets printed out in the JavaScript console. We can access the console in the same place we access the element inspector, inside the web browser. To open the console, first open the web inspector, and then click the Console tab button, next to the Elements tab button, in the pane that opens up.
If everything goes well, you should see a series of values printed in the console, line by line. Notice that these values exactly correspond to the values of the variables we reported out in our code. At the right-hand end of each line in the console, you'll also see a filename, followed by a colon, followed by a number: this number that you see tells you exactly which line of code in which file is causing the browser to print out the value you see. Cross-check one of these numbers with the corresponding line number in your template file to confirm that these numbers match. (Note that your numbers may be slightly different from the ones shown here.)
The console.log() pattern is extremely useful for debugging, which is the process of finding and correcting errors in code. Sometimes, we'll encounter errors that are related directly to specific variables, and we can use the console.log() pattern to double-check the value of those variables to confirm that what we think its value is matches what the browser thinks its value is. We will use this pattern a lot moving forward.
Changing variable values
After we declare a variable, we may want to change its value to something else – either manually and directly by reassigning a new value to it, or indirectly through other things we might do in our code. When we have a variable that already exists and want to change its value, we can do that by simply naming the variable again, without the const or let keyword, and assigning a new value to it with the equals sign.
In the example at right, we change the value of the variable lovesToCode, which was originally true, to a new value of false. If we use console.log() to report the value of lovesToCode after doing this, we will see that the new value has indeed been assigned to this variable.
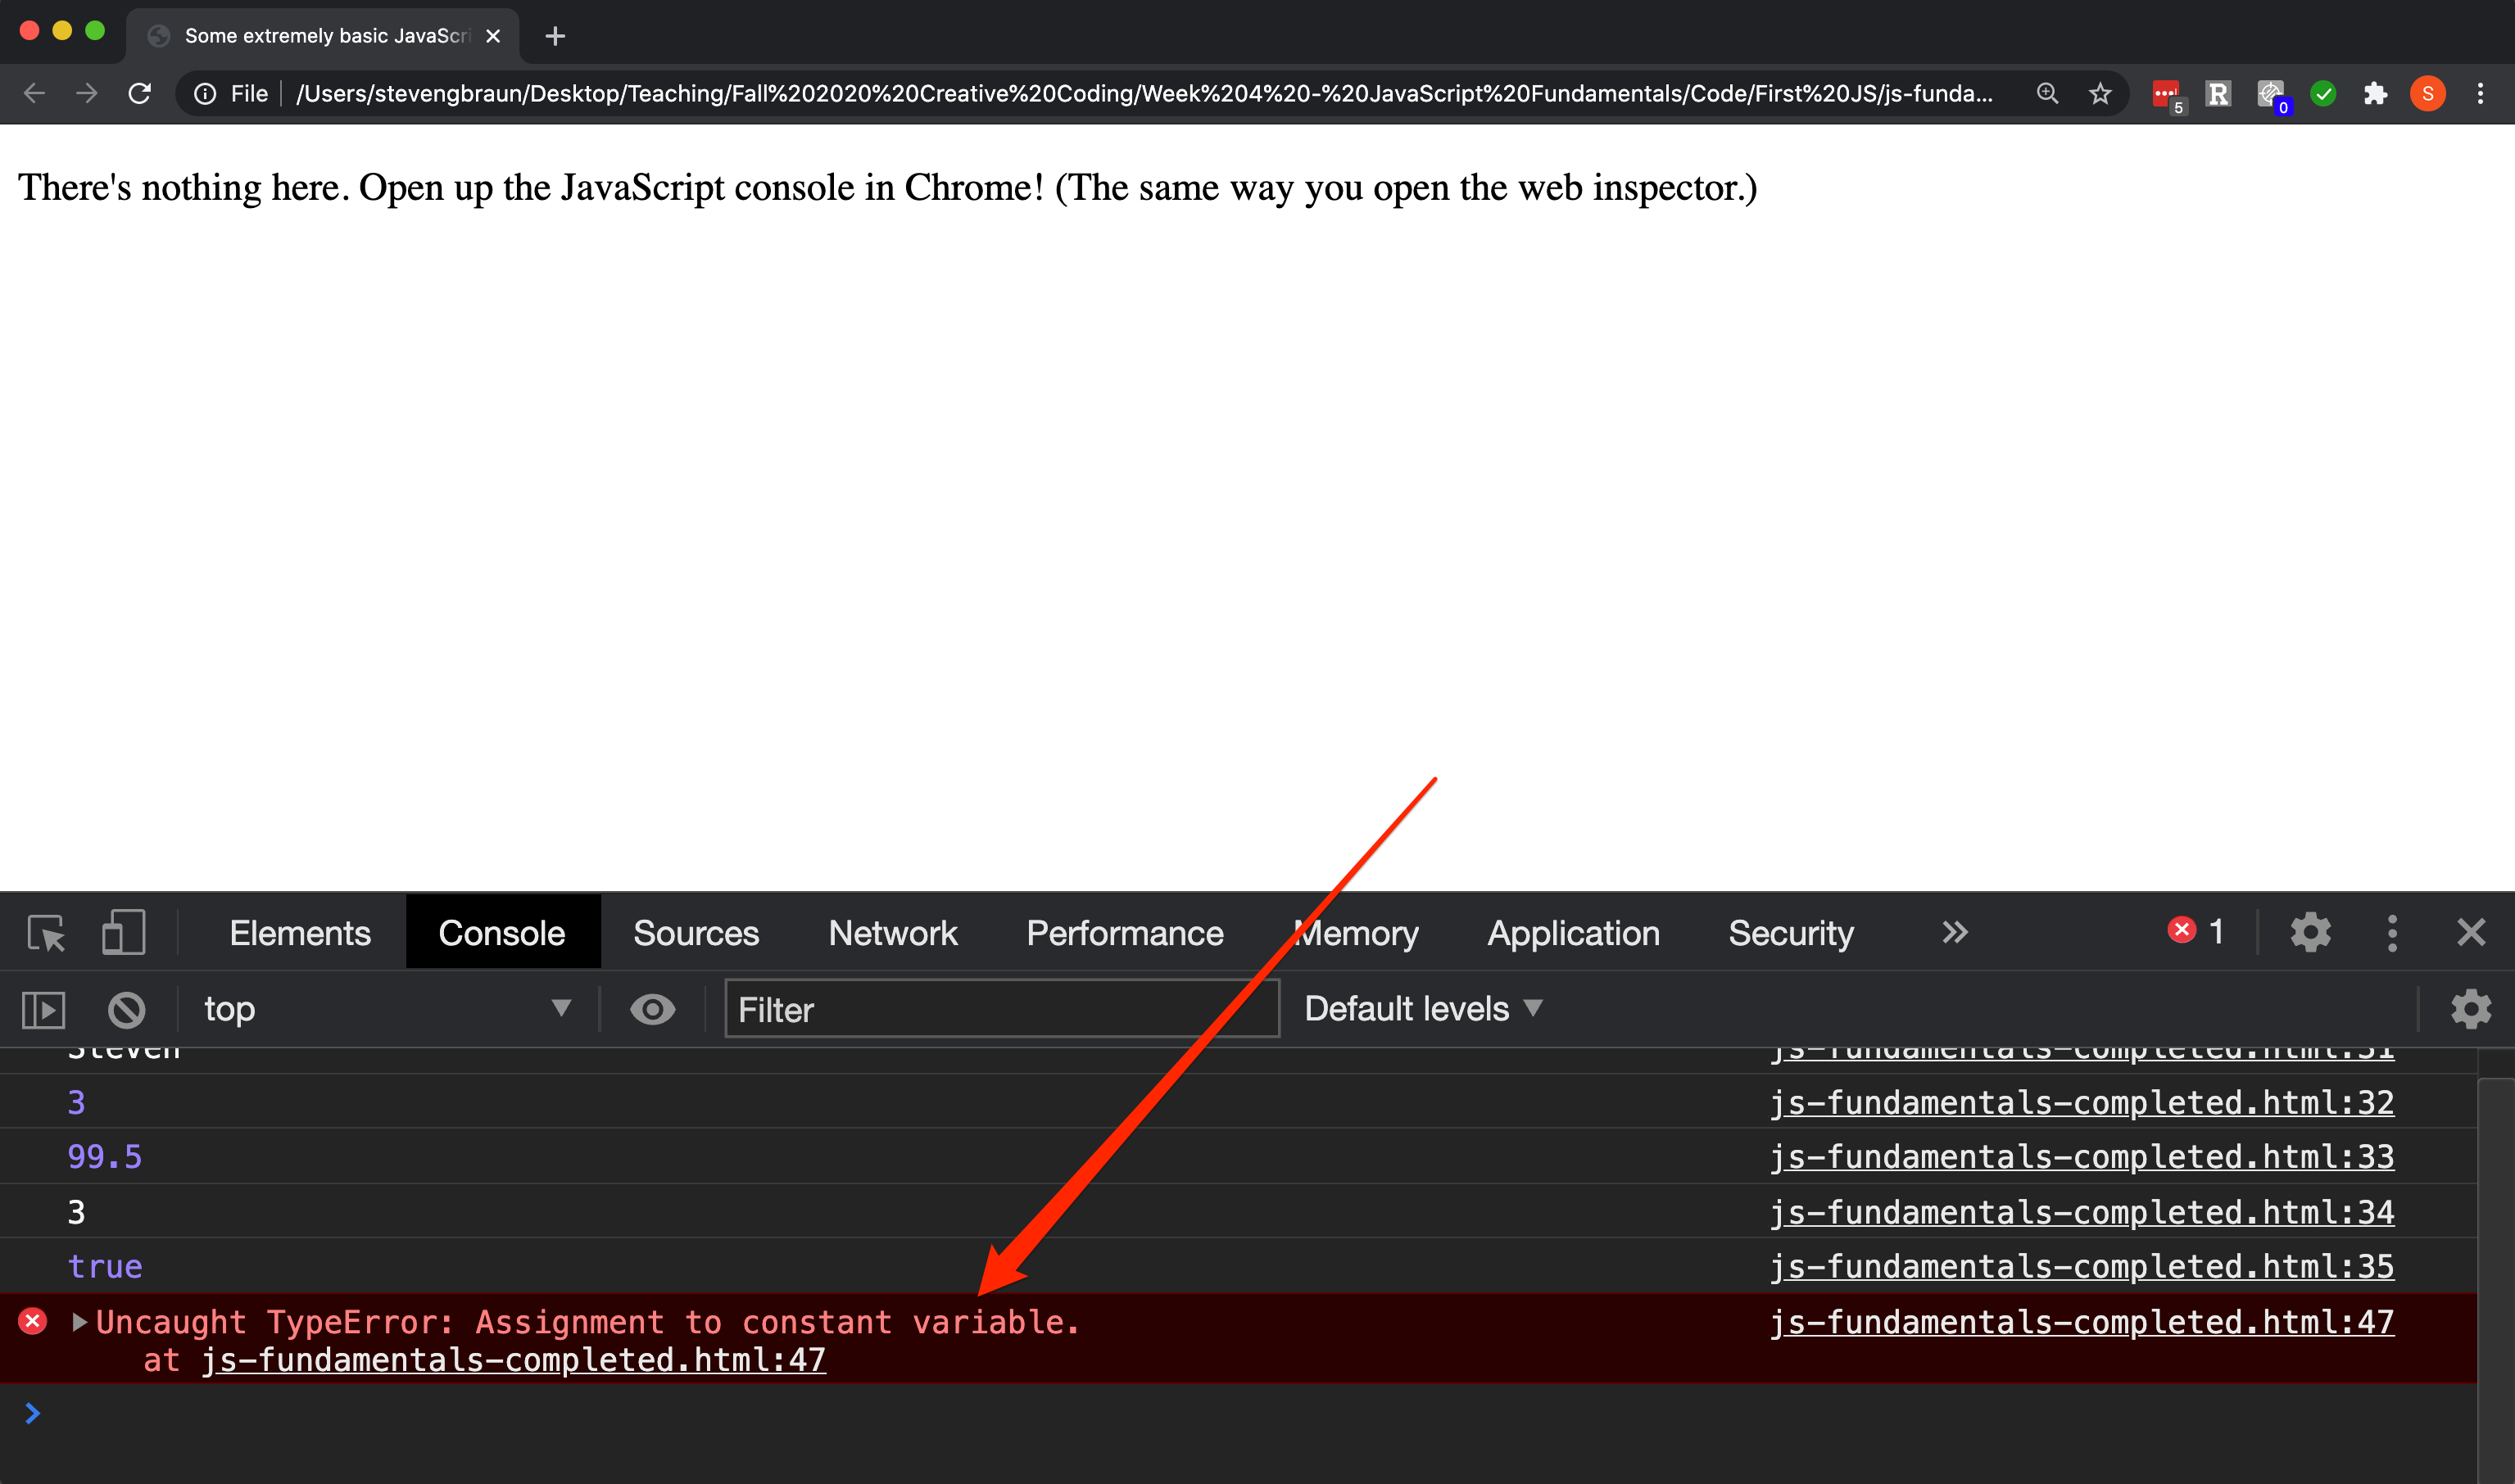
However, there's something we must be careful about. While we are allowed to change the value of any variable declared with let, we cannot change the value of a variable declared with const. The reason for this is that the const keyword is intended for values that are constants, or unchanging values. If we try to change the value of myNumber to a new value, we will see a red and angry error message in the console that tells us we are not allowed to do this because we declared this variable using the const keyword. Importantly, this error stops everything else afterwards from working – it's as though the browser encounters this problem and refuses to go any further until we fix the error.
myNumber.
Using comments
In this case, we can easily fix the error simply by removing the offending part of the code. We can certainly just delete that line of code, which will just cause it to vanish from the browser's memory. Alternatively, we can comment this line of code as a way of reminding us that this doesn't work. When we comment some code in JavaScript, we will still be able to see it in our source code, but the browser will ignore it and make no attempt to interpret it.
We have two options for writing comments in JavaScript. One way has already been demonstrated for you in your template: placing text to be commented between /* */. This approach is useful for creating multi-line comments, or comments that extend over multiple lines. A second approach uses two forward-slashes in sequence: //. This only creates a comment that persists over a single line of code; when we place it at the beginning of a line, any and all code that appears on that line turns into a comment. (We can also put comments like these at the end of a line, after existing code; in that case, the existing code will still be run, but anything that comes after the // will be turned into a comment.)
To demonstrate this, turn the myNumber reassignment line into a commented line by putting the two forward slashes at the very beginning of the line, as shown at right.
Expressions and operators
Reporting values of variables back to ourselves can be fun, but the novelty wears off quickly. A much more useful thing we'll want to do with variables is use them as part of other calculations and expressions.
Return to the JavaScript console in Chrome. Below the values reported using console.log(), you'll see a line at the bottom that has two right-pointing angle brackets at the start of the line. This part of the console is an interactive console, meaning we can type regular JavaScript on this line, press Return, and then see what value the expression we typed evaluates to.
To test this out, type 2 + 2 on this line and press Return. You should see that the console returns a value of 4.
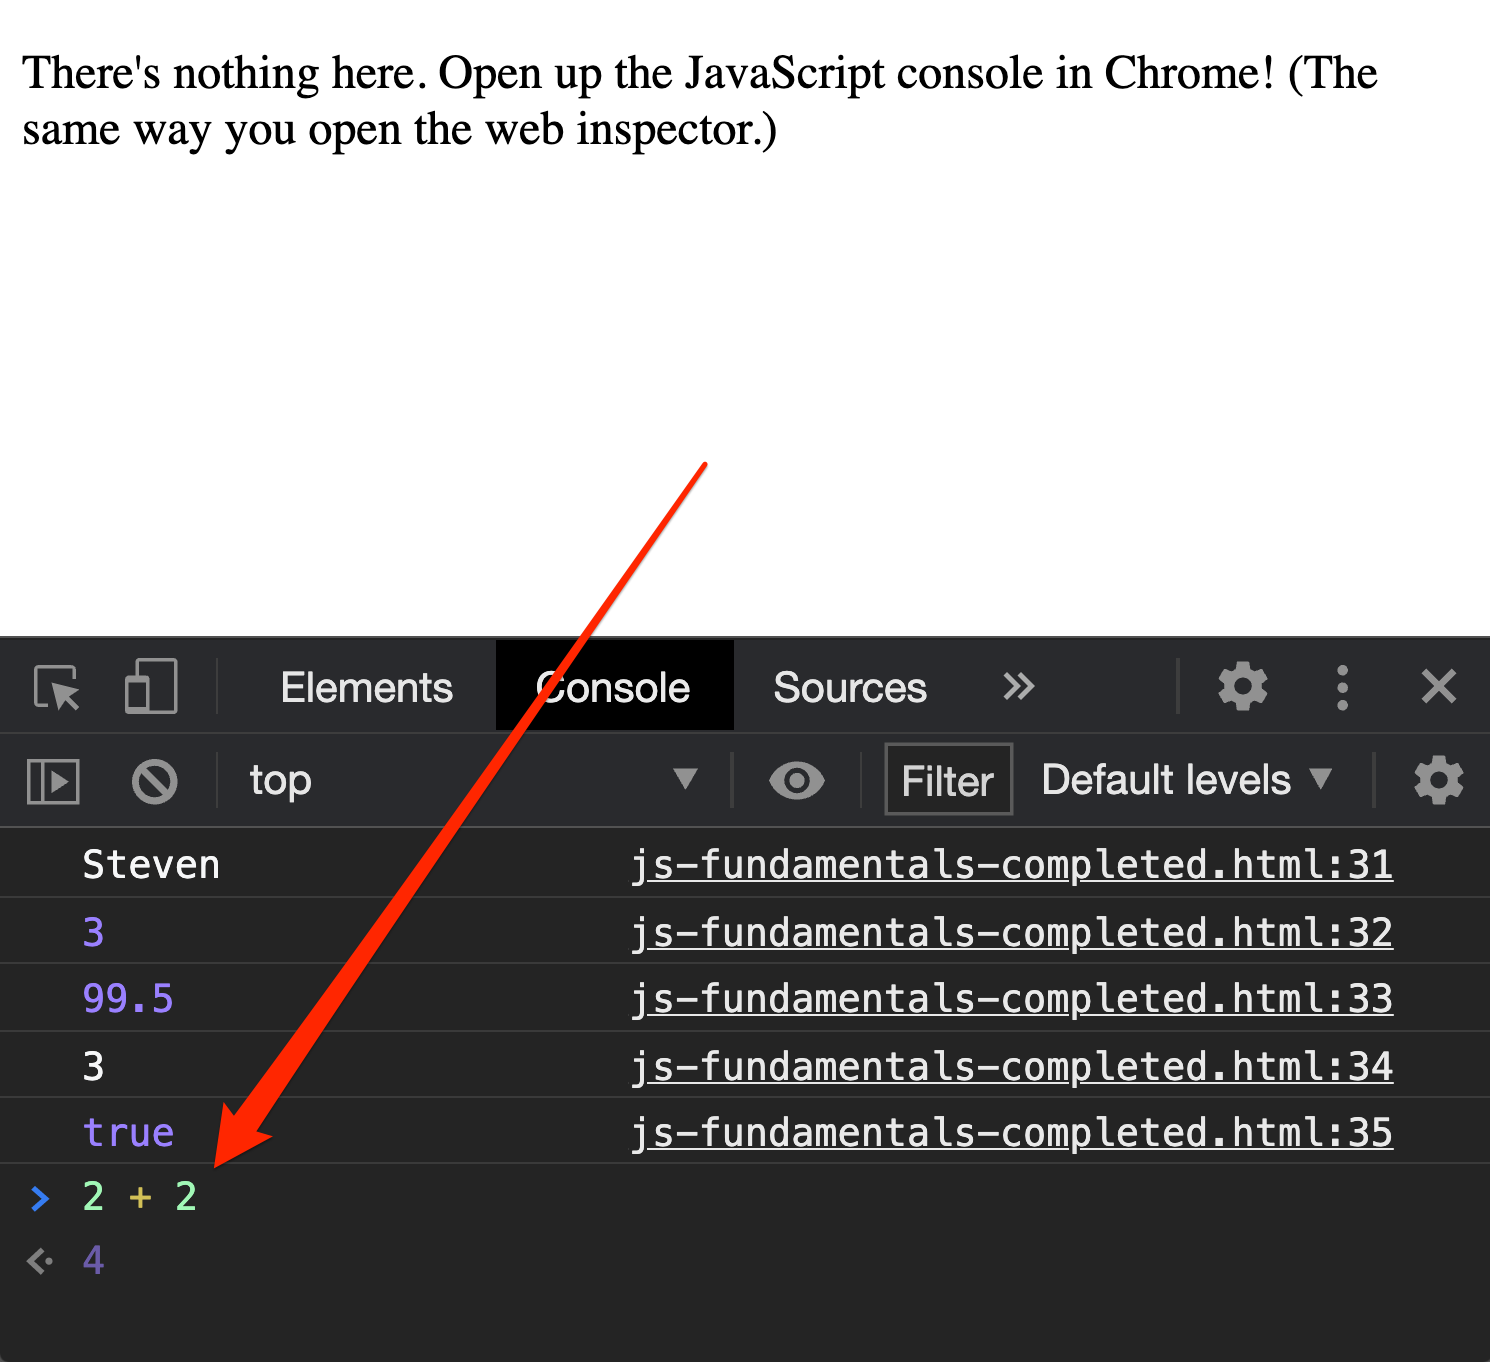
The thing we just typed (2 + 2) is called an expression. An expression is a combination of values and operators that evaluate (i.e., compute) to a new value. In this example, we say that the expression 2 + 2 evaluates to 4. The plus sign (+) is called an operator in JavaScript. It operates on two values, does something with them, and returns the result of that operation. In this case, the plus sign means "add these two numbers together."
There are other operators for other kinds of calculations, as demonstrated below:
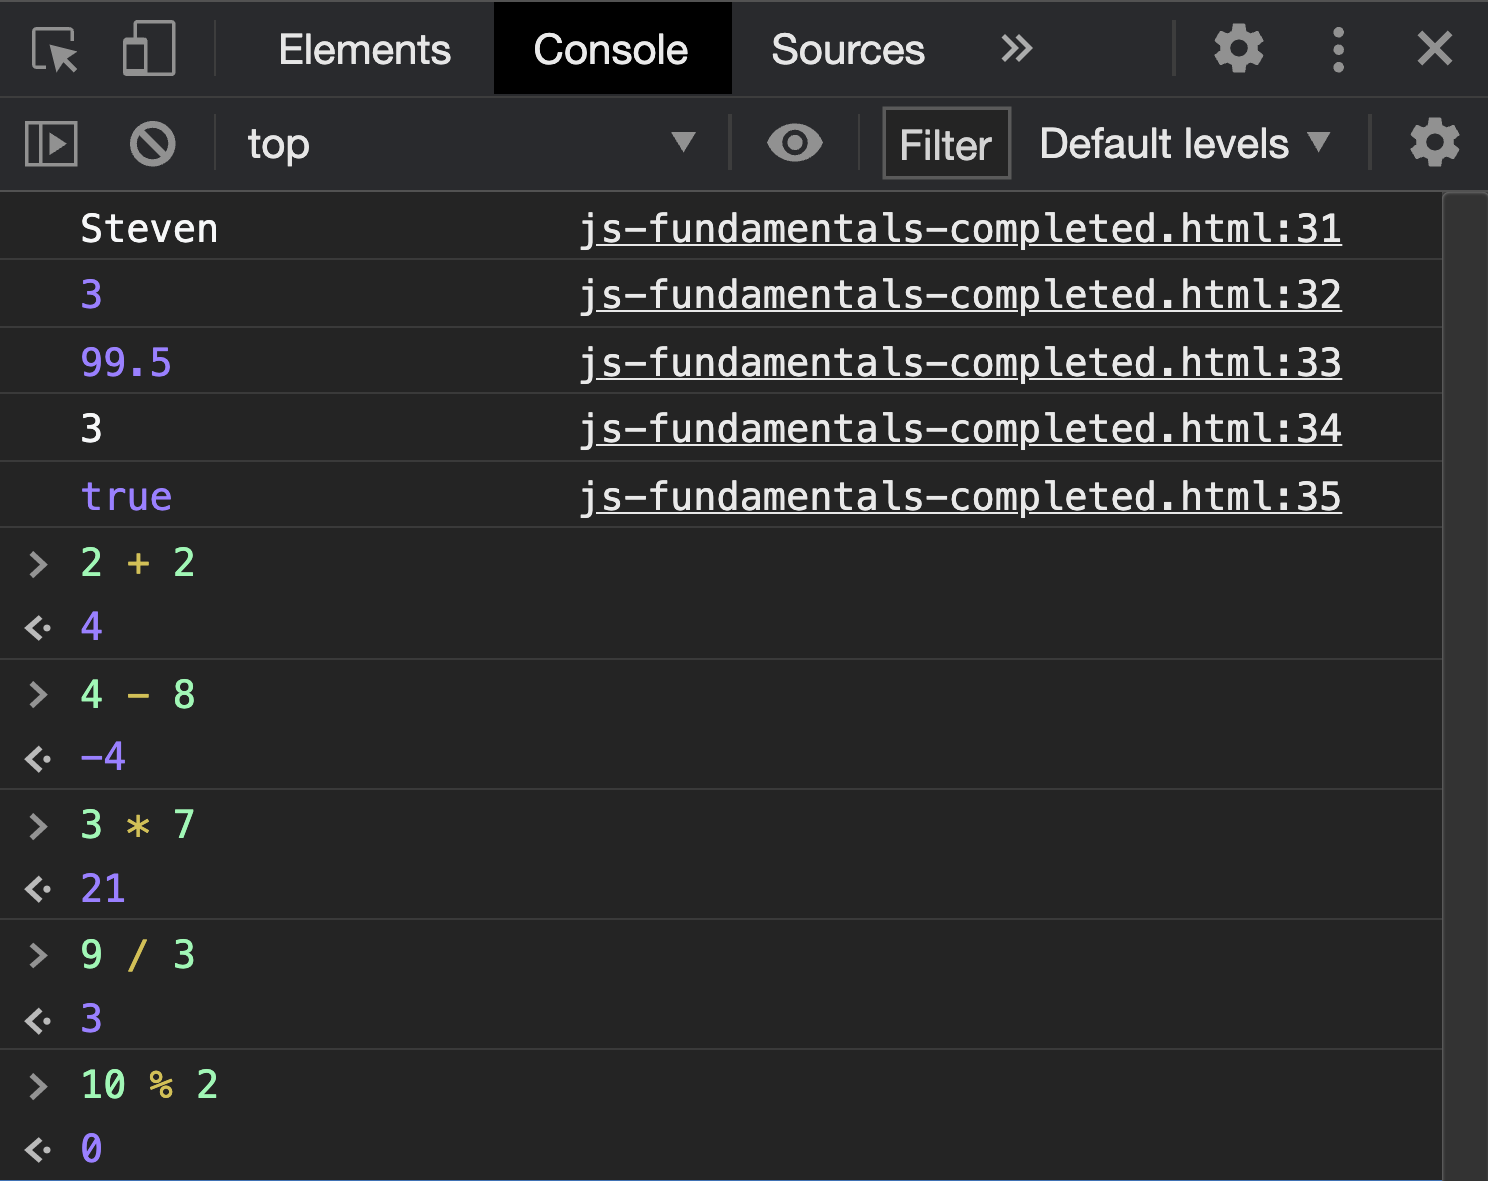
The plus and minus signs should be self-explanatory (+ addition and - subtraction), but the others may not be as intuitive. The forward slash / divides one number by another; the asterisk * multiplies one number by another. The last example, %, is called the modulo operator. It returns the remainder after division.
Let's see these examples using some values stored in variables. Return to your template code file and declare the variables named a, b, and c shown at the right. Notice that the value of the variable c is the result of adding the values of variables a and b together. In the subsequent lines, we use console.log() to report out the resulting value of several different expressions using these variables, with different operators. After writing these statements, save your template file and refresh the page in the browser. Examine the values reported out in the console, and confirm that these values match the code on the lines indicated.
The variable d shown at the right demonstrates how to combine multiple operators in a single expression. We can chain together as many different values and operators as we want. However, we need to be careful about the order of operations, which determines the order of precedence for combining values that could be operated on by multiple operators. To disambiguate expressions where the order of operations doesn't match the order we want our values to be calculated, we can use parentheses to group subsets of calculations together.
Boolean negation
In addition to the mathematical operators demonstrated above, there's another special kind of operator we can use: the Boolean negation operator. When we put an exclamation point (!) immediately in front of a value or a variable, we negate its Boolean value. This means that if the value is true, or evaluates to true, the ! turns that value into false; if the value is false or evaluates to false, the ! turns that value into true.
This is demonstrated in the code at the right. In the first example, the value of true is negated. In the second example, the variable lovesToCode is negated; since we defined this variable as having a value of false, this negation makes this value true. However, we haven't modified the value of the original variable! In this example, we are using the exclamation point in an expression that we've placed inside the console.log() statement. We haven't done anything to actually store a changed value of lovesToCode. You can confirm this for yourself by using console.log() to check again what the value of lovesToCode is, after using the negation operator.
Built-in functions
Variables represent one of the most atomic kinds of building blocks in JavaScript: we can create them, change them, and move them around as isolated units. But the power of JavaScript comes not from these elementary pieces but from larger patterns that can do more complex things for us. In particular, much of this power comes from functions, and JavaScript has many functions built into the language already that we can take advantage of.
A function is a named pattern of code that does a task for us. That task can be anything, such as generating a random number, or rounding a value, or changing the capitalization of letters in a String – anything you could imagine. Typically, these functions accept an input value, do something with that input value (e.g., modify its value), and then return a new value. Other functions don't accept any inputs and don't return any outputs but rather do something else behind the scenes. We will learn more about functions in depth next week, but for now, we will see some examples of built-in named functions that can do convenient things for us.
The first example uses Math.random(). This function returns a random number between 0 and 1. If we invoke this function by name, it gets a random number for us. Importantly, if we want to then do anything with that value later in our code, then we must capture it in a variable. Here, we are running the function Math.random(), receiving the random number it returns back to us, and then storing it in a name of a variable (randomNumber) we created with const. Note that this function does not accept an input value; it only gives us back a value.
The next three functions are convenient ways of manipulating numeric values in common ways. The function Math.round() accepts an input Number value (which we place in the parentheses) and returns back to us the rounded value of that input. This function follows standard rounding conventions, meaning that a value is rounded up when the decimal value is greater than or equal to 0.5. When we want to round a decimal value up to the next largest integer regardless of rounding conventions (i.e., even if the decimal value is less than 0.5), then we can use the function Math.ceil(). (The "ceil" part refers to the ceiling of a numeric decimal value.) Conversely, when we want to round a decimal value down to the next smallest integer regardless of rounding conventions (i.e., even if the decimal value is greater than or equal to 0.5), we can use the function Math.floor(). In these examples, you should see that for a value of 12.2, Math.ceil() returns the value 13 and Math.floor() returns the value 12. If you're curious, you can see other mathematical functions here.
Such functions aren't limited to working only with numbers! Another extremely common thing we will want to do is to manipulate String values. Conveniently, JavaScript has several other built-in functions designed specifically for working with Strings. In the examples at the right, these functions are named toUpperCase() and toLowerCase(). Notice however that the way we use these functions is different from the way we used the mathematical functions above. In these examples, we invoke these functions on an existing String value. Here, we are invoking these functions on a variable named myName, which holds a String value. The dot (.) between the name of the variable and the name of the function tells the browser to run the desired function on the desired value. The toUpperCase() function takes a String value and capitalizes all the letters; the toLowerCase() function takes a String value and makes all the letters lowercase. In these cases, both functions accept an input (our String value), but the way we indicate this input is by connecting the input with the function through a dot. Note that this is different from our mathematical fuctions above, in which we passed our inputs into the parentheses.
The reason for this difference will become clearer in the coming weeks. For now, it's important just to note that there are different ways that we can pass an input into a function.
There are many different built-in functions for manipulating Strings, which you can explore more on your own here.
Constructing complex Strings
There is one more fundamental pattern in JavaScript we will pay attention to before completing this demonstration: constructing complex String values by joining together individual String values.
When we declared our variable myName, we created a singular atomic String value. But singular String values like this are often much more useful when we can use them to construct larger String values. This is a common task we will need to perform; we will have some content, and most of the content will be template text, but some of the content will need to be dynamically updated with non-template text (e.g., content stored in variables). Here, we will demonstrate two different ways of doing this kind of task.
The first of these is called String concatenation, and we accomplish this using the plus (+) operator. Recall from before that we used the + operator to add Number values together. It turns out we can also use this operator to "add" String values together, but instead of getting back a numeric value as the result of adding two numbers together, what we get back with "adding" String values is a single larger String that is a mashup of the two smaller Strings we provided. We can use this behavior to our advantage, as in the demonstration at the right. Notice that we have a mixture of literal String values (for example, "Hello, ") and String values stored in named variables (for example, myName). Also notice that these values are being concatenated together using the + operator. The end result is a complete sentence that is the combination of the literal String values and the variables: "Hello, Steven! You are destined to have 15 cats."
String concatenation works fine for simple Strings – when we aren't concatenating together too many different values. However, as you might imagine, this String construction business can get very messy very quickly. With even just a couple more String pieces to concatenate together, our code can quickly become very difficult to read. To simplify this, we can use a second way of constructing complex Strings: using template literals.
A template literal is created by using backticks (`), located on the same key as the tilde (~). Inside the backticks, any literal String value will be interpreted as a normal String. However, if we place ${ } inside the backticks, then anything we place inside the curly braces of the ${ } are evaluated first before being inserted at the same position. In this example, we are using ${ } to insert the values of the variables myName and rounded into the given location of the template literal. With this structure, it's easier to see what the final String will look like, cleaning up our code and making it more legible to ourselves and others.
Try typing the code you see at the right in your template file. What happens with the output in the console? Note: although what you see here may be displayed as broken up into multiple lines, this is just a consequence of the long line of code wrapping to the next line, based on the size of your screen. Each of these instructions here represents a single line of code, so for example the String concatenation code should all be part of one line, without any manual line breaks.
You might have noticed something odd about all of this concatenation business, however. In our String construction, we have a value that is definitely not a String: the value of the variable rounded (which is a Number). Technically, we are inserting a Number value into a String value, which would ordinarily cause a data type conflict. But what happens in the process is that the Number value gets turned into a String value specifically so that it can be inserted into another String value. We call this process type coercion, meaning we are coercing one data type to be another; we will see this more in the weeks to come.
Notice the syntax coloring
The coloring you see in the demonstration above (and in Visual Studio Code) is no accident. As we saw with HTML and CSS, VS Code colors the code we write to confirm to us that we are writing the correct code. For example, when writing HTML, all the tag names are colored the same way; when we write CSS, all the selectors get colored in the same way. This is VS Code's way of visualizing for us what kinds of building blocks we are working with.
This feature – which is called syntax coloring – will become more important to us than ever before in JavaScript. All of the colors you see indicate different elementary building blocks: names of variables, reserved keywords, String values versus Number values, names of built-in functions. Every time you see a new color, you are working with a different kind of building block! As we continue to unpack all the different building blocks we can use, pay attention to this coloring; notice what kinds of things are colored the same, and what kinds of things are colored differently from one another.
Practice on your own
At the end of your completed JavaScript template, practice writing some additional JavaScript of your own. Specifically, write code that does the following:
- Create at least 2 new variables using
const - Create at least 2 new variables using
let - Across your variable values, you should have at least 1 of each data type: Number, String, Boolean
- Using your new variables, construct a sentence of your choice from those variables' values, using a template literal
Looking ahead
This demonstration is just an entry point into the vast world of JavaScript. In the weeks ahead, we will continue to unpack the many intricate layers of the language and what it is capable of, particularly through the lens of D3.js. Although our end goal is to develop creative applications with the D3 language, all of the things we do in D3 will be predicated upon an understanding of plain JavaScript. After all, D3 itself is a JavaScript library, meaning its source code is written in JavaScript. As we will see in future demonstrations, we will use both D3 and plain JavaScript code side by side to create more complex applications. For now, focus your energy on the importance of applied practice: our best understanding of these deeply complex topics will come through applying and practicing them in new kinds of contexts.